Configuring REST services in Mendix
In today’s world of hyper-connectivity, it is extremely hard to find an app that can function without any external data integrations. If you are a developer, I can guarantee you will have to integrate at least one REST API during your career.
Why REST?
While APIs or application plugins come in many varieties and standards, I will be discussing my personal favorite; REST services. You might ask, “why REST?”. The answer is simple, it’s easier than SOAP. There are other reasons too, REST supports more data formats than SOAP which only supports XML. Another big part of why I think REST is BEST is that it goes hand in hand with JSON.
JSON (JavaScript Object Notation) offers quicker data parsing in general, which means better support for browsers with this lightweight data format. Finally, consuming REST APIs in Mendix does not require installing any client libraries or files for your app to work.
What API am I using?
The Google Cloud API has an entire suite of Google’s best services all broken down into consumable methods, with many being completely free to use. However, before you can interact with any of these APIs your request will need to authenticate itself with an OAuth Token. Google uses OAuth 2.0 as the defacto authentication method for most of its APIs. This means in order for a user to use a Google API they will first need to call the Google Identity API (For server-side apps), in order to make any subsequent calls to Google’s services.
In other words, getting a token is the first step to implementing many of Google’s APIs, and is a good place to start for someone looking to get into API development.
Prerequisites
Before you start, this blog assumes you have enabled any Google API for a project on the Google Cloud Platform, as well as completed the OAuth credentials page and Oauth Consent screens for that Google Project. In particular, you will need to configure redirect URLs for your app to point to your localhost or deployed web application and you will need to have both a Client ID and Client secret provided by Google after configuring your app’s OAuth Client.
A word on REST Methods
In this example, I am using a POST method to call Google’s Identity API, but what does that mean? In REST, there are 5 methods you have to know about:
- POST — This is used to create new records
- GET — This returns a record or a list of records
- PUT — Used to update or replace a record
- PATCH — Used to update or modify a record
- DELETE — Delete or eases the record
There are some other methods that I know of, but I’ve never encountered them in my work, if you are interested there is a good summary of methods here.
A general plan for integrating REST services
Depending on which method you are using and which API you are consuming, the actual steps to completing an integration may vary, for instance, a GET request does not have a request body, and instead makes use of query strings. But in general, here are the steps to consuming a REST service in Mendix Studio Pro:
- Set your location
- Also known as endpoints or URI, this is the location where the service is hosted
2. Choose your HTTP Method
- A choice between the methods mentioned above, generally the API documentation will tell you which one to select.
3. Authentication
- Can either be OAUTH, an API key or not required at all.
4. HTTP Headers
- Headers can play various roles, each service is capable of having unique headers, you will need to refer to the documentation for whichever API you are trying to consume.
To set the format of the Response, we can use the header “Content-type” and provide it with the value “Application/JSON” for JSON format or “Application/XML” for XML. Other options exist such as ‘Application/x-www-form-urlencoded’, which we will make use of in this tutorial (check out this stack overflow post for a great summary of all Content types).
5. Create the Request
- For most methods, you will need to provide a request body, normally in JSON format. For GET methods we normally use query strings added to the end of the location to pass parameters, normally identified by a “?” at the end of the Location also known as a URI.
6. Handle the Response
- There are a couple of options here, from storing the response in a string variable, or applying an import mapping that will map the data to your domain model, the best option here will change case by case, but in most cases, you should choose to apply an import mapping.
How does Google Identity work?
Before we can start, a quick explanation of how Google implements OAuth 2.0 for server-side apps.
Google’s documentation explains it in 5 steps which I will summarize for you here: Using OAuth 2.0 for Web Server Applications | Google Identity | Google Developers.
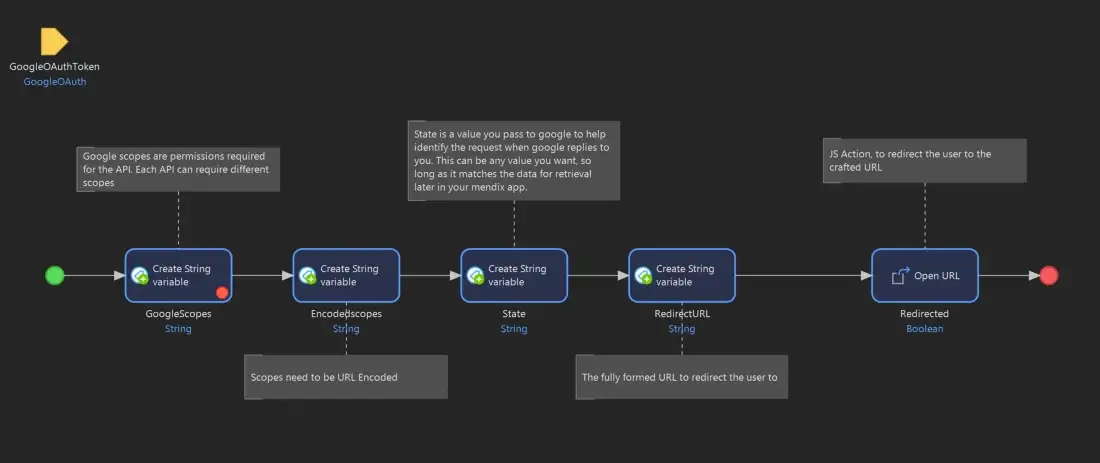
Step 1: Set authorization parameters
This means we need to create a URL in our Mendix app, that details what our application would like access to, on behalf of the user from Google’s services.
In step 2, the user is taken to this Google URL to approve access to the user’s Google account and then they will be redirected back to your Mendix app, along with an Access Code we will use to authorize our token request.
The important values here are:
- Redirected URI (Should redirect to your app’s URL),
- Scopes (Permissions for Google APIs for example mail/drive/translate etc, click here for a list of all scopes for Google API’s)
- Client ID (Client ID provided by Google After registering your App under OAuth)
- State (A value used by the app to maintain state, an identifier you can use to retrieve the correct Request later)
Here is an example of what this URL might look like :
https://accounts.google.com/o/oauth2/v2/auth?scope=https%3A%2F%2Fwww.googleapis.com%2Fauth%2Fcloud-platform+https%3A%2F%2Fwww.googleapis.com%2Fauth%2Fcloud-translation&access_type=offline&include_granted_scopes=true&response_type=Code&state=123&redirect_uri=https://localhost:8080/link/googleredirect?code=&client_id=281413935351-jh5hs5chgf9n84eeqhpodrfq6oir2qnk.apps.googleusercontent.com
Step 2: Redirect to Google’s OAuth 2.0 server
Redirect the user to the URL you created in step 1 (I used the Open URL Javascript Action available in Nanoflows)
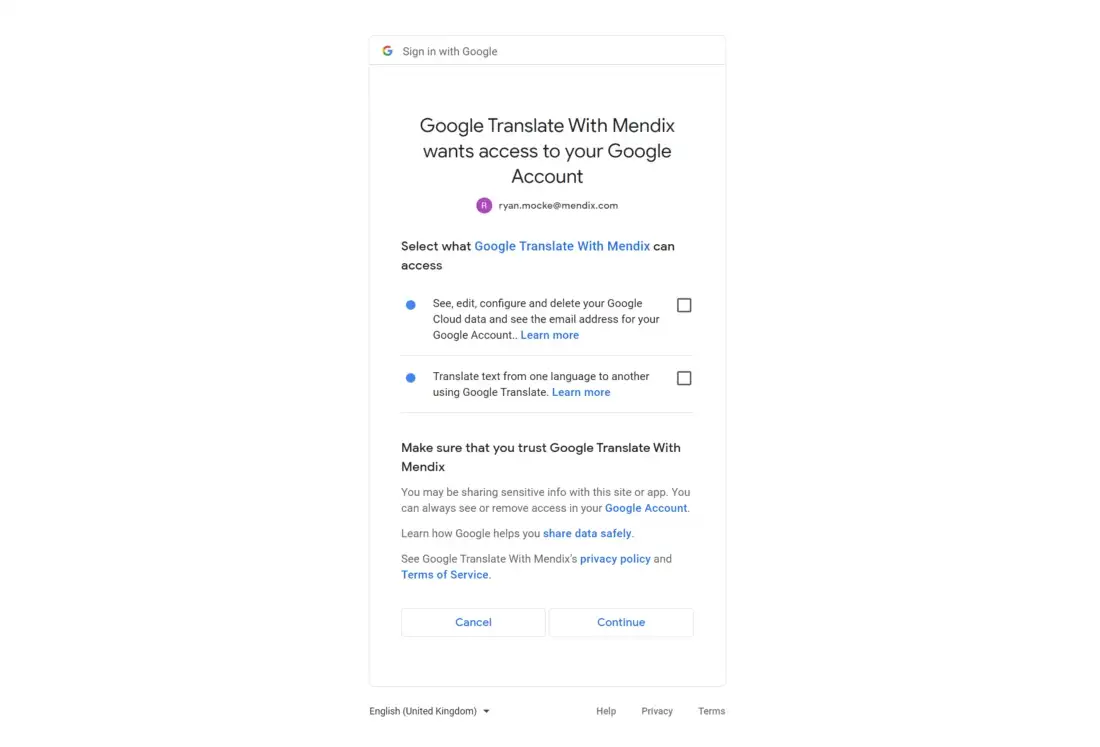
Step 3: Google prompts the user for consent
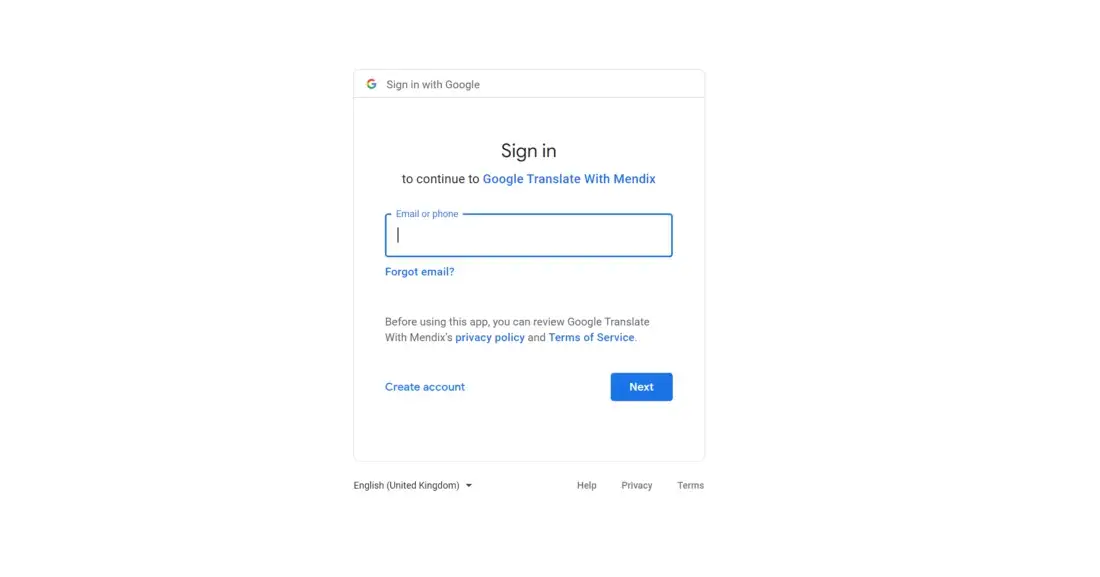
The user is asked by Google to Sign In/Select their Account and then approve the access requested by your app.
Step 4: Handle the OAuth 2.0 server response
After the user has verified the request to their account, Google will redirect the user to the redirect URI parameter we supplied in step 1. This is your app URL, but in my case, I used the Deeplink module to handle the redirect. This way I could gain access to the Authorization code which Google includes in the Link. This is an example of the deep link created to handle this:
https://localhost:8080/link/googleredirect?code=
Step 5: Exchange authorization code for refresh and access tokens
Once Google gives you the Access Code, you can now make the REST call to exchange it for an official Token. Here is the Request and Response for my example
I have deleted my project on Google, after publishing this, these Requests won’t work as is (You will need to use your own client ID and client Secret)
Request content for POST request to https://oauth2.googleapis.com/token?grant_type=authorization_code&client_id=281413935351-jh5hs5chgf9n84eeqhpodrfq6oir2qnk.apps.googleusercontent.com&client_secret=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&redirect_uri=http%3A%2F%2Flocalhost%3A8080%2Flink%2Fgoogleredirect%3FCode%3D
HTTP/1.1
Content-Type: application/x-www-form-urlencoded
code=4%2F0AdQt8qiGaCaJYgKgRpHKqXj8265JL72PfsKpusgctqYXhVwPxg5qn4EHU9iUGnMxMiHiqA
Response content for POST request to https://oauth2.googleapis.com/token?grant_type=authorization_code&client_id=281413935351-jh5hs5chgf9n84eeqhpodrfq6oir2qnk.apps.googleusercontent.com&client_secret=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&redirect_uri=http%3A%2F%2Flocalhost%3A8080%2Flink%2Fgoogleredirect%3FCode%3D
HTTP/1.1 200 OK
Cache-Control: no-cache, no-store, max-age=0, must-revalidate
Pragma: no-cache
Date: Mon, 01 Aug 2022 12:53:44 GMT
Expires: Mon, 01 Jan 1990 00:00:00 GMT
Content-Type: application/json; charset=utf-8
Vary: Origin
Vary: X-Origin
Vary: Referer
Server: scaffolding on HTTPServer2
X-XSS-Protection: 0
X-Frame-Options: SAMEORIGIN
X-Content-Type-Options: nosniff
Alt-Svc: h3=”:443"; ma=2592000,h3–29=”:443"; ma=2592000,h3-Q050=”:443"; ma=2592000,h3-Q046=”:443"; ma=2592000,h3-Q043=”:443"; ma=2592000,quic=”:443"; ma=2592000; v=”46,43"
Transfer-Encoding: chunked
{
 “access_token”: “ya29.A0AVA9y1tawnqK-42beGFAomiTqx8Zg0UUiedmIIPaAIraSas6VEO2D7NH5rInBPCUQK_7aghDiiTVrD_SnnQzOAtGq3XP2GQfWbpuZmDFjWfL0FSAw6JQU37mthQnRFsJvvqlgzTcryTdruKiOtcc63YrI8DvYUNnWUtBVEFTQVRBU0ZRRTY1ZHI4NjVOQUxhR2ppS0kyOVpINVZoYTJ4Zw0163”,
 “expires_in”: 3599,
 “scope”: “https://www.googleapis.com/auth/cloud-platform https://www.googleapis.com/auth/cloud-translation",
 “token_type”: “Bearer”
}
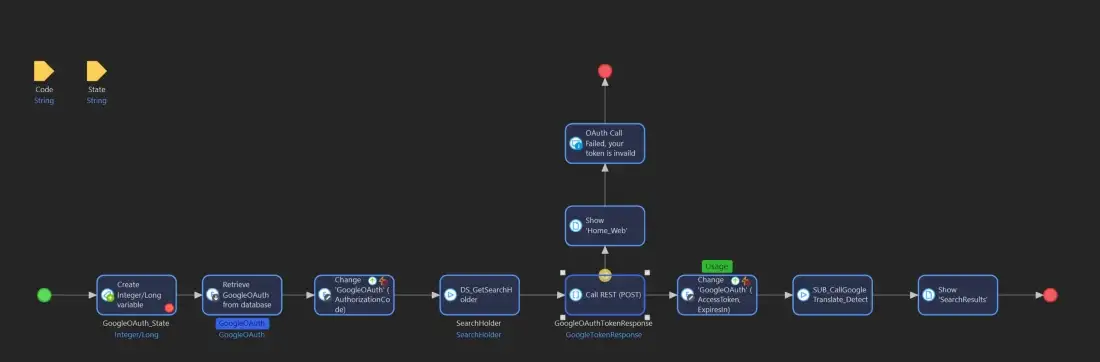
Now that you hopefully understand the architecture behind this, we can get into the specifics of calling the Token API.
Calling the API in Mendix
Set the Location
To set your location go to the properties of your call REST action (in a microflow) and click edit. You can set the location here by providing the URI where the API is located, inside quote marks, as it’s a String value.
However it’s best practice to create an application constant to store this, so you don’t need to worry about typos or copy-paste mistakes.
The location for this is https://oauth2.googleapis.com/token. Keep in mind we will append a query to the end of the location.

Choosing the HTTP Method
As mentioned above, we are using the POST method for this integration. I selected this because Google’s documentation indicates it should be so in their example.
Next up, Authentication
To ensure we are registered users, we need to send Google some details in our request. We need to provide the Client ID and Client Secret our app was issued by Google (As Query fields), and we need to pass the Access Code granted to the user in the Request body.
What headers do we need?
For this Request, we only need to add the header ‘Content-type’ and give it the value ‘application/x-www-form-urlencoded’. We pass this as it tells Google what format your request is using.
Always check the documentation provided before assuming there are none, as not including a required header will normally result in a 401 response (Bad request).
Building our query
As we need to pass some parameters for our request in the URI we need to append our query to the APIs base location.
The Base location :
https://oauth2.googleapis.com/token
The additional query string :
?grant_type=authorization_code&client_id=281413935351-jh5hs5chgf9n84eeqhpodrfq6oir2qnk.apps.googleusercontent.com&client_secret=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&redirect_uri=http%3A%2F%2Flocalhost%3A8080%2Flink%2Fgoogleredirect%3FCode%3
Here’s a breakdown of what each field means direct from Google:
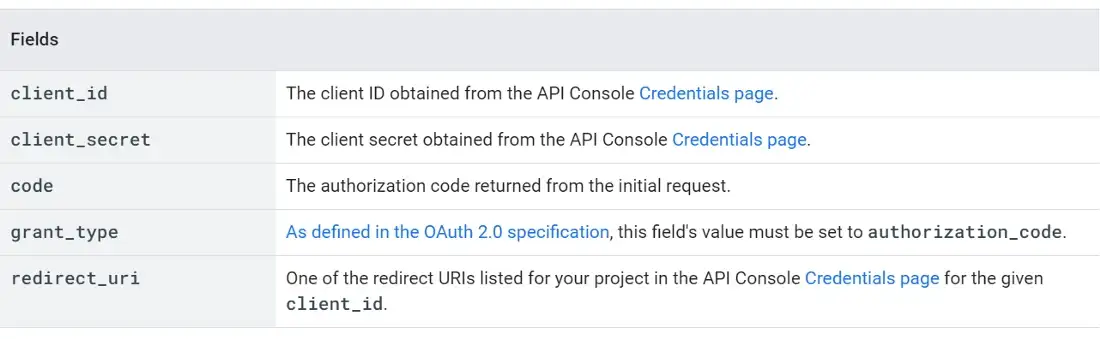
Remember to URL Encode your Query before making the request.
URL encoding? What’s that?
If there are any special characters or white spaces in the query string, it will result in a 401 error (Bad Request). This is simply a way to translate these special character’s into something that is universally accepted by browsers. URL encoding is a string function in Mendix, that you can call in any microflow or nanoflow.
Now you can append everything together and your final string should look something like this
https://accounts.google.com/o/oauth2/v2/auth?scope=https%3A%2F%2Fwww.googleapis.com%2Fauth%2Fcloud-platform+https%3A%2F%2Fwww.googleapis.com%2Fauth%2Fcloud-translation&access_type=offline&include_granted_scopes=true&response_type=Code&state=1&redirect_uri=https://localhost:8080/link/googleredirect?code=&client_id=281413935351-jh5hs5chgf9n84eeqhpodrfq6oir2qnk.apps.googleusercontent.com
Keep in mind the actual query statement will have your credentials and provide your app user’s access code and redirect URL, so it will differ from mine.
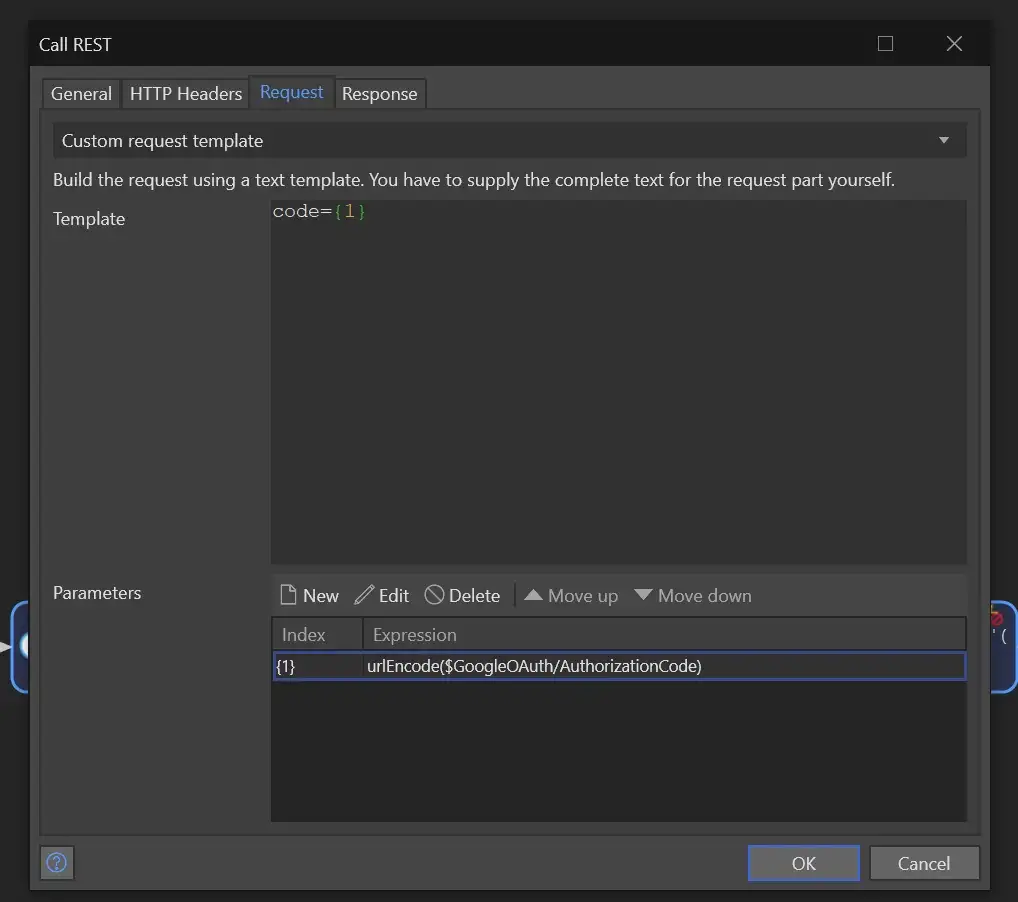
Defining the Request Body
As this is a Post Method we need to provide a Request Body. Under Request, select Custom Request Template and provide the body :
code=YOUR_USER_ACCESS_CODE
Now to handle the Response
Mendix allows us to apply an import mapping to map the response data into your domain model.
To do this, you need to have a JSON sample of what the response should be. In their documentation, Google gives us this sample.
{
  "access_token": "1/fFAGRNJru1FTz70BzhT3Zg",
  "expires_in": 3920,
  "token_type": "Bearer",
  "scope": "https://www.googleapis.com/auth/drive.metadata.readonly",
  "refresh_token": "1//xEoDL4iW3cxlI7yDbSRFYNG01kVKM2C-259HOF2aQbI"
}
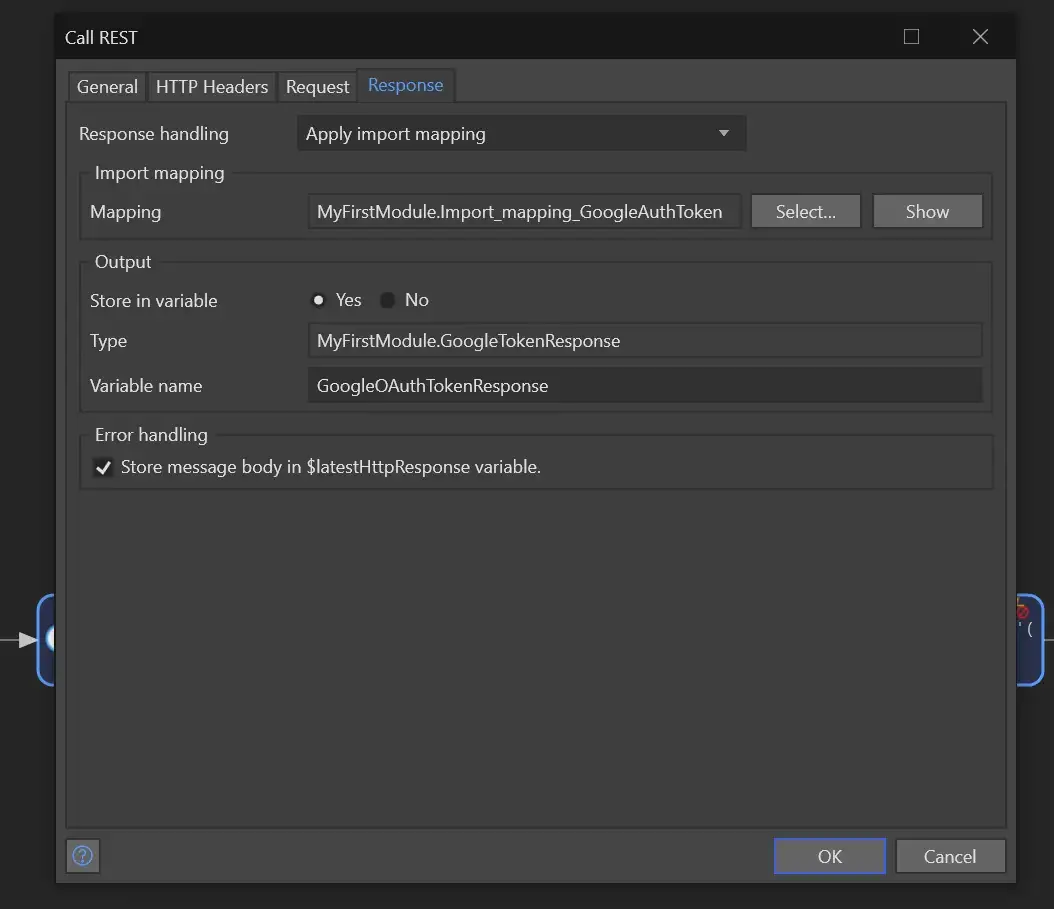
In Studio Pro, select “Apply an Import mapping” under the Response Tab on the call REST activity.
Choose to create a new import mapping from the window which appears and give the mapping a name.
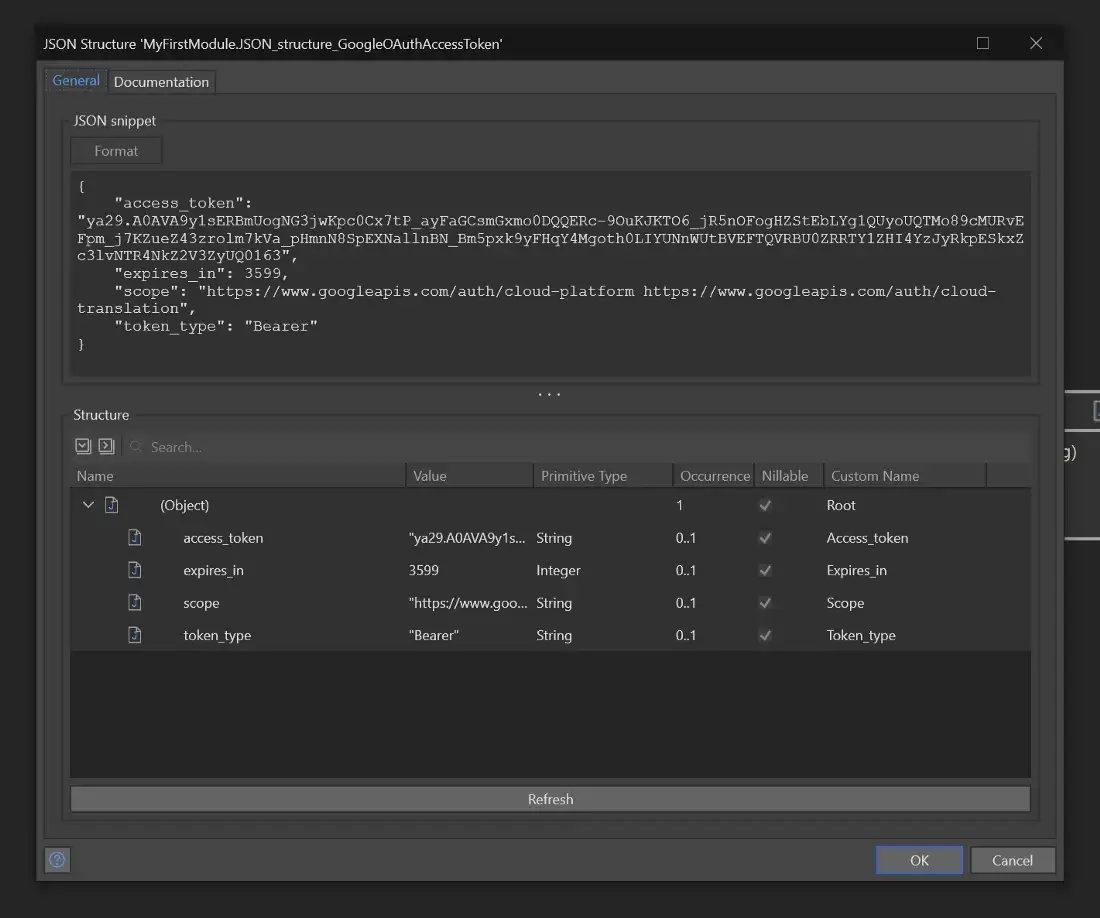
Once in the Import Mapping editor click “Select elements” in the top left corner of the screen. Select “JSON structure” as the option for this.
Select or create the JSON Mapping, with an appropriate name. Now paste the JSON from above in the text area and click “refresh”.
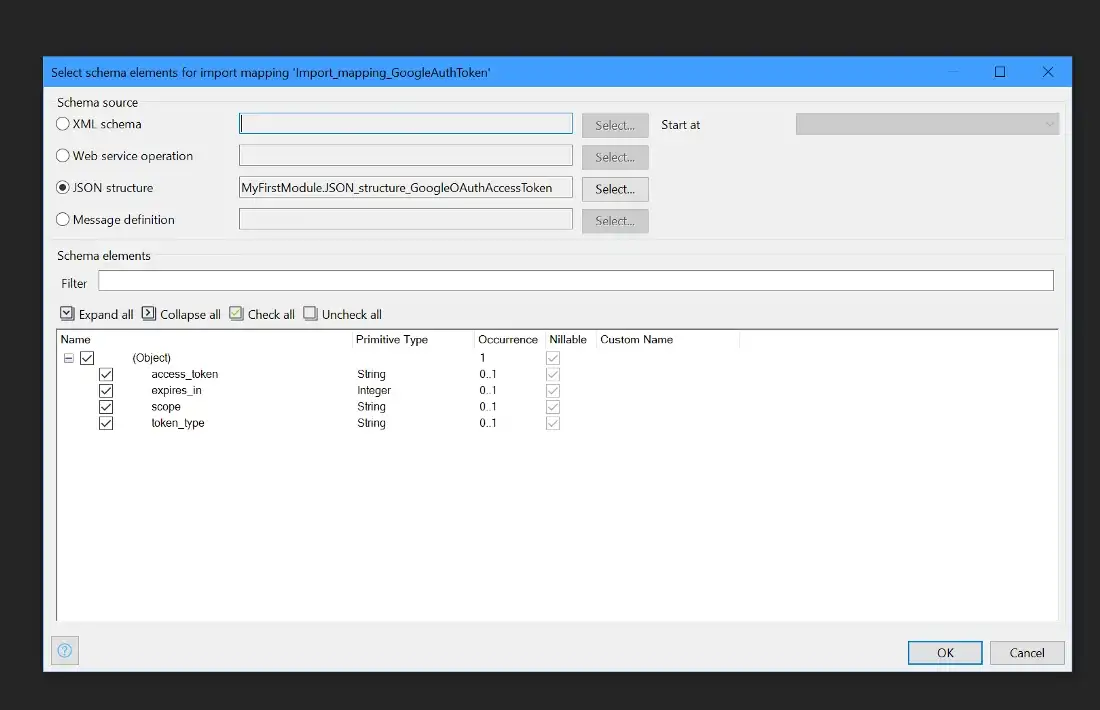
Click “OK” to close this window. Now back on the “select elements” screen click expand all and then check all, before clicking okay.
Next, in the import mapping, you can now simply click “map automatically”. Studio Pro will automatically create any required entities and associations. By default, these will be created as non-persistable entities(entities that live in memory and which aren’t committed to the database). You can modify this mapping manually if needed, but most times there is none and you can leave it as.
You can now access and retrieve the data returned by the API in your microflow.
Specifics on what to do with the data once it’s accessible in your app are up to you. Each service will be different, no 2 implementations are the same.
In my example, I store the Token in a persistable entity, which is linked to the user account in the database, but in a real-world implementation, you should also consider adding encryption.
That’s all folk’s
I hope you found this helpful, if you would like to read more on how to implement REST services in Mendix, check out our documentation page for more info, or go to our academy and start learning.