Mendix Release 9.24 – What a Ride It Has Been

Mendix 9.24 marks the end of Mendix 9, as this version will be the latest 9 version. This also means that 9.24 is Long Term Supported (LTS Release – read more about it here). While Mendix 9 is ending, our team is excited about another new beginning – Mendix 10, which is coming in June! Stay tuned for the first beta release of Mendix 10 in April, with the second beta release planned for May.
Because many customers often choose to stay on an LTS for quite a while, we made sure we pushed the max value into this release, such as: start from Excel, multi-select for the Data grid 2 and Gallery widget, improved properties, custom icon support, and many mobile and integration improvements. On top of that, there is a Marketplace update for components, plus partners and private cloud improvements.
Git ready – New apps will be based on Git
With Mendix 10, we are fully committing to Git support and therefore are putting customers on the right track by only supporting the creation of new apps based on Git.
Don’t worry, SVN apps created before or in Mendix 9.23 can still be opened and modified in 9.24. If there is a strong need to still use SVN, you can create an app in 9.23 and then update it to 9.24.
With Mendix 10, it will not be possible to open SVN apps. Before upgrading your Mendix app to Mendix 10, you will have to ensure it is migrated to Git. For Team Server SVN apps, this is possible from Mendix 9.12 and above. For on-premise apps, you can follow these steps.
Generic Studio Pro improvements
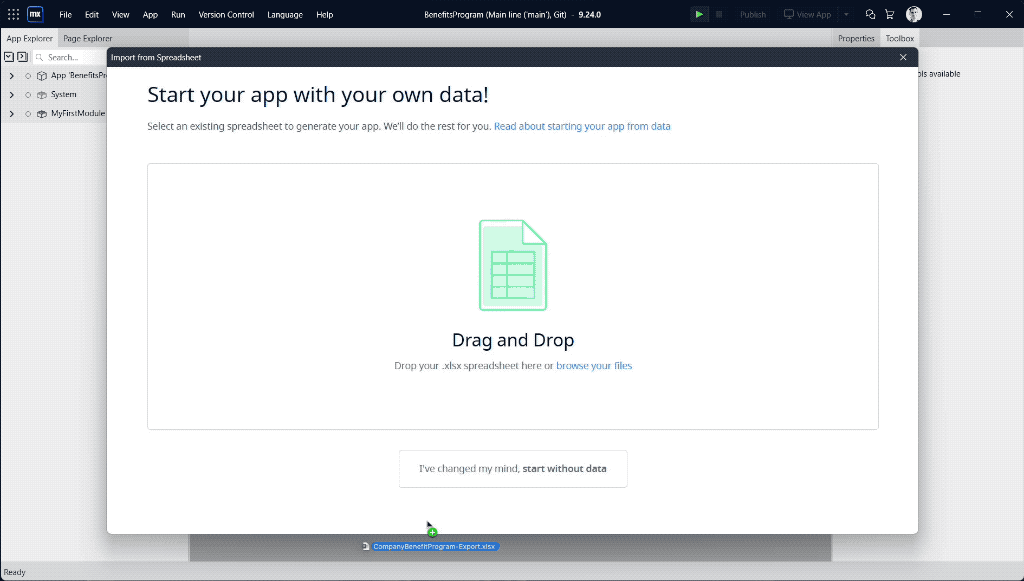
Start converting spreadsheets into apps
Most of us have a love/hate relationship with spreadsheets. These documents are incredibly easy to create, and they help us structure relevant thoughts and applicable data in a straightforward way. Beyond that, though, things can get messy. Maintaining data integrity and version control is a challenge with static spreadsheets, especially with remote workforces.
With the upcoming merging of Studio and Studio Pro, we’ve added the popular ‘Start from spreadsheet’ Studio feature to Mendix Studio Pro. Converting a spreadsheet into an app is as easy as drag and drop. Seriously.
The ‘Start from spreadsheet’ feature will provide you with a fully functional app, which can be extended with features that go beyond spreadsheet capabilities – like supporting process workflows, integrations, dashboard pages, and tailored user experiences in the best possible way.
New properties update
The new properties pane has been updated with several features to improve the experience! We now support more controls in the properties so that you can edit even more with the new sidebar. Next to that, the overall experience has been made a bit nicer by moving all the remaining styling properties into the appearance tab. This gives a more holistic approach when modeling. Collapsed sections are now also remembered when switching between different selected items.
Performance issues? Try the Software Rendering option
To help users who may still have some performance issues in later versions of Studio Pro, we introduced a new option in the preferences to allow for enabling software rendering.
This different way of rendering can help users with slow performance due to specific hardware configurations to ensure everyone has a smooth experience with Studio Pro.
UI (Building) improvements
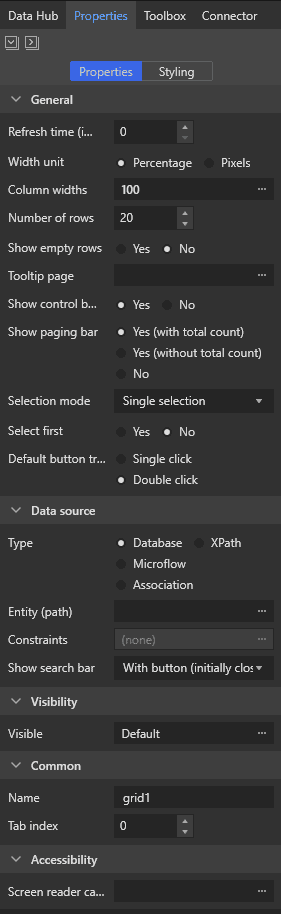
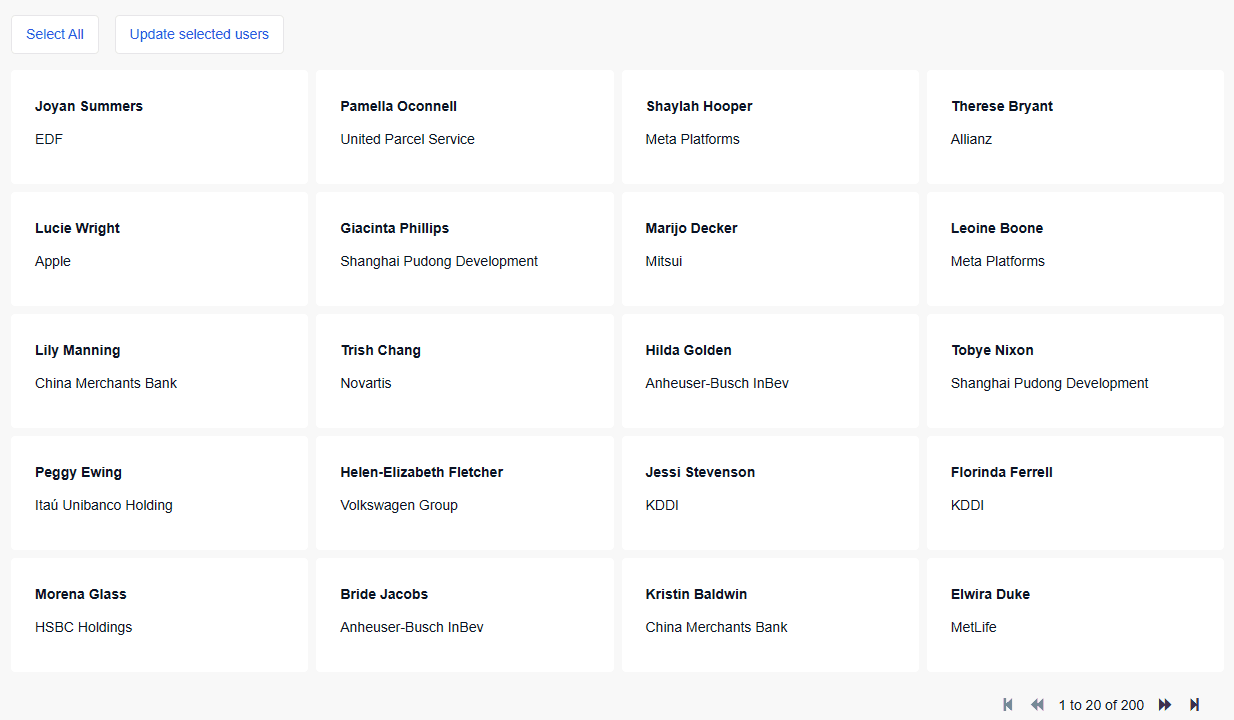
(Multi-)selection for Data grid 2 and Gallery
We are happy to introduce a much-requested feature for the Data grid 2 and the Gallery widget: (Multi-)selection support. Now it’s possible to easily enable single or multiple selections. For example, with the Data grid 2 widget, you can easily enable it so that checkboxes will appear.
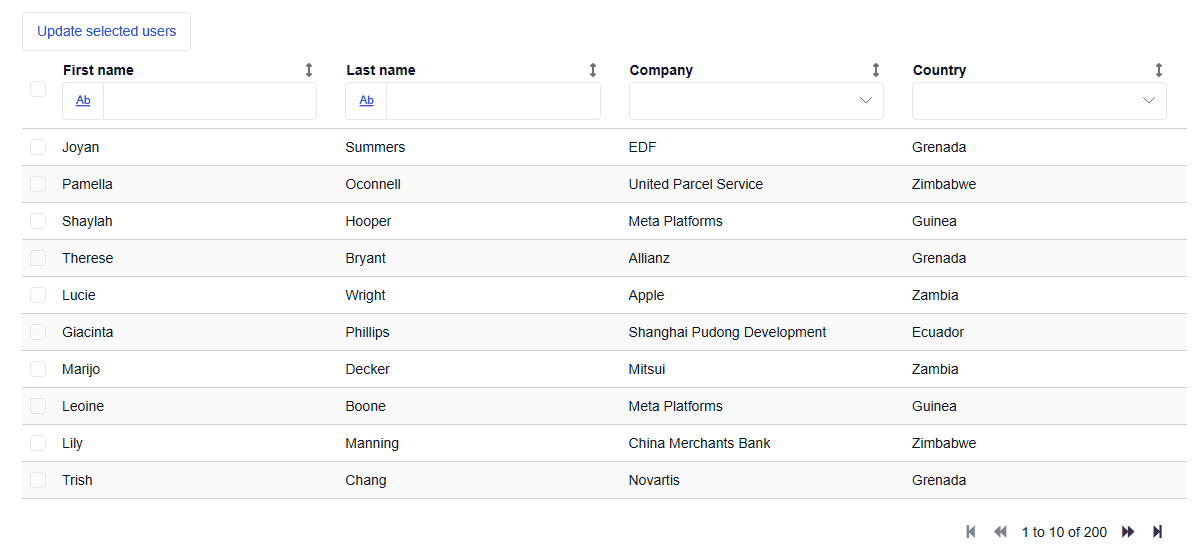
Don’t like checkboxes? No problem! You can also disable it.
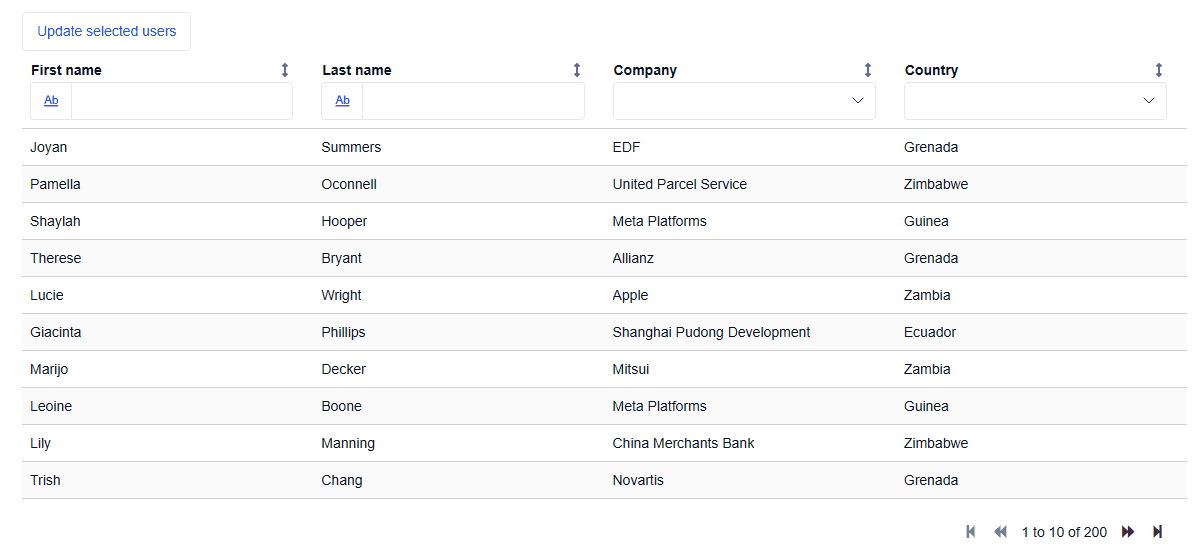
The gallery widget is a very flexible widget for displaying all kinds of data. Here you can also simply enable single or multi-select, and it will work.
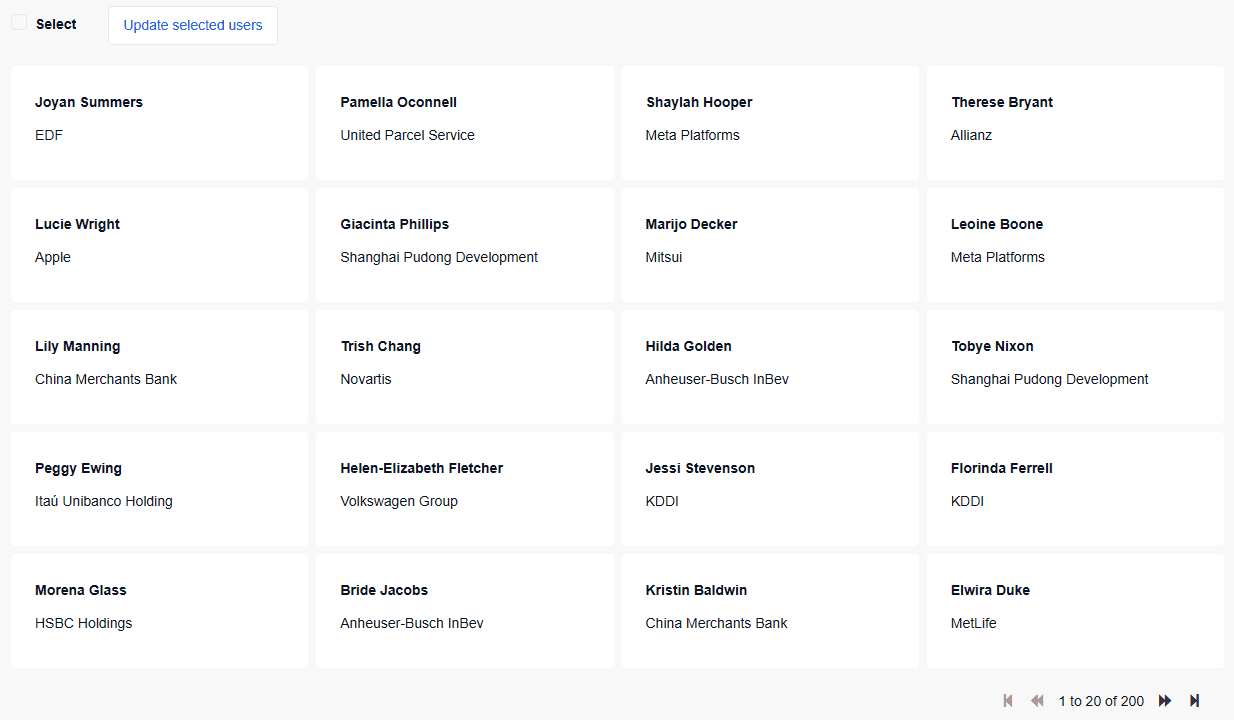
If you want to add a multi-select action, then you can easily add the Selection helper widget to the header of Gallery (or for Data grid).
This will, by default, render a checkbox. But via the Custom option, you can also render a different visualization. What an option! We are curious what you will be creating with it.
Custom icon support
Icons – who doesn’t love or use them? By default, Mendix has always offered free Glyphicons, and via custom (S)CSS, you could add your own icon sets, but that wasn’t always very easy to use. We are happy to share that with 9.24 it is now possible to import custom icon fonts and use them just as with the Glyphicons! You can now create a new icon collection document in which you can upload your custom font.
![]()
You have full control over the class names to make it easy with custom CSS. On top of that, you can now add tags to make it easy for users to find the right icon in a search. For example, searching for “thumbs-up” or “accept” will find the same icon.
![]()
Unfortunately, icon font files do not contain all the necessary information, so you will have to configure the names and tags yourself. Though this is a one-time job, we want to make this easier. However, icon sets are delivered in different formats, so we added a tool to import icon data. If you format it, we import it! For example you can take the CSS, do a search and replace (with empty string) to get it in the right format.
![]()
Also – one small teaser. Soon Mendix will come with a whole new icon set with great icons which you can use for free!
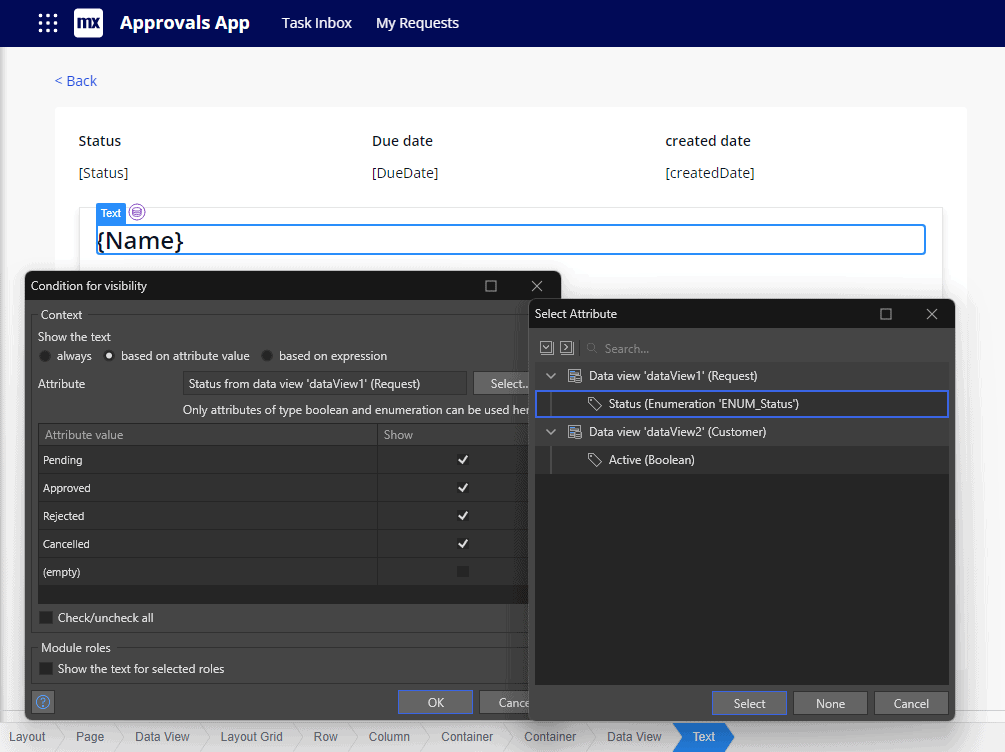
Selecting attributes made more powerful
When configuring attributes for conditional visibility, editability, text templates, or reference selectors, you could previously only choose the current context and not a parent context unless you used an expression. Good news! In this release, we made that easier. It is now possible to select an attribute from any surrounding data widget. Also, parameters or snippets can now be directly used.
Improved NPE client performance
In our continuous efforts to make our platform as fast as possible, we have identified another opportunity to make the client faster. When traversing associations between non-persistent entities (NPEs), the client had to communicate with the runtime to resolve identifiers. With this release, we have removed this need, and the client can now resolve associations directly without talking to the runtime (if all objects are present in the client state). Fewer runtime requests mean better performance and happier users!
Microflow improvements
Range option in microflows
When doing list operations in microflows you now have a Range option available. This will allow you to select a subset of a list between two different values. This can make it a lot easier to model if you’re looking for a specific subset within your list.

Convert nanoflows to microflows and vice versa
Sometimes you start implementing your logic in a microflow and only when you finish do you notice that this logic could actually run faster directly on the client as a nanoflow. Other times, you might encounter the inverse: You started to build something on the client in a nanoflow only to notice that you need to move it to a microflow to avoid opening up your access rules too much.
This is a common – and a good sign – of learning and improving your app as you go. However, the experience of transforming your microflow to a nanoflow, or your nanoflow to a microflow has not been a good experience in the past. In fact, you have suggested a remedy to this problem six times on the idea forum. No more – this release lets you convert your flows with a single mouse click!

Simply right-click the background of your microflow or nanoflow, select “Convert to…” and … Voilà! Enjoy the new flow.
Count as default in Aggregate list activity
A quick and simple timesaver, Count is now the default option for list aggregation as most users use that option.
Native mobile improvements
React Native upgrade
Native mobile apps built with Mendix deliver the best user experience that can be built with low-code technology today. The biggest reason why is that our apps run natively on the device and leverage native user interface components. This is powered by the popular open-source libraries React and React Native.
With this release, we have updated React to version 18.2.0 and React Native to version 0.70.7. This update brings many improvements to stability, performance, and security for all native apps built with Mendix. In fact, we measured some impressive performance improvements: JavaScript is executed up to 8x faster, which makes all client-side activities, such as nanoflows, widgets, and general page performance, up to twice as fast.
Due to some breaking changes in React Native, mobile extensions such as JavaScript actions and pluggable widgets might need to be updated. We have made sure to update all of the components provided by Mendix. If you are using third-party modules in your native app, please test them with the new React Native version before updating your app. If you encounter any issues, reach out to the module authors so they can update the module.
New synchronization mode: Never
We are amazed by the diversity of offline-first applications built with Mendix. More and more complex use cases, such as supporting job interviews or tracking chemical measurements, are made more reliable and convenient using the offline-first approach. Looking at these emerging apps, we noticed a common need that was underserved with our offline capabilities: the ability to store and manage data on the device that should never be synchronized to the runtime.
With this release, we introduce a new synchronization mode: Never. When you set synchronization to Never for an entity, its objects will not be synchronized between the runtime and the offline database during a Full Synchronization. The objects can still be synchronized using Sync-to-Device or Selective Synchronization, but you will be in control of when and what is synchronized.
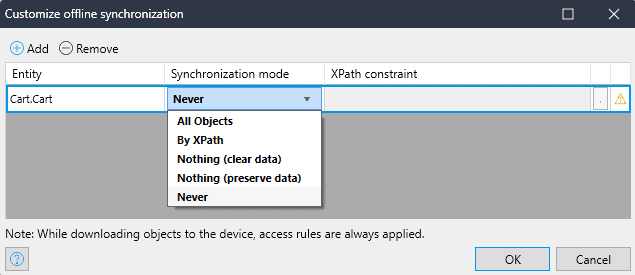
We are excited to see how you will use this new synchronization mode to build even better offline-first apps.
Workflow – Improved retry for failed user tasks
We have modified how a failed user task is handled when there are no targeted users (i.e., the Xpath or microflow results in an empty list of users). In the new situation, after the task has failed (and the workflow goes to a Failed state), you can add System.WorkflowUserTask_TargetUsers associations, either via the Workflow Commons Admin page or by adding your own logic/page. A Retry action of the failed workflow will not re-execute the Xpath or microflow but take the targeted user as (manually) added.
Integration improvements
Documenting authentication details in Catalog
We are excited to announce a new feature in Catalog – the ability to document authentication details for Odata APIs. With this new functionality, data source owners, curators, and company admins can now easily indicate the required authentication method, provide a description to inform consuming developers how to use it and link to any required (private) marketplace modules that are needed to make the authentication work.
This new feature enables consuming developers to request access to data sources they find in the Catalog. When a developer finds a data source they need, they can simply click a button to request access. This sends an email request to the technical owner of the data source, making the process seamless and straightforward.
The ability to document authentication details for Odata APIs in the Catalog is an important addition for Mendix users. It allows consuming developers to easily understand the authentication requirements of the data sources they are working with, improving the overall user experience.
To use this new functionality, data source owners and curators can simply log in to the Mendix Catalog and edit the documentation for their Odata APIs. They can then indicate the required authentication method, provide a description of how to use it, and link to any required (private) marketplace modules. Consuming developers can then request access to the data source with just a few clicks.

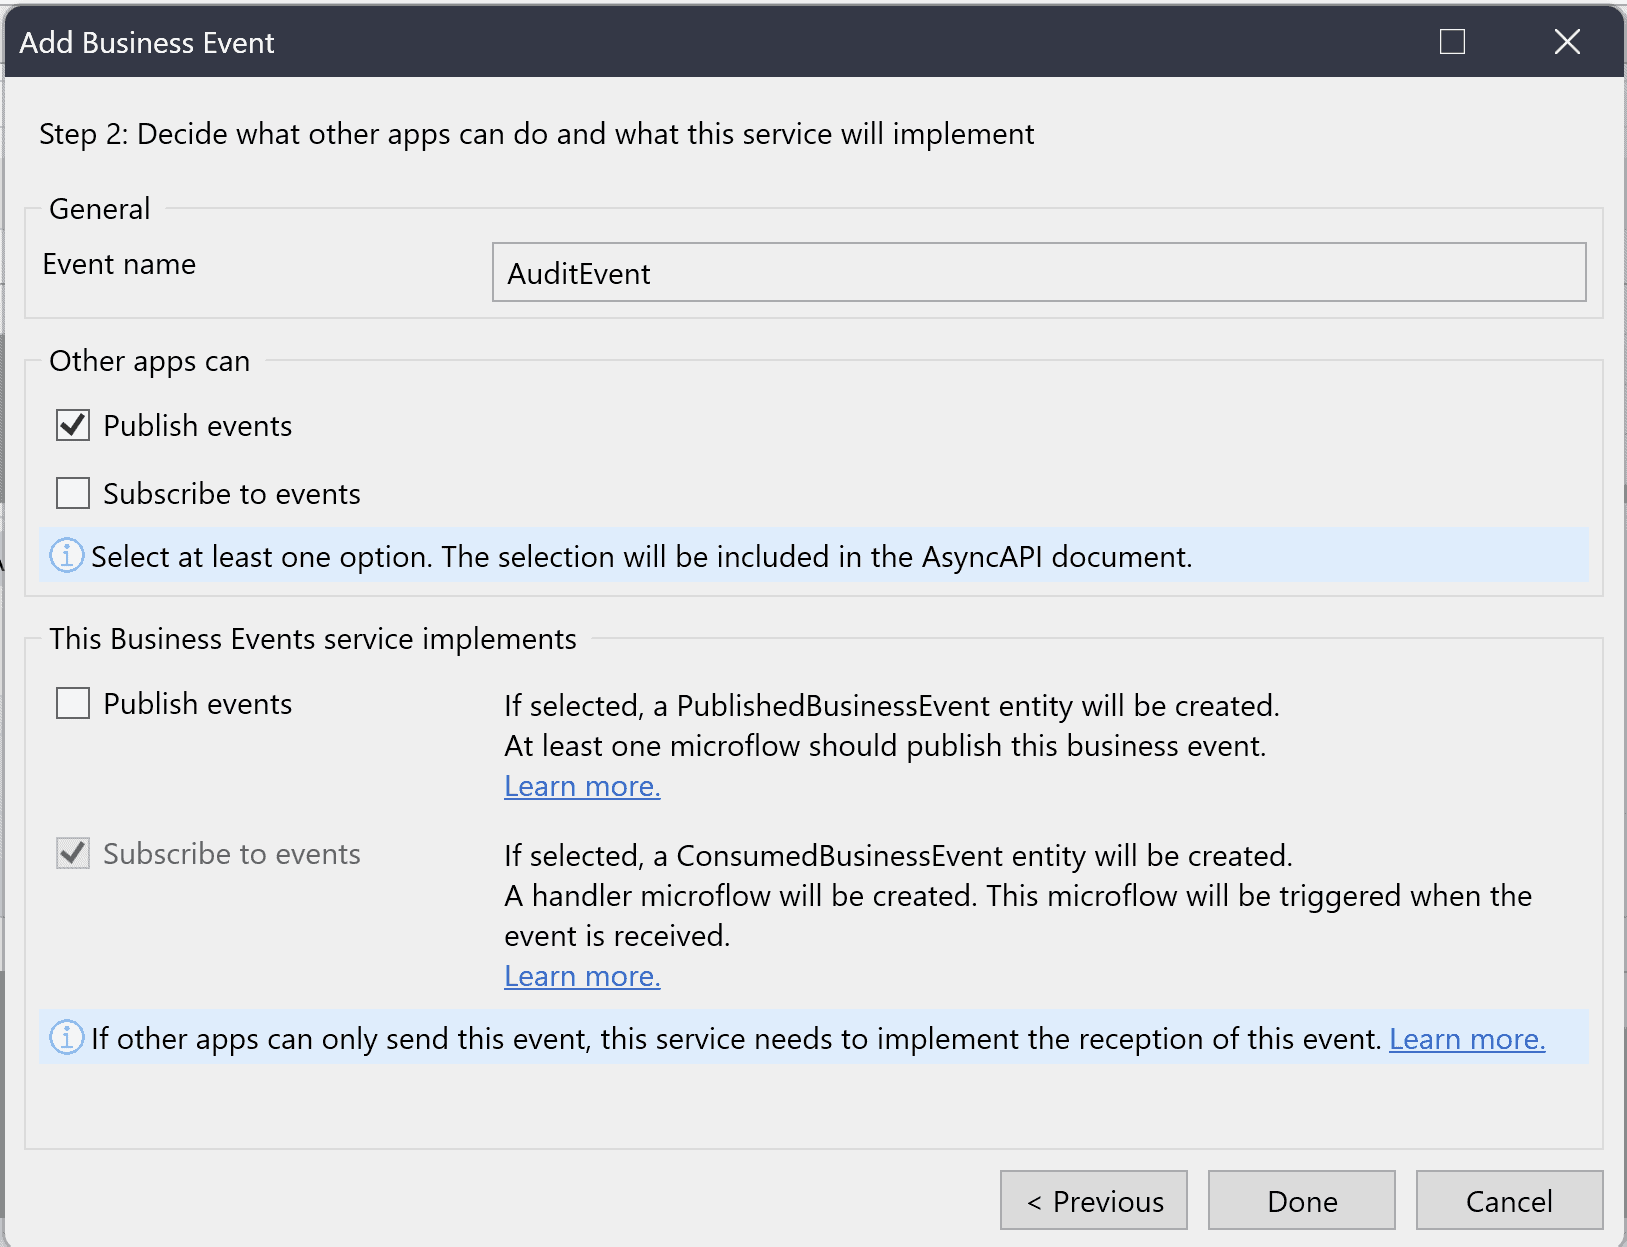
Two-way Business Events – publish and subscribe
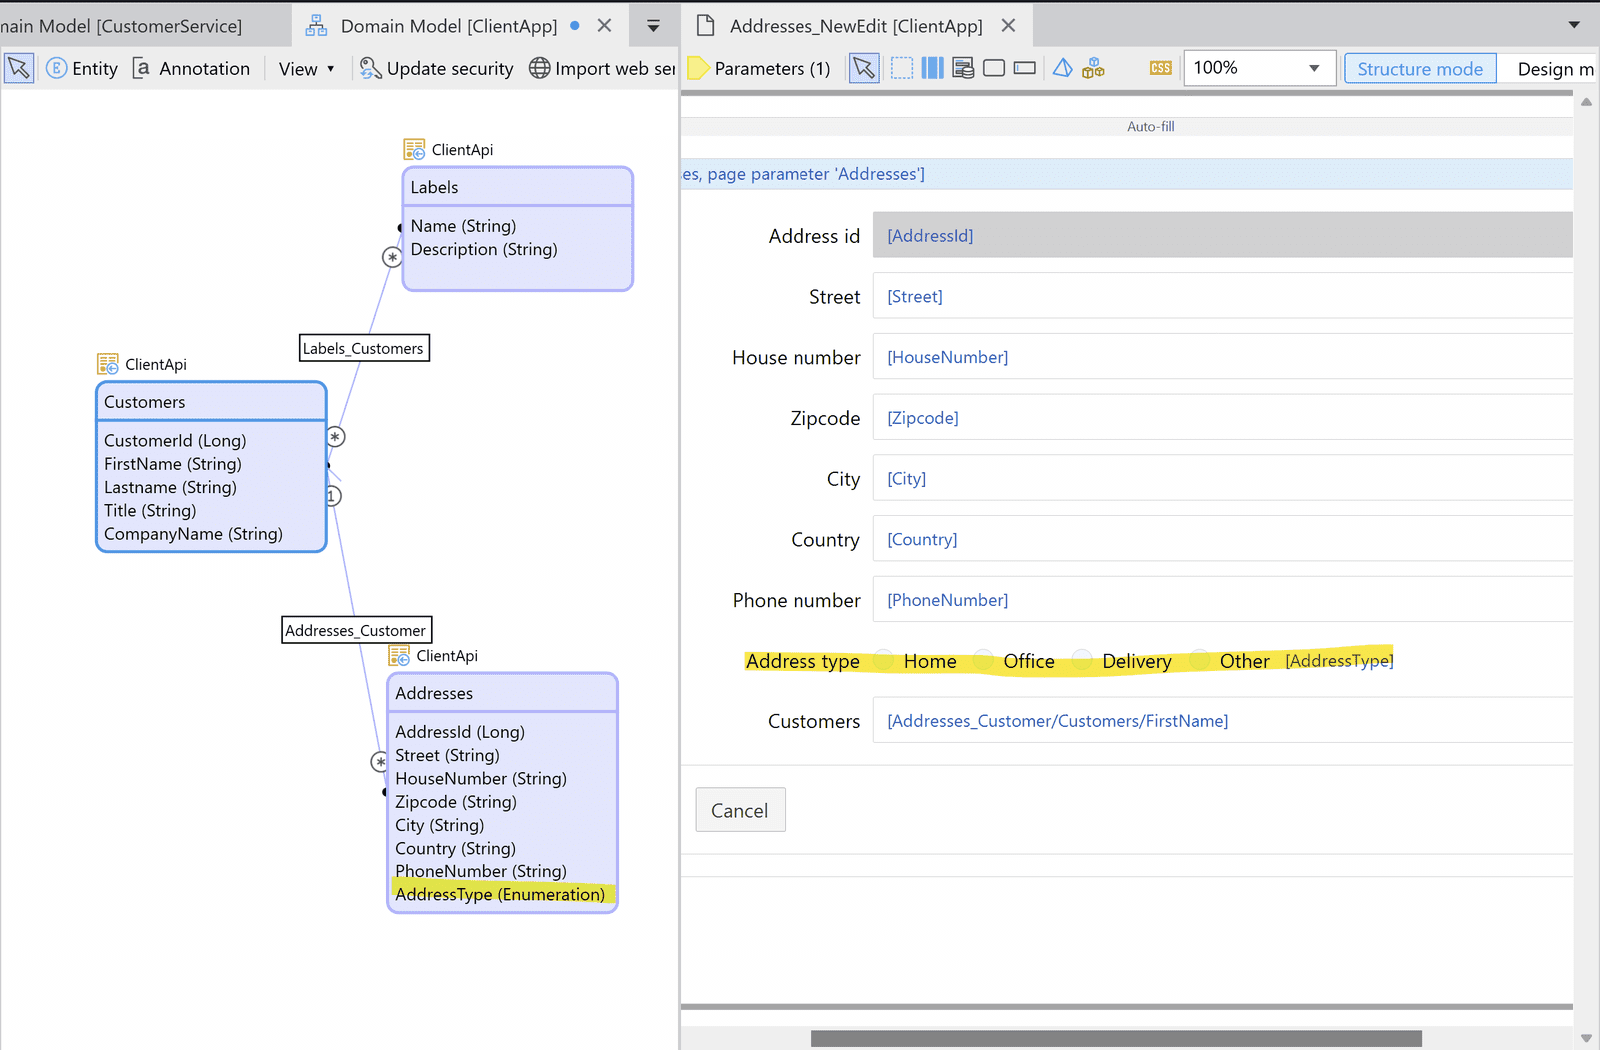
Until 9.24, Business Events communication was one way: an app providing a Business Event Service would publish events, while other apps using the Business Event Service could subscribe to these events. This was useful if you needed apps to respond in real-time to events in other apps, but also limited as the events were only going one way.
With 9.24 it is now possible for any app using a Business Event Service to both publish and subscribe to events from a Business Event service. In effect, this means that one app can centrally define the events used for a specific use case, and all other apps will use these predefined events to send and receive.
Imagine an app that needs to receive Audit Events from other apps. This app would define a business events service, define an AuditEvent, and define that any app can publish these events. The service would receive all these audit events and analyze them to determine if any privilege anomalies can be detected. In case of a detected anomaly, the service will publish an event that other apps can use to take action, e.g., to start a workflow to investigate the anomaly.
The business event service screenshot below illustrates this example. In the top part of the dialog, you can define the events relevant to this service and what users of this service can do: subscribe to the event, publish the event, or both. Once the service has been defined, an AsyncAPI document can be exported for use in other apps.
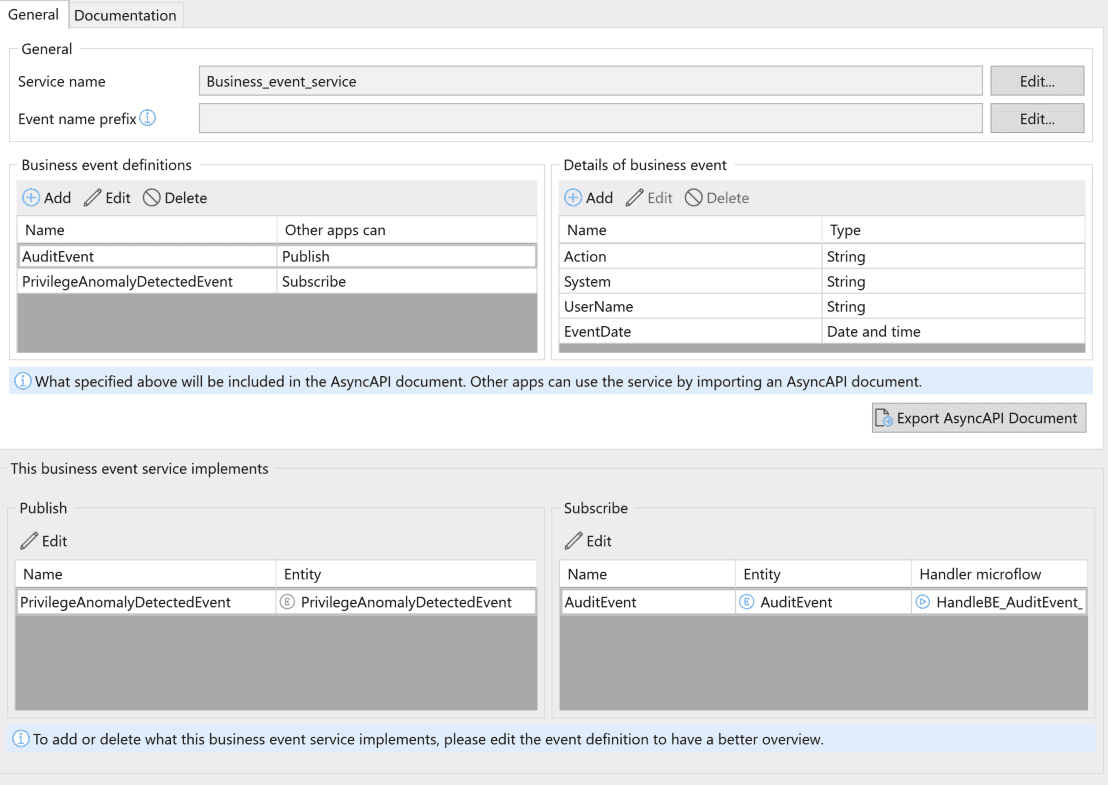
The second half of the dialog defines how the service is implemented: the entities used to capture the event information and the microflow handlers defined to receive events from other apps.
In the first part of the service definition dialog, you define your events. For every event, you can define its attributes and, as shown below, how these events can be used, both by the app implementing the service and by apps using the service.
External Entities and OData now support enumerations
When publishing an OData REST resource based on an enumeration attribute, you can now publish it as an enumeration. This means that any form using this resource in your client applications will show and validate it as an enumeration.
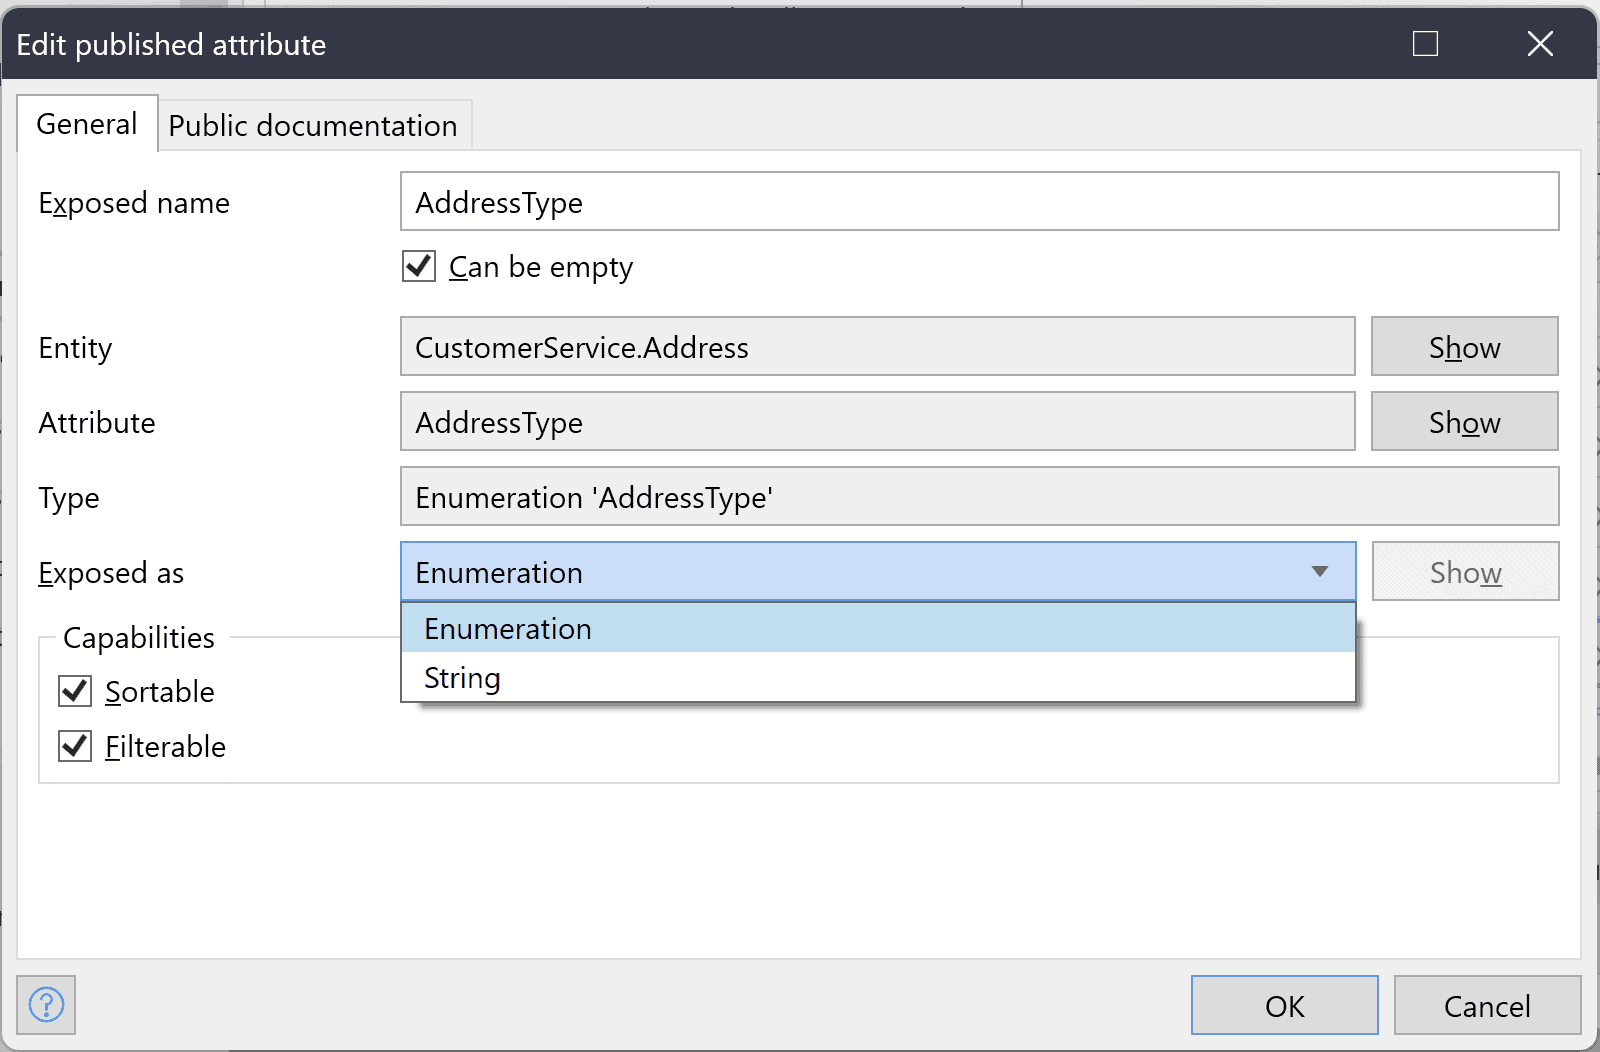
In your client application you can import the OData REST resource as an External Entity, which will show an enumeration attribute. When you use it in a form, the appropriate form widget will be used.
Both the OData $metadata contract and the REST OpenAPI contract will also list the enumeration options available.
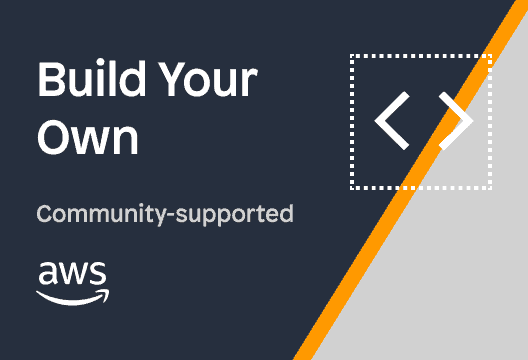
New platform-supported AWS connector and a template to build your own connectors!
Mendix Business Events offer a low-code way to build event-driven applications with Mendix-to-Mendix communication. We’re now introducing a way to also send and receive events from AWS to Mendix and vice-versa by using our new Amazon EventBridge connector. Using the connector will greatly reduce your maintenance overhead when you have to maintain different integrations with different sources.
In addition to the new connector, we have also released our Connector Boilerplate, with which we enable you to create your very own AWS connector with as little effort as possible. So even if you can’t find the connector required for your business case in the Mendix Marketplace, you can now use the template to build your connector yourself!
Event messaging with the new Amazon EventBridge Connector
With the newly released Amazon EventBridge Connector, it is now possible to send and receive events to and from Amazon EventBridge. You can use the connector to build event-driven applications with AWS and third-party services as the receiver and publisher. This makes it much easier to act on events in your AWS account without writing any custom code.
For example, if a file has been added to an S3 bucket and your Mendix app needs to know, there’s no more need to poll the S3 bucket periodically. Instead, you can let EventBridge send an event to your Mendix app to notify you and fetch the file from your S3 bucket based on the event.
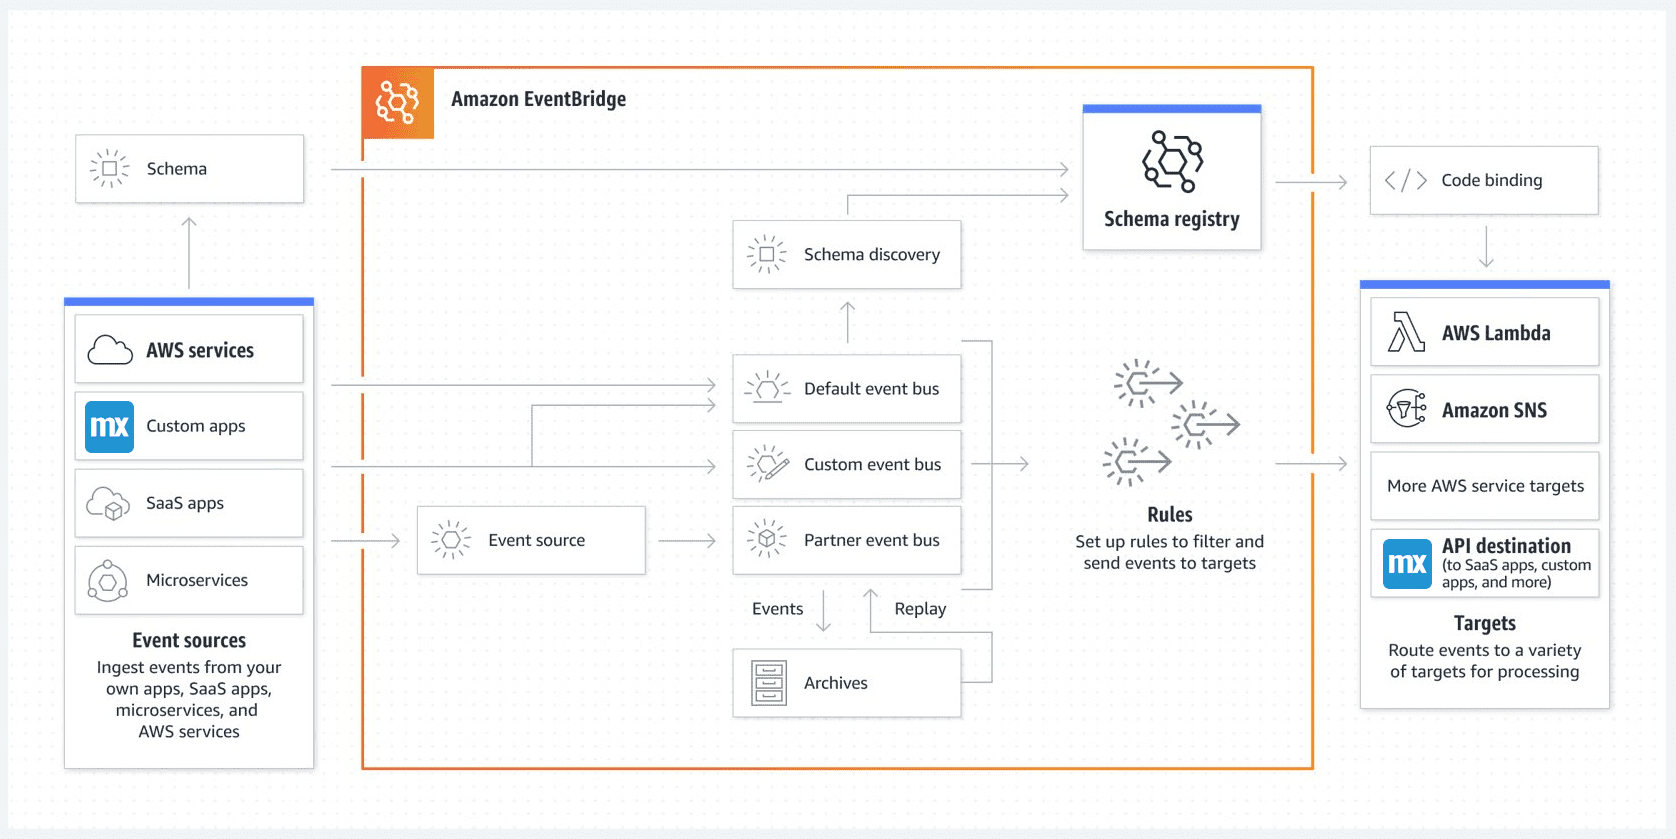
Our new Amazon EventBridge connector contains (among others) three important actions:
• Register My Mendix App
• Create Configuration
• Put Events
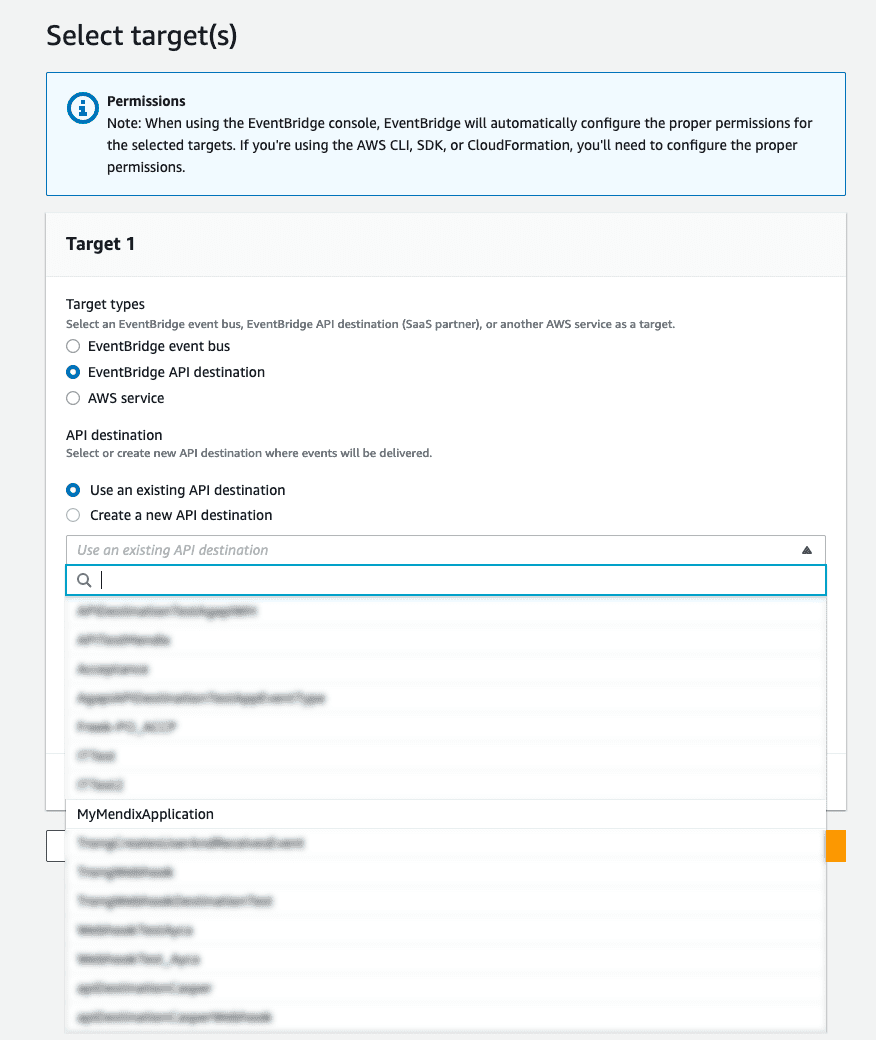
With the Amazon EventBridge Connector, you can automatically register your Mendix application in Amazon EventBridge, so it pops up as an API destination without needing to configure a published Rest Service, authorization, or AWS configuration. This will save you a lot of configuration time when setting up your API destinations in Amazon EventBridge.
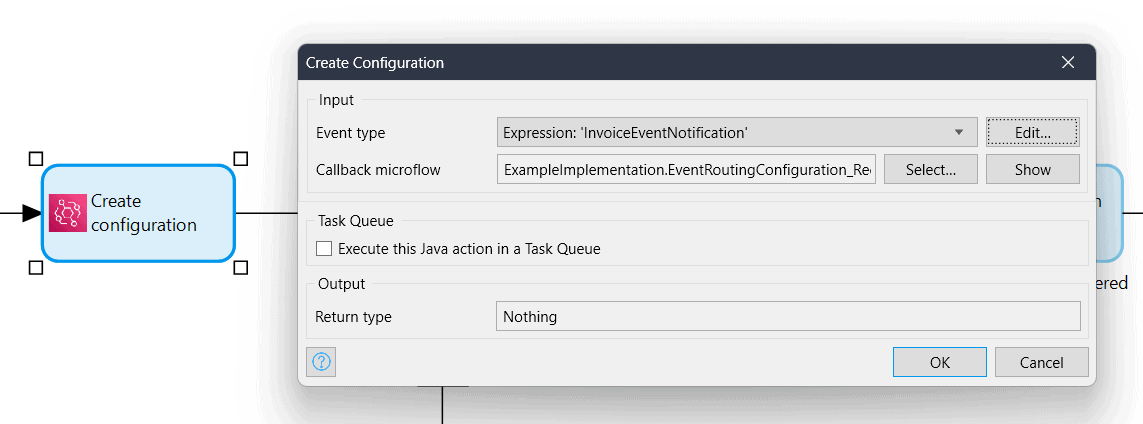
You can use a Create Configuration action to define which microflow should be executed when an event of a specific event type is pushed to your Mendix application by Amazon EventBridge. In this microflow, you can then decide how to manage the execution of this event without having to integrate a polling mechanism to check for new events!
Do you have an event that another AWS Service or Partner service needs to be notified about? Use the Put Events action to send an event to Amazon EventBridge with a single microflow action!

Build your own AWS connector
In the last Mendix release, we also shared a how-to on building your own AWS connector by using the REST connector in Mendix. But as you might have seen, all the Mendix platform-supported connectors are developed using the AWS Java SDK, and for a good reason! The REST APIs at AWS are a good starting point for developing a connector. Still, they require you to determine how the authorization headers should be calculated and what each service maintains for its conventions. With the AWS Java SDK, this has all been normalized, which makes the connector a lot easier to maintain if you have the necessary Java skills.
To help you get started, we’re developing a “boilerplate” for AWS connectors, providing you with the necessary AWS SDK and module scaffolding out of the box. You only need to implement the desired actions for your business case and release your connector to the Marketplace! We can even help you with the implementation and publishing process.
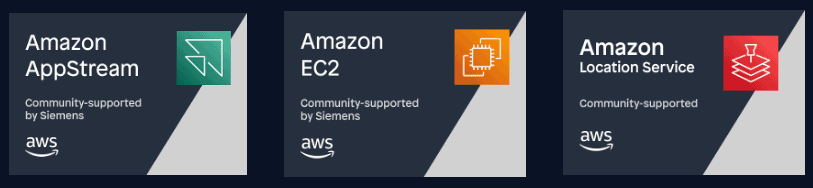
Three new community-supported AWS connectors have already been released to the Marketplace using the AWS Connector Boilerplate. Check them out in the list of AWS connectors in the Marketplace.
Want to learn more, or get started building your connector straight away? Reach out to us on [email protected], or post a message in our Forum Space.
Composing apps from Marketplace content supported by our partners
Mendix Marketplace is full of valuable reusable components that allow you to build apps faster by composing them from existing reusable functionality. With every component that you reuse in your app, you can reduce time-to-market and achieve things that you would otherwise not be able to. The Mendix community currently provides over 1,000 open-source, community supported reusable components like connectors, services, widgets, modules, and templates.
To increase the number of high-value and trusted reusable components and services further, Mendix is introducing a new, formal partner program for the Marketplace: The Mendix Component Partner program. This program creates an additional layer of support on top of the open-source, community supported content. We enable partners to bring premium components to the Mendix Marketplace under terms that provide full support to customers:
- Partners are free to choose from one of the existing open-source licenses -or- they can opt for a commercial option and present their own license.
- Partners in the program commit to providing support to paying customers, under an SLA (under terms specified by the partner). Customers can rely on this SLA for support from the partner if something goes wrong. The marketplace listings will then contain a reference to the support portal or support contact email of the partner.
- Customers can take advantage of these new components under formal support terms, in turn alleviating governance concerns.
These partner-supported components are easy to find and distinguish from open-source, community-supported components.
How can I find and use partner-supported components?
These partner-supported components can be found on the homepage of Marketplace under “From our partners” and the Marketplace supports filtering on the Partner support level, in addition to the existing Platform and Community support levels. The partner-supported listings have an explicit indicator, a crown, to make them easily visually distinguishable from community-supported content.
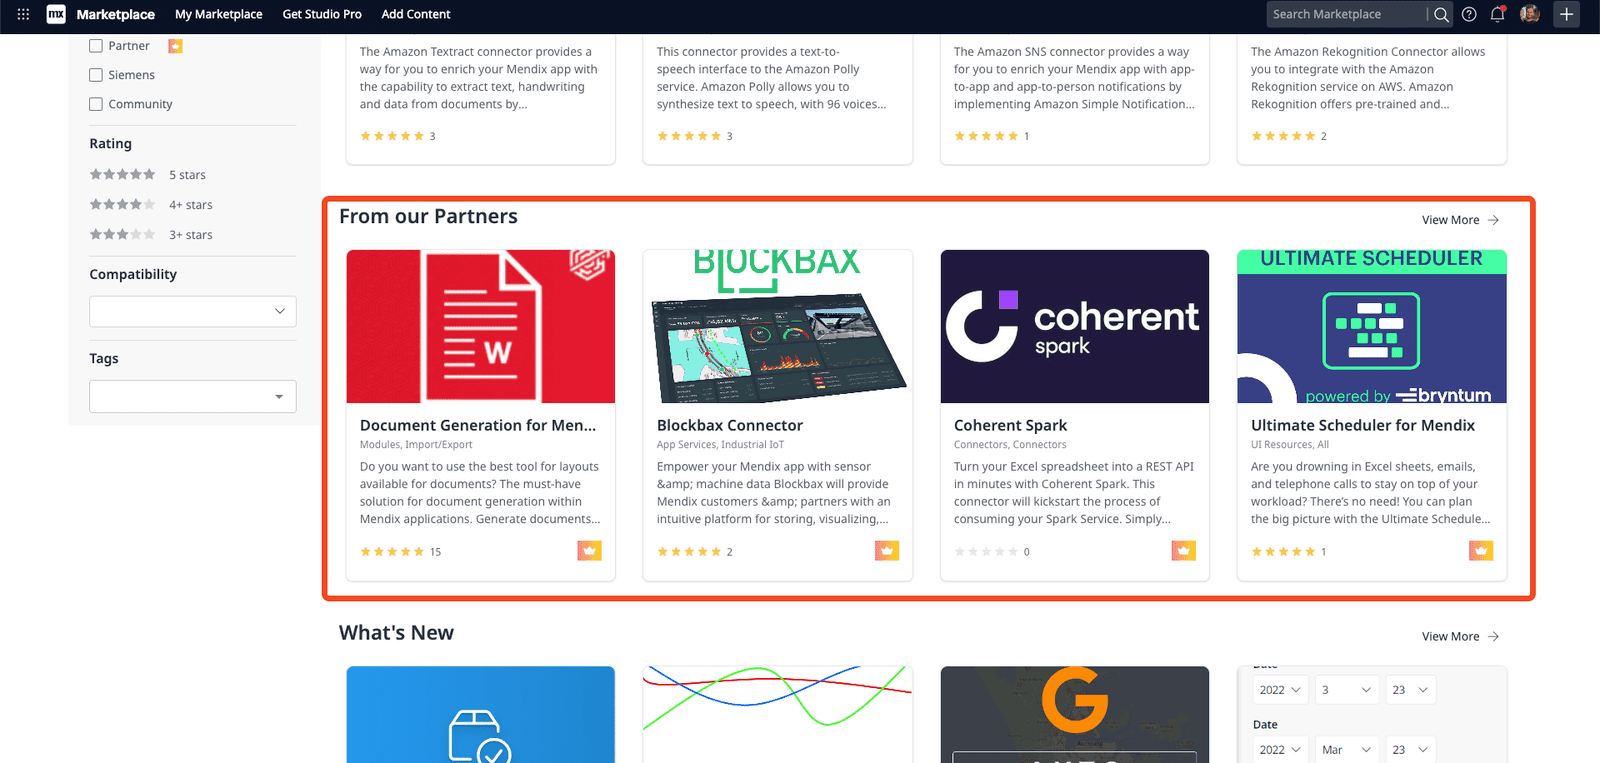
Partner listings will get a crown icon and will be labeled with a “Partner” support level. Additionally, partners can opt to put their own commercial license on the listing.
Which components from our partners are currently available?
Mendix has worked with an initial group of partners to bring their products to the Mendix Marketplace and into the Mendix ecosystem. From widgets and modules, to connectors for services, and entire templates, there are some great building blocks for you to use when building new apps:
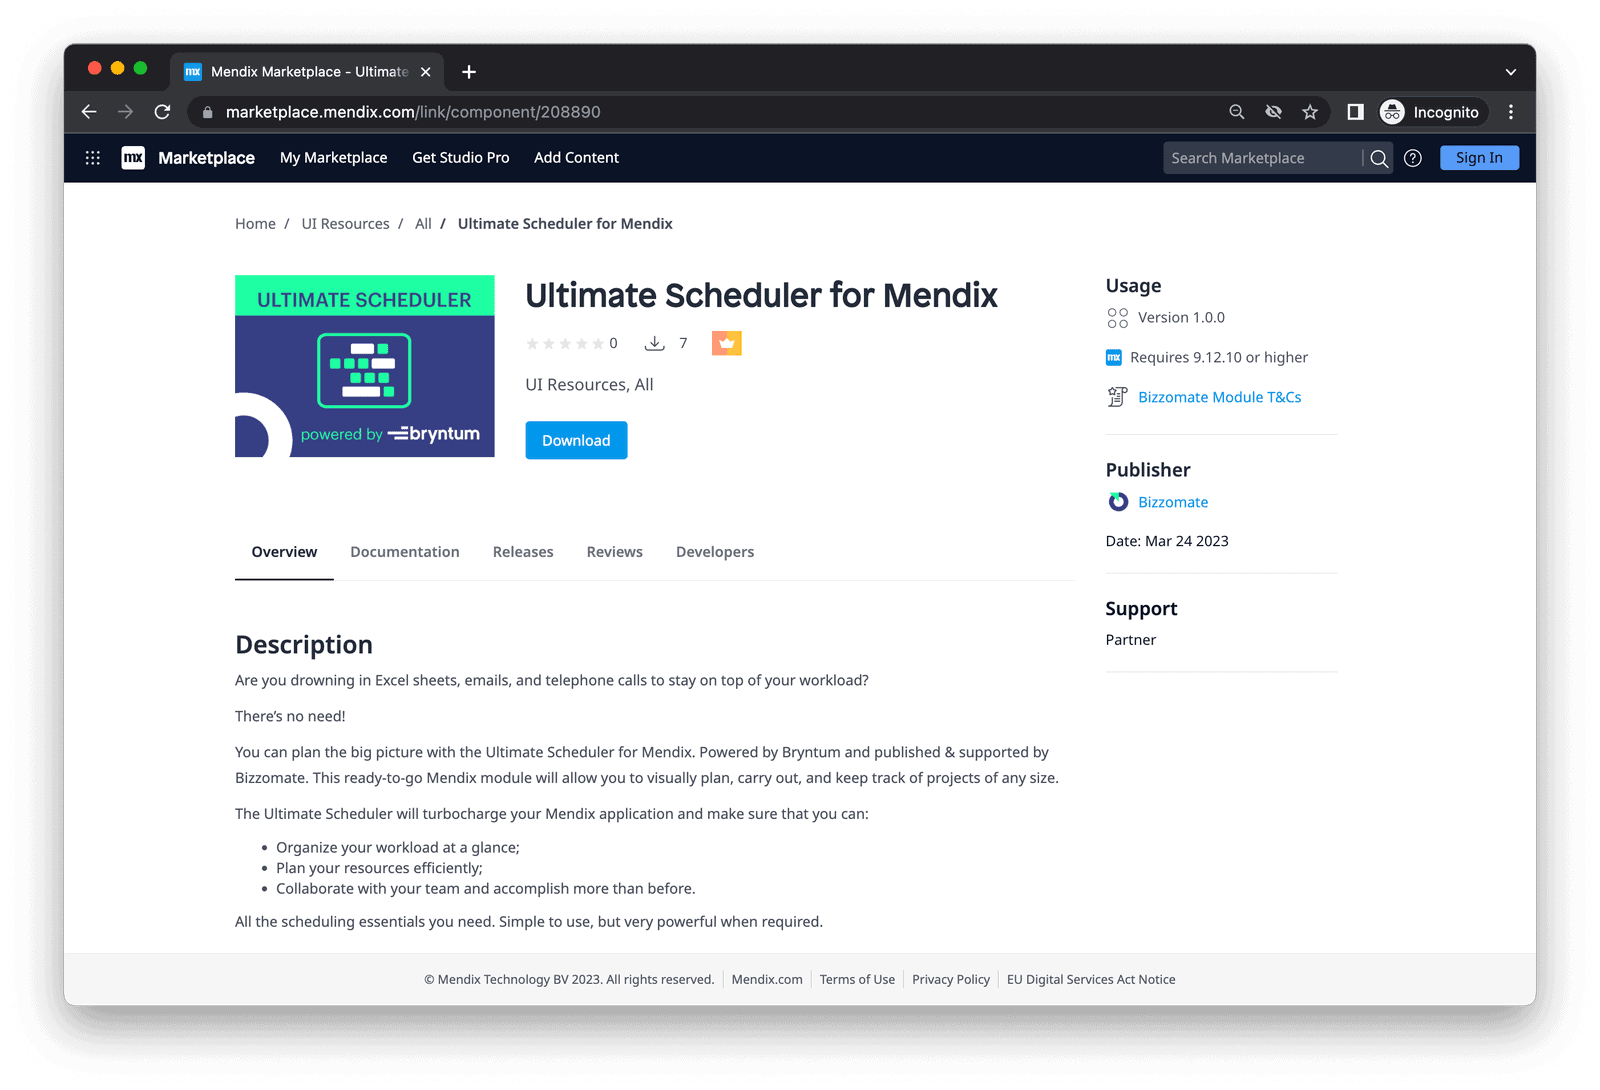
- Bizzomate built a powerful Ultimate Scheduler widget in partnership with Bryntum. Mendix has included it with a trial license in the Field Service Management template available on the Marketplace.
- Coherent has provided an easy-to-use example connector showing how to integrate with their Coherent Spark service which makes it possible to easily turn spreadsheets into services with REST APIs and access them in your Mendix app.
- A connector to leverage Avola Decision as a business rule execution engine in your Mendix apps to simplify decision definitions.
- The Blockbax connector, which allows you to develop Mendix apps on top of Blockbax to take advantage of historical and real-time streaming time series data from machine sensors.
- Appronto’s venerable Document Generation and Virus Scan modules which have lingered for far too long as premium components hidden in plain sight. Now they’re visible to all.
- Several templates from TOCnDIX to kick-start development of apps for specific use cases:
- The Database Scrambler module from Bizzomate to safely reuse anonymized production data in test/acceptance environments.
- Bonjoy’s Claims Management template to complement the Bonjoy Insurance Suite.
- Kinetech Cloud has published a connector to simplify integration with Fiserv’s credit card processing service Fiserv cardpointe.
- Amorph System’s SmartUnifier connector lets you integrate with their connectivity and DataOps platform for integration of fab devices, equipment, peripheral devices, and sensors as well as ERP, MES, and cloud-based IT systems.
- ABBYY’s Vantage Connector enables Mendix customers to extract valuable data from any type of document, from invoices and contracts to forms and emails, with unmatched accuracy and speed.
By selecting the “Partner” option in the new “Support level” filter, you get a good overview of all partner-supported content:

And this is only the beginning. In the coming months, we will be bringing additional partners to the Mendix Marketplace so that all our customers and developers can take advantage of the great solutions, services, templates, widgets, connectors, and modules our partners have to offer.
How do I become a Mendix Component Partner?
Any organization can become a Mendix Component Partner, whether you are new to the Mendix ecosystem or an established partner or even a customer. As long as you have a tangible reusable component, a module or widget, connector, or template, you can apply to become a member of the program. We encourage anyone who wants to position premium content to sign up.
Mendix for Private Cloud APIs – portal extensibility and automation
New Build API 🚀
- We have introduced a new Mendix for Private Cloud Build API, which allows users to build, upload, delete, and retrieve deployment packages for an application deployed in the Private Cloud.
Deploy API improvements to support private cloud/cluster administrators:
- We have added a new API endpoint for updating the namespaces. This will allow cluster managers to do the following tasks:
- Add, edit, or remove member permissions and members in a namespace.
- Enable or disable the external secret store and development mode configurations.
- Add, update, or clear the operational URLs.
- Activate or deactivate database and storage plans.
- We have improved the Update Cluster API endpoint by allowing cluster managers to add new cluster managers.
- We have improved the responses for
Get Cluster,Get Namespace,Get Clusters, andGet Namespaces. The responses now provide more information for the user.
Get Clusterresponse:{
"manifestVersion": "2.0.0",
"cluster": {
"clusterId": "085a0e34-69ec-4c61-9c7d-5cd42554f9f2",
"name": "new-cluster",
"clusterType": "os",
"description": "This cluster is for testing purposes.",
"totalNamespaces": 0,
"totalEnvironments": 0,
"creator": " cluster creator",
"clusterManagers": [
{
"email": "[email protected]",
"status": "Invitation_Sent",
"displayName": "member name"
}
]
}
}- We have improved the Delete Cluster API endpoint by allowing the forced deletion of a cluster with namespaces, as long as the namespaces do not have any attached environments.
- We have modified the OpenAPI specification file. Please download or check the latest version.
For more details or review OpenAPI specification, please to go to Mendix for Private Cloud Build API or Mendix for Private Cloud Deploy API.
Public Cloud
Webhooks Beta Launch 🚀
Webhooks allow notifying external systems when an event takes place in the Mendix ecosystem. Mendix will be releasing this capability in beta with two events:
- Teamserver push (Git) – when a new commit is pushed to the Team Server — this will only be triggered if your app is stored in a Git repository
- Package upload – When a deployment package is available in the Developer Portal — this includes creating a package from the Teamserver
These events will help automating CI/CD processes for customers using third-party tools such as Gitlab, Jenkins, Azure, etc.
The below visual describes the customer journey for creating, testing, and managing webhooks.

Access logs made self-service!
For apps running in the Mendix Cloud, we keep an extensive log of each request that is made to every app. This log includes things like the URL that was requested, the source IP address of the request, the response and the process time. This information can be valuable to customers when they are investigating issues with their apps. An example would be a security issue where the customer would like to know which user made what request at what time and from what IP address.
The access logs that contain this information were only accessible by filing a support ticket. Support would then download the access logs and provide them through the ticket. This took quite some time and effort on both side.
You can now download the access logs yourselves from the Developer Portal from the Logs menu item in the left-hand menu of the Developer Portal. Here you can select a date and select to download the access log.

DNSSEC for custom domains
DNSSEC is a security technology that helps to ensure that when you visit a website, you are actually reaching the correct website and not a fake one created by hackers. It does this by digitally signing the domain name system (DNS) records that associate website names with their IP addresses.
DNSSEC is a security requirement for a lot customers and providers, such as DigiD. Apps that want to implement DigiD need to have DNSSEC configured.
We already had DNSSEC enabled on the mendixcloud.com, mxapps.io & mendixcloud.net domains. We now also have DNSSEC for custom domains our customers have configured for their apps in the Mendix Cloud and Cloud Dedicated. We now have a 100% score on internet.nl for apps with a custom domain in the Mendix Cloud and Cloud Dedicated!
Additional HTTP security headers
In the Mendix Cloud, you can restrict access with TLS client certificate verification to ensure that users can only access (parts of) your app if they provide a client certificate that is signed by a specific root certificate authority and/or intermediate certificate authorities (CA). Only if a user provides a client certificate that is signed by the CAs, will they be allowed through. If they don’t provide a client certificate that is signed by the certificate authorities, they will not be allowed through.
This mechanism doesn’t verify whether the client certificate presented by the user is linked to the user. To increase security, you might want to take an additional step. To enable this, the Mendix Cloud now adds new HTTP request headers with client certificate information:
- Certificate serial
- Certificate thumbprint
With these, you can build a verification mechanism in your app to verify that the provided client certificate is linked to the user making the request.
We built a module show-casing the possibilities to verify a user’s client certificate. You can find this community-supported module in the Mendix Marketplace.
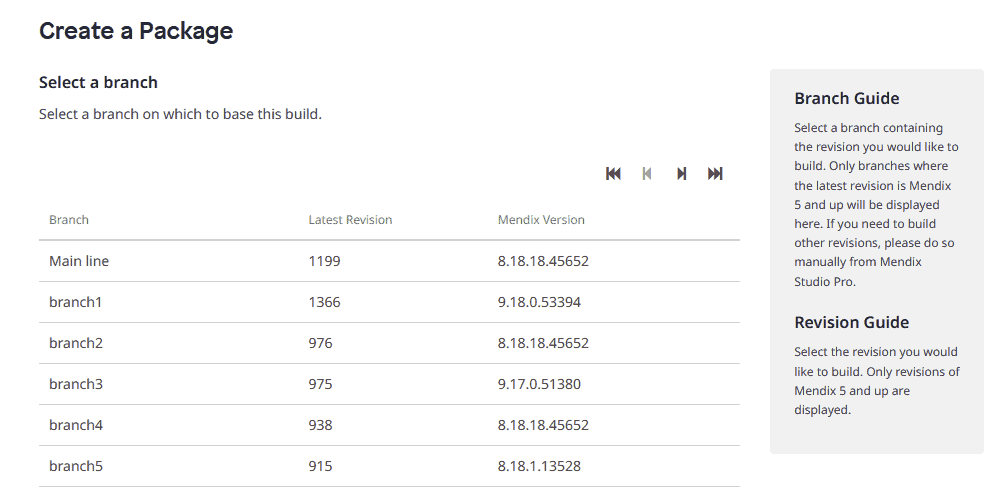
Improved Team Server branch browsing
We improved the performance of browsing branches in Cloud Portal. This makes it easier and faster to select a revision for building a deployment package in Cloud Portal.
Epics
Label management
It was always easy to create a new tag in Epics – but it was assigned a random color and there was no way to rename or delete it. Now all of that functionality is available in the tag management menu. You can access it from the little cogwheel next to the tags in your story or epic details page, or from the general settings on the planning page. Manage your tags, your way, with 21 different colors to choose from.

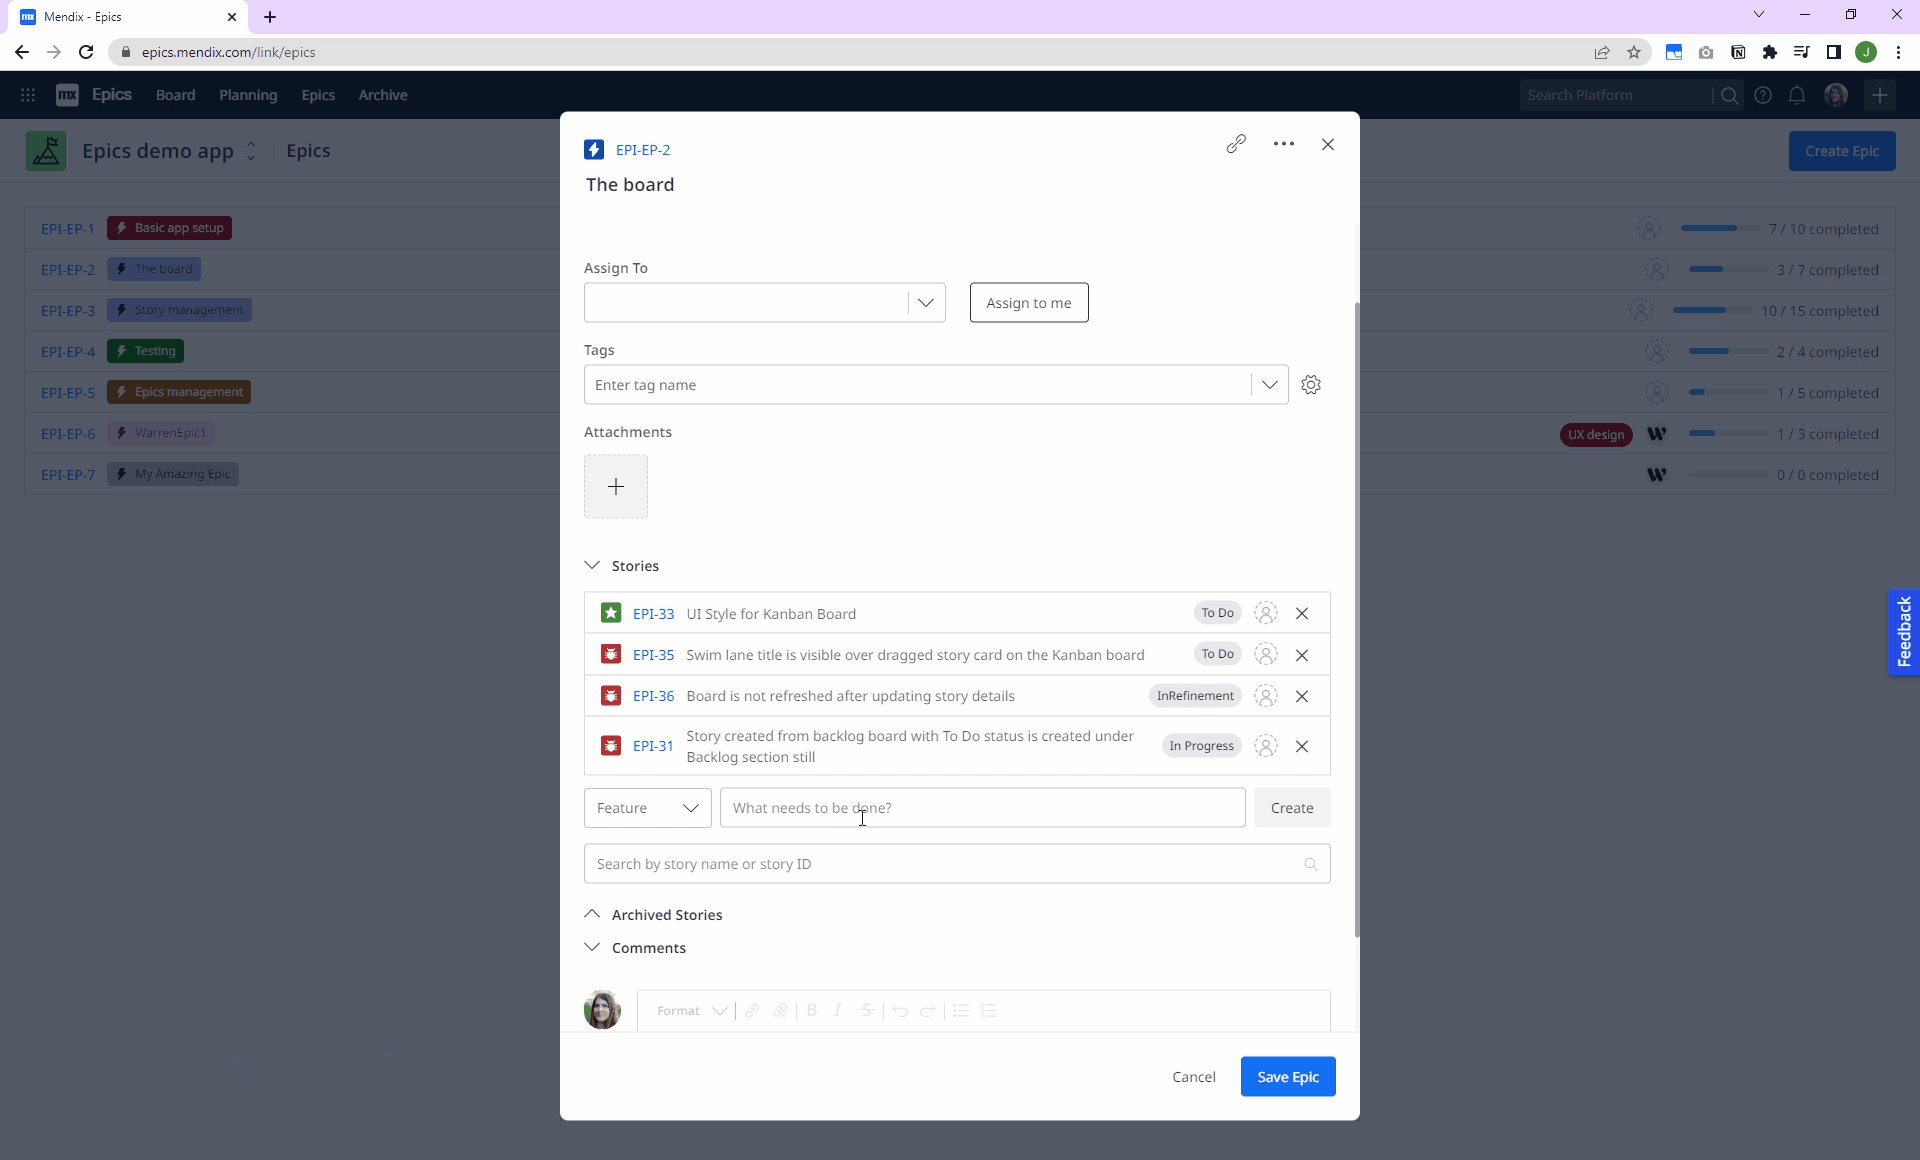
Creating stories from epics
You asked – we delivered! It is now possible to create stories directly from an epic. You can quickly create stories by just giving them a name or link some of the existing stories if you search by their name or story ID. This is particularly useful for creating a bunch of placeholder stories all at once and then you can always add more details later.
Are you ready to start making?
• Mendix 9.24 is waiting for you here!
• For more details, take a closer look at all the features, improvements, fixes, and more in the Mendix 9.24 release notes.
• Don’t want to miss future updates? Subscribe to our blog to receive the latest updates.