XML Inheritance by Extension in Mapping Documents
Mapping documents in Mendix help to connect your Mendix apps to other systems such as external web services. In Mendix 6.1 mapping documents have been significantly improved and you can read about this in this blog post.
In mapping documents you define how to translate between Mendix objects and XML based on an XML schema or WSDL document. Such schemas can contain an inheritance relation by defining a complexType as an extension of another complexType. We call this XML inheritance and this is the topic of this blog post.
Mendix has partially supported XML inheritance for a long time but with version 6.1 it’s fully supported. This is important because some widely used standards use XML inheritance (e.g. the ACORD electronic data standards for electronic exchange of insurance data between trading partners).
From now on we require you to map to an inheritance structure in your domain model similar to defined in the XML schema. You will also need to decide which subtypes you want to map. Because of these changes we can now support mixed lists of a certain parent type in import and export mappings. In this article I explain how to make use of the new functionality.
1. XML inheritance example
In this article I will use the following XML schema as an example:
<?xml version="1.0" encoding="UTF-8"?>
<xsd:schema xmlns:xsd="https://www.w3.org/2001/XMLSchema">

	<xsd:complexType name="PersonType" abstract="true">
		<xsd:sequence>
			<xsd:element name="Name" type="xsd:string"/>
			<xsd:element name="Address" type="xsd:string" minOccurs="0" />
		</xsd:sequence>
	</xsd:complexType>

	<xsd:complexType name="CustomerType">
		<xsd:complexContent>
			<xsd:extension base="PersonType">
				<xsd:sequence>
					<xsd:element name="Company" type="xsd:string"/>
				</xsd:sequence>
			</xsd:extension>
		</xsd:complexContent>
	</xsd:complexType>

	<xsd:complexType name="EmployeeType">
		<xsd:complexContent>
			<xsd:extension base="PersonType">
				<xsd:sequence>
					<xsd:element name="Salary" type="xsd:int"/>
				</xsd:sequence>
			</xsd:extension>
		</xsd:complexContent>
	</xsd:complexType>

	<xsd:element name="root">
		<xsd:complexType>
			<xsd:sequence>
				<xsd:element name="Person" type="PersonType" maxOccurs="unbounded"/>
			</xsd:sequence>
		</xsd:complexType>
	</xsd:element>

</xsd:schema>
The schema has a root element with one element called Person of type ‘PersonType’ which occurs one or more times. ‘PersonType’ is an abstract type which means that objects of type ‘PersonType’ can’t be created. There are two types extending ‘PersonType’: ‘EmployeeType’ and ‘CustomerType’. So XML that is valid according to this XML schema is a mixed list of customers and employees with at least one entry. An example XML with 3 entries: an employee, a customer and another employee, is shown below:
<?xml version="1.0" encoding="UTF-8"?>
<root>
    <Person xmlns:xsi="https://www.w3.org/2001/XMLSchema-instance" xsi:type="EmployeeType">
        <Name>employee1</Name>
        <Address>somewhere</Address>
        <Salary>12</Salary>
    </Person>
    <Person xmlns:xsi="https://www.w3.org/2001/XMLSchema-instance" xsi:type="CustomerType">
        <Name>customer1</Name>
        <Address>somewhereElse</Address>
        <Company>companyA</Company>
    </Person>
    <Person xmlns:xsi="https://www.w3.org/2001/XMLSchema-instance" xsi:type="EmployeeType">
        <Name>employee2</Name>
        <Address>somewhereElseAltogether</Address>
        <Salary>12000000</Salary>
    </Person>
</root>
In the XML the employees and the customers are in ‘Person’ tags and specify the type by specifying the xsi:type attribute. They have the name and address attributes in common and extend this with salary and company respectively, as specified in the XML schema.
2. XML inheritance in the select elements screen
If you want to make a mapping for an XML schema in Mendix, you first make a XML Schema document and import the XML Schema. Subsequently, you make an import or export mapping document and click “select elements”. Following this, you select the XML schema in the select elements screen and then you’ll see the screen shown in figure 1.
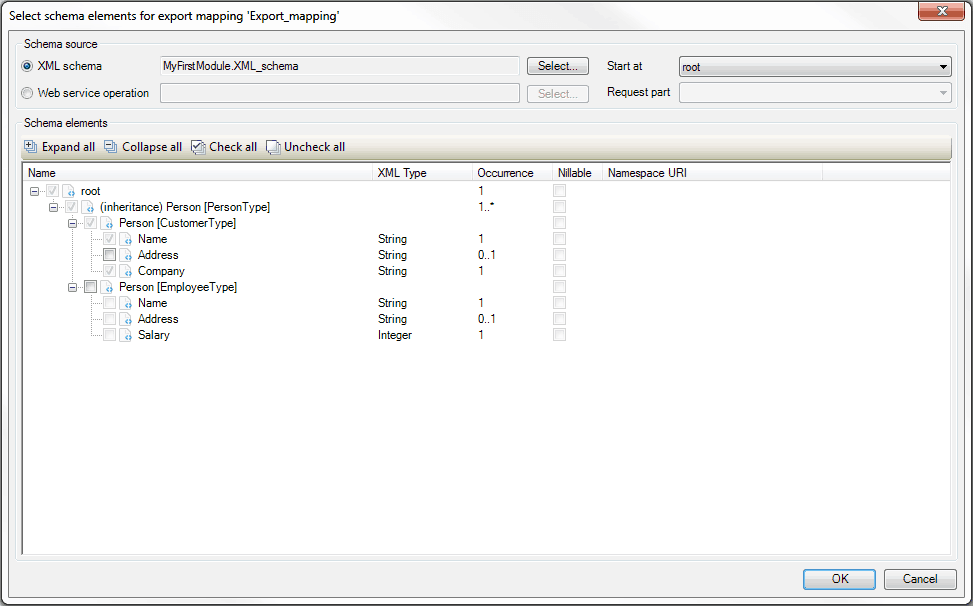
Figure 1. Select elements screen for an export mapping with our example XML schema
In the selection tree we see three levels. Firstly there is the ‘root’ level. Secondly there is the inheritance level which represents the element with the name Person and the type ‘PersonType’ in the XML schema. In the third level all allowed subtypes of ‘PersonType’ are shown. In this case that means ‘CustomerType’ and ‘EmployeeType’. If ‘PersonType’ would not have been abstract in the XML schema it would have been available here too. All types that you check here will be present in the mapping document. Each type you include in the mapping will be exported or imported (depending on the document type) when the mapping is invoked in a microflow. Objects of a type that you choose to not select will be silently ignored. So, as the selection is now, the mapping will only export persons of type ‘CustomerType’ and not of type ‘EmployeeType’. Similarly, if the current selection would have been made for an import mapping, all objects in the incoming XML of type ‘EmployeeType’ would have been ignored by the mapping.
In figure 1 you can also see that a number of elements are checked and cannot be unchecked because the checkboxes are disabled. For the root and inheritance node this is true because they are mandatory: they must occur exactly once (root) or at least once (inheritance). For the ‘CustomerType’ this is the case because for every inheritance node that is selected at least one child node must be selected. When you also select the ‘EmployeeType’ node it becomes possible to uncheck the ‘CustomerType’ (see figure 2).
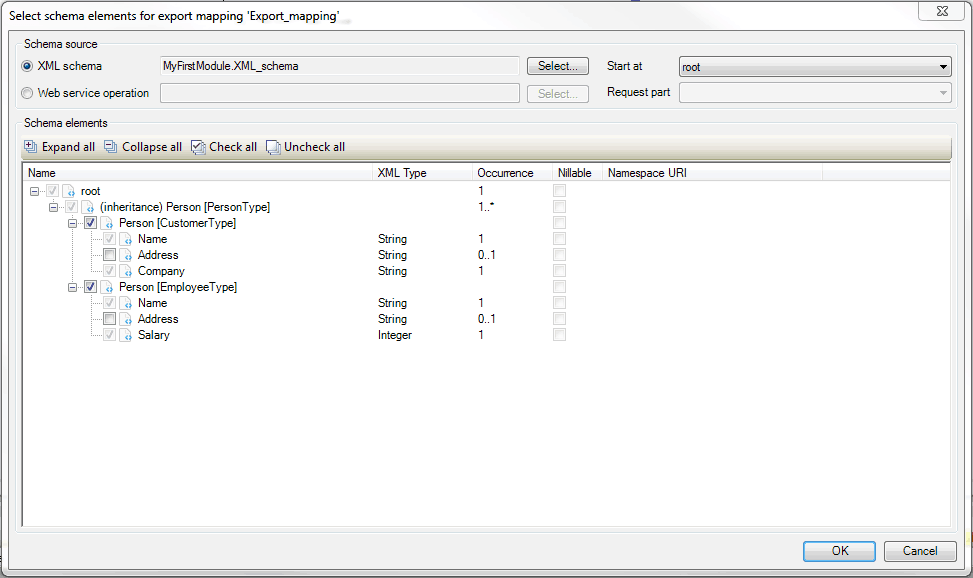
Figure 2. Select elements screen: ‘EmployeeType’ also selected
3. XML inheritance in export mappings
When you select all the elements in the selection screen shown in the previous section and press ‘OK’ you see the export mapping document shown in figure 3.
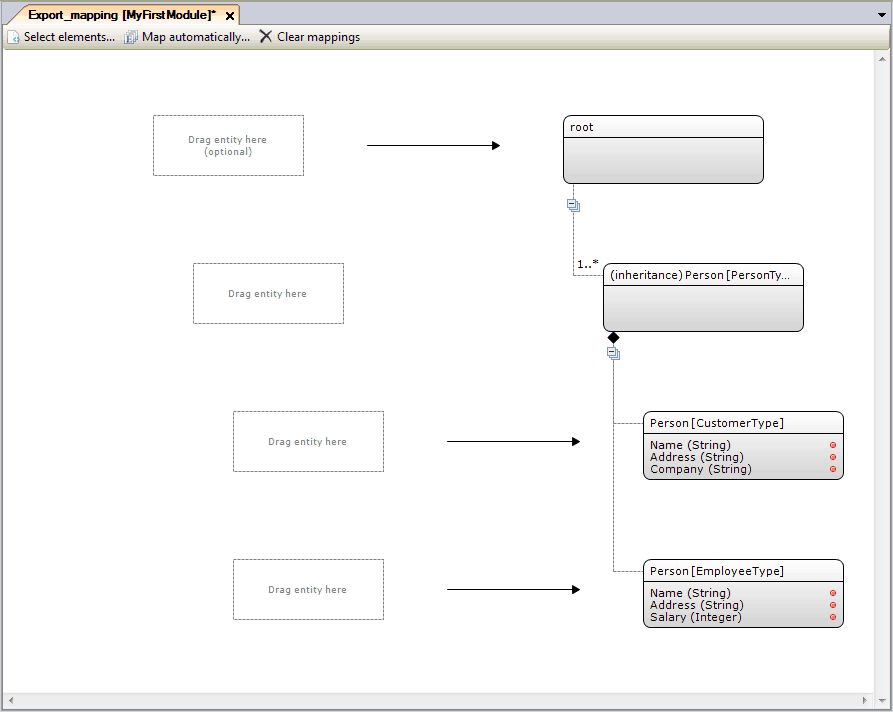
Figure 3. Empty export mapping with an inheritance element
How does an export mapping work? The goal of an export mapping is to translate a Mendix object into an XML document (or part of an XML document). On the right-hand side in figure 3 you can see the elements you selected in the select elements screen. This is the XML structure we want to create. On the left-hand side you need to specify what entities and attributes need to be used to create that XML structure and how to obtain these. You can choose the entities by dragging entities (defined in the domain model) on the placeholders from the connector menu. Subsequently you can double-click the dragged-in entity, choose to obtain the object by association or by microflow and choose what attributes from the Mendix entities you dragged in should map to what attributes in the XML elements. How to configure export mappings is explained in more detail in chapter 4 of this blog post on mapping documents.
To show how this all works for inheritance mapping elements I’m going to walk you through completing the export mapping for the example. First see figure 4 for the domain model that I’m going to use. In the figure you can see a ‘Collection’ entity with a 1..* association to a ‘Person’ entity. The ‘Person’ entity has two string attributes: ‘name’ and ‘Address’. Finally there are two entity types which use ‘Person’ as their generalization: ‘Employee’ with an integer attribute ‘Salary’ and ‘Customer’ with a string attribute ‘Company’.
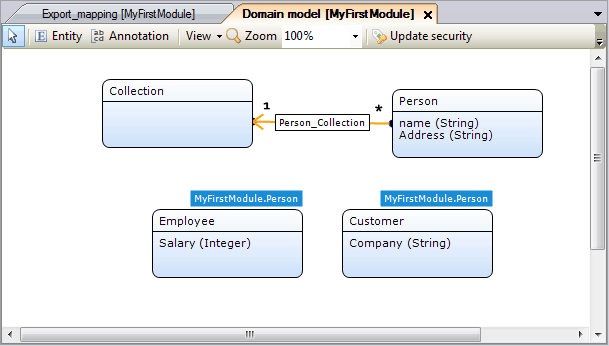
Figure 4. Domain Model for the example
Now we are going to connect the entities in our domain model with the XML elements in the export mapping. The end result is shown in figure 5 and I will explain it below.
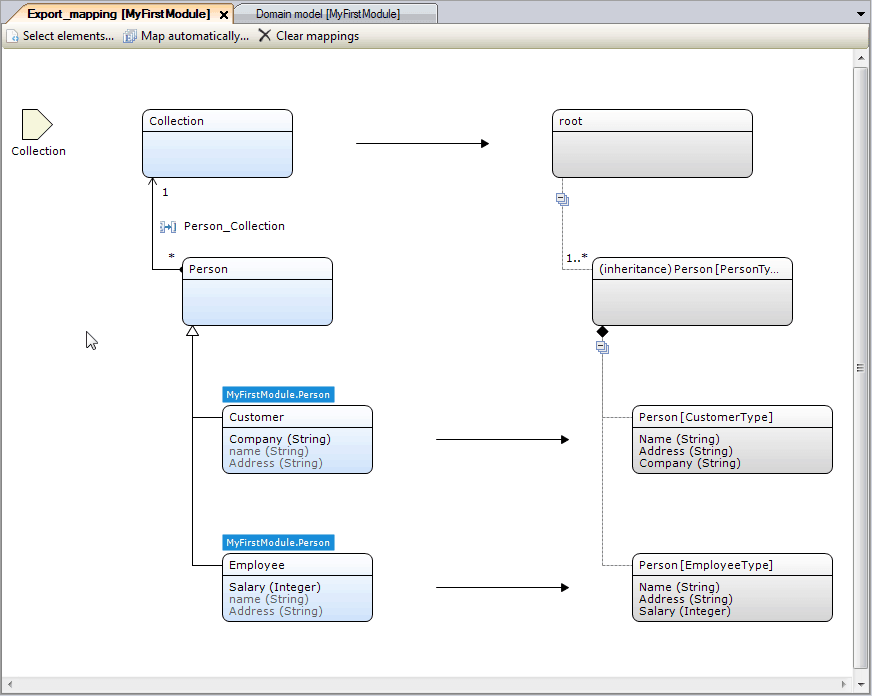
Figure 5. The completed export mapping
When you invoke an export mapping from a microflow you pass a Mendix object to convert to XML. The type of this entity should be the same as the Mendix object you choose to map to the root of the mapping document. We dragged in the ‘Collection’ entity there, so when you invoke this mapping you should pass a Mendix object of type ‘Collection’. When the mapping is invoked an XML element called ‘root’ is created. The following level is the inheritance element of type ‘PersonType’. We dragged in the ‘Person’ entity here. The inheritance level mapping element is different from regular mapping elements because it will not create an XML element (that’s why no arrow is drawn for this level). Instead, it’s used to specify the shared parent type for all the allowed subtypes for this XML element. In this example we dragged in the ‘Person’ entity because this is the parent of the ‘Employee’ and ‘Customer’ entities we dragged in under it to map to the ‘CustomerType’ and ‘EmployeeType’ XML elements.
What also makes the inheritance mapping elements different from regular mapping elements is that you only configure how to obtain the object. In the example we obtain the object through the ‘Person_Collection’ association. We configured this in the screen shown in figure 6 which you arrive at by double-clicking the inheritance mapping element.
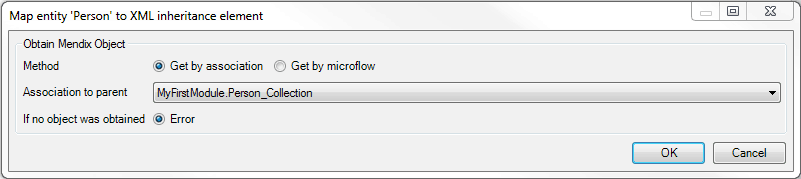
Figure 6. Obtaining an object for an inheritance mapping element
We don’t map any attributes here because the inheritance level mapping element does not create an XML element. It’s only there to specify how to obtain the object and the parent type for all the allowed subtypes. In the mappings elements for those subtypes it’s the other way around. There you don’t have to specify how to obtain the objects because this is already configured in the inheritance level mapping element. However you do need to specify how the attributes are mapped because for each object of that type an actual XML element is created. In the example, for every ‘Customer’ in the collection a ‘CustomerType’ XML element is created with the ‘Name’, ‘Address’ and ‘Company’ from the ‘Customer’ Mendix object. For, every ‘Employee’ an ‘EmployeeType’ XML element is created with the ‘Name’, ‘Address’ and ‘Salary’ from the ‘Employee’ Mendix object. We configured this in the screen shown in figure 7 which you arrive at by double-clicking the ‘CustomerType’ mapping element.
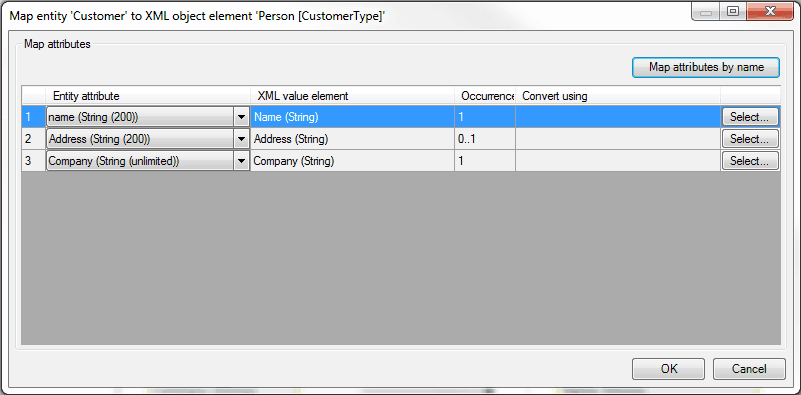
Figure 7. Mapping the attributes for the ‘CustomerType’ XML element
4. XML inheritance in import mappings
When you select all the elements from the example XML Schema for an import mapping you see the import mapping document shown in figure 8.
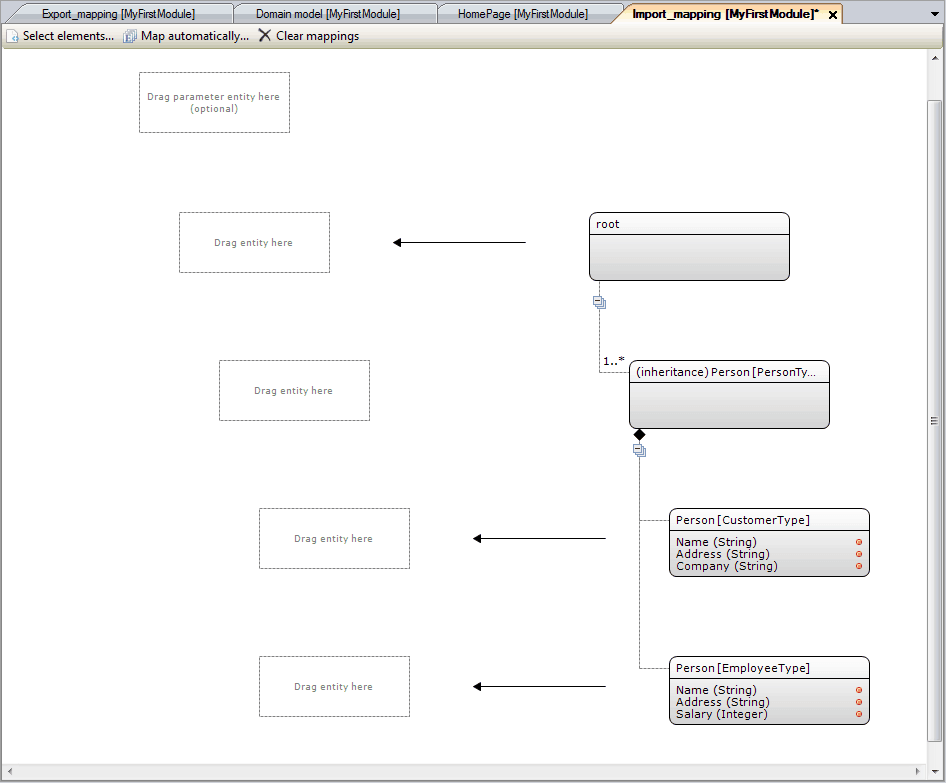
Figure 8. Empty import mapping with an inheritance element
The import mapping looks similar to the export mapping but there are some important differences. For one, the arrows point from right-to-left indicating the XML elements come into the system and are translated into Mendix objects. Because of this, the configuration is different from export mappings as well. First, I again connected the entities in our domain model (see figure 4) with the XML elements in the import mapping. The end result is shown in figure 7 and I will explain this below.

Figure 9. The completed import mapping
So what does an import mapping do? It takes incoming XML elements and translates them into Mendix objects. When an XML element comes in there are three methods for obtaining an object: “create new object”, “find by key” and “call a microflow”. In figure 9 you see “create new object” above the arrow for each of the three levels for which a Mendix object needs to be obtained. This means that we create a new empty Mendix object before we continue with the next step in the mapping. Subsequently, the attributes get mapped to the obtained Mendix object how you configured it in the mapping (in a screen similar to figure 7). Finally, you can choose to set an association to the parent object. How to configure import mappings is explained in more detail in chapter 3 of this blog post on mapping documents.
Just like for the export mappings, the inheritance level mapping element is different from regular mapping elements. Only for the children of the inheritance level element, we need to specify how to obtain an object (“create new object”, “find by key” or “call a microflow”) and how the attributes map from the XML element to the Mendix object. This is visualized in figure 9 by not drawing the arrow for the inheritance level element. Whether and what association needs to be set on the obtained Mendix object, is however configured in the inheritance mapping element because the imported objects of type ‘Customer’ and ‘Employee’ need to end up in the same collection to conform to the XML schema.
5. XML inheritance and using ‘Map automatically’ to fill your mappings
When you make a new mapping document it can be quite cumbersome to initially connect the XML elements with entities, associations and attributes. The Map automatically helper function will help you with this by finding or creating domain model entities and associations and adding them to the mapping to relieve you from doing a lot of manual work. This helper function also works with inheritance and will create the required inheritance structure in the domain model. Note that if you have a partial existing domain model it won’t automatically create entity generalizations if there is an impact on the persistence behavior of the entity. So there might be some work remaining after using the “Map automatically” function. For more information see the Map Automatically section in the documentation.
6. Converting old projects with XML schemas with XML inheritance
In this section I will discuss how you can upgrade your old projects with XML inheritance to Mendix 6.1. To do this I will first show how the domain model (see figure 10), export mapping (see figure 11) and export mapping (see figure 11) for the example XML schema could look like in Mendix 6.0 and older versions.

Figure 10. Domain model for example XML schema in Mendix 6.0
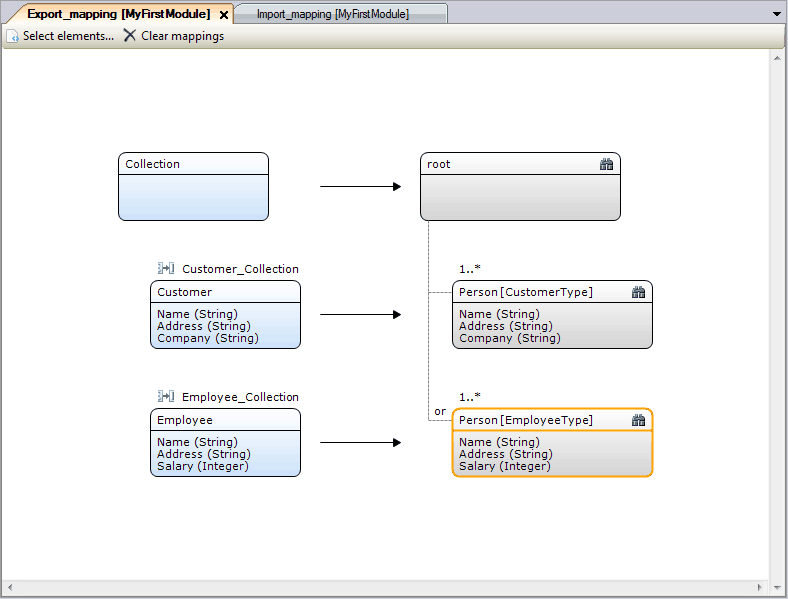
Figure 11. Export mapping for example XML schema in Mendix 6.0

Figure 12. Import mapping for example XML schema in Mendix 6.0
In these figures you notice that the collection entity has two separate associations with ‘Customer’ and ‘Employee’ (without an abstract ‘Person’ entity) and that the extra level for inheritance level in not present in the mappings. When we open this project in Mendix 6.1 we see the consistency errors shown in figure 13.
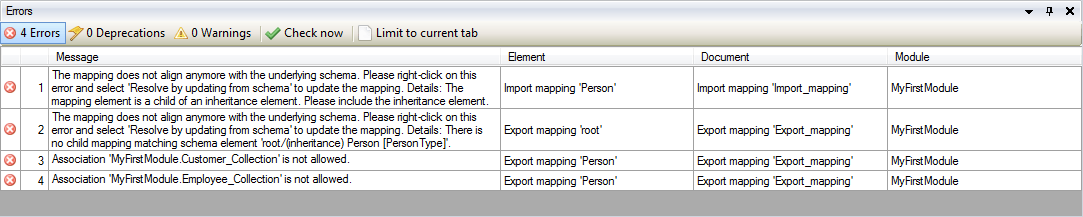
Figure 13. Consistency errors after upgrading the project to Mendix 6.1
To resolve these, first right click the first two consistency errors and click “Resolve by updating from schema” to realign the mappings with the XML schema. This will update the import mapping to look like figure 14, and the and export mapping to look like figure 15.
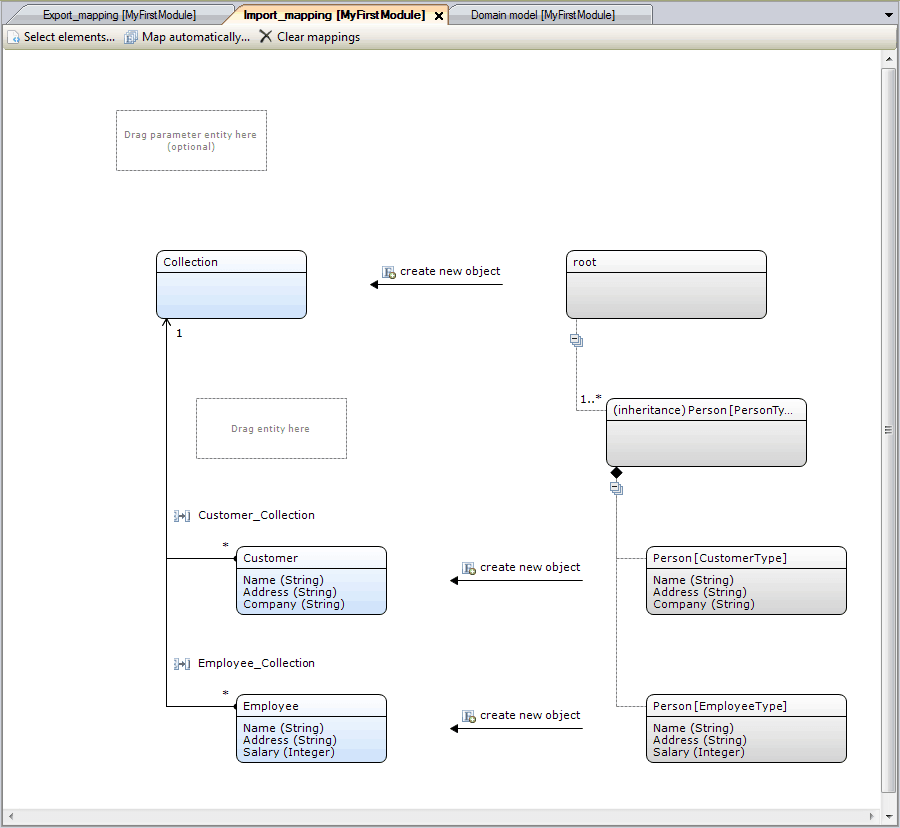
Figure 14. Import mapping after updating from the schema

Figure 15. Export mapping after updating from the schema
The consistency errors that remain can be resolved by doing the following. First update the domain model to resemble figure 4 by introducing a generalization entity for ‘Employee’ and ‘Customer’ (‘Person’) with a single association with ‘Collection’. You don’t need the ‘Employee_Collection’ and ‘Customer_Collection’ associations anymore. Take in mind though, that if you have existing data in your app and you want to preserve it, you need to migrate your data when you are making changes to the associations in your domain model. Finally drag the ‘Person’ entity to the empty placeholder in the both the import and the export mapping and the consistency errors should be resolved. You will end up with mappings like figure 5 and 9.
In situations where you only have one subtype of an inheritance element selected there is a trick to avoid the above steps to change your domain model. If, for example you only have the ‘CustomerType’ selected in your ‘Select elements’ dialog you don’t need to make a generalization (the ‘Person’ entity) and can instead use the ‘Customer’ entity on the inheritance level as well. This works because a ‘Customer’ is a ‘Customer’ and there are no other subtypes selected which need to be a specialization of the ‘Customer’. The export mapping created like this is shown in figure 16.

Figure 16. Export mapping with only the ‘CustomerType’ selected