Mapping documents in Mendix help to connect your Mendix apps to other systems such as external web services. They do this by helping you specify how to translate between Mendix objects and XML, based on an XML schema or WSDL document. In Mendix 6.1 these documents have been significantly improved and in this blog I will explain how this will enable you to deal with more complex situations, make mapping documents easier to use and save you valuable time.
Table of Contents
- The value of Mapping documents in Mendix
- Name changes and direction of the arrows
- How to use import mappings
- How to use export mappings
- Improved selection tree for select elements
- Important other improvements
- Conclusion
1. The Value of Mapping Documents in Mendix
With Mendix you can develop fully functional stand-alone applications. Many real world applications don’t exist in a vacuum however and need to integrate and communicate with the outside world. To do this, data needs to be exported from and imported into your Mendix app. Because Mendix and other applications have different domain models, a format needs to be agreed upon for the data. A standardized way to specify such a format for your data is an XML schema (XSD). This format is also used in the web services standard as part of a WSDL (Web Service Description Language) file. Mendix supports both XML Schemas and WSDLs.
After you have chosen a format, you need to specify how the data in your Mendix domain needs to be transformed to fit that data format. This is where mapping documents come in. Specifying how to transform data is not an easy task. The mapping documents in Mendix are designed to make it easier by visualizing the transformation. This is very important because it enables business analysts to read and understand the mappings. Because of this they can validate that mappings are correct and even create the mappings themselves. This is key since the business analysts are the ones with the business knowledge. If someone else needs to do the implementation, information can get lost. The biggest challenge of integration is semantics, not syntax.
Another advantage of defining mappings as separate entities in Mendix is that it is possible to reuse them. Reusing mappings saves time, which reduces costs. If a problem has already been fixed, there is no need to do it again. Further, reusing existing mappings can help prevent bugs because it reduces the size of your project and generally the larger the project, the more bugs it’s likely to have. Finally, larger projects are harder to maintain and extend so it will take more time to do so. Reusing mappings keeps your project smaller and therefore avoids these issues.
Finally, mappings make it easier to work with interfaces that are big and complex. This is true when implementing them for the first time, but especially when maintaining them. It’s important because big and complex interfaces are very common in the enterprise landscape and when integrating ERP systems.
In Mendix 6.1 we have improved mapping documents and made them even easier to use. In the next sections I will go over the most important changes.
2. Name Changes and Direction of the Arrows
In earlier versions of Mendix the two types of mapping documents were called XML-to-domain and domain-to-XML mapping. We have chosen to rename them to import and export mapping. We did this to make it immediately clear whether a document specifies how to translate data going out of you Mendix app to the outside world (export) or data coming from the outside world into your Mendix app (import). To make this even clearer, we have also changed the direction the data flow is drawn. We have now fixed the Mendix domain on the left and the outside world on the right. Because of this, the arrows point from left to right for export mappings and from right to left for import mappings. Previously, arrows always pointed from left to right. In the remainder of this article I will use the example import mapping shown in figure 1 and the example export mapping in figure 2 to illustrate the other changes in the mapping documents.
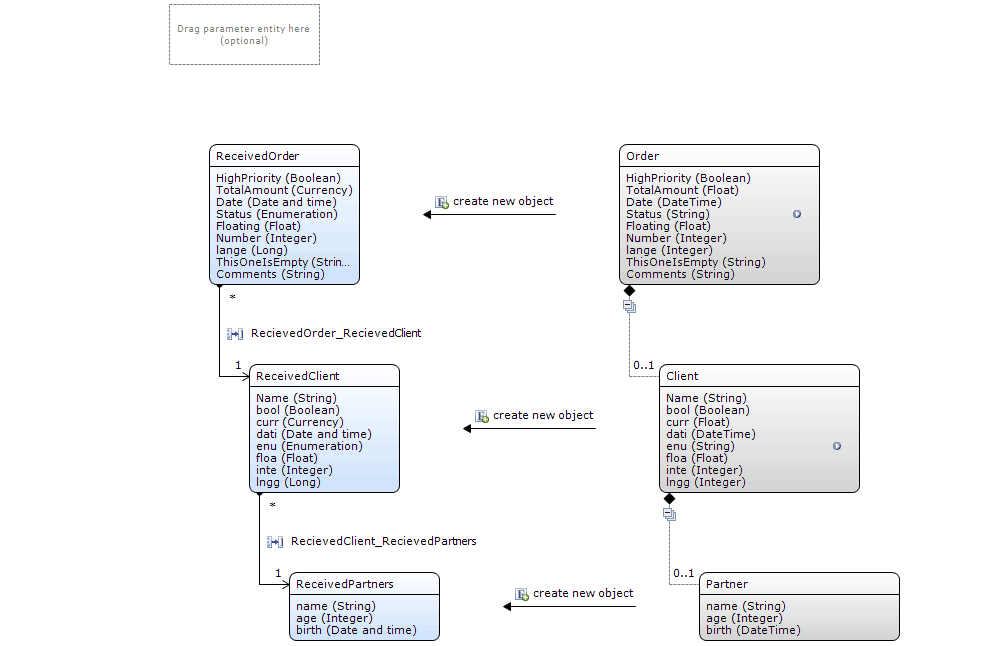
Figure 1. Example of an Import Mapping

Figure 2. Example of an Export Mapping
3. How to Use Import Mappings
The process for importing data into Mendix consists of three steps:
- Obtain a Mendix object (create, find by key or by microflow).
- Map XML attributes to the obtained object.
- Optionally set the association to the parent object.
The visibility of these steps in the mapping document has been improved to make it easier to understand and configure. In this section, I will explain this in more detail.
3.1 How to Obtain a Mendix Object
For import mappings, the incoming arrows now show how to obtain a Mendix object to be used in later steps. In figure 1 you can see that all the arrows have “create new object” written above them. This means that for each of the elements a new Mendix object is created. After this, the attributes are mapped to that Mendix object as specified in the mapping details. To change how the Mendix object is obtained you can double click one of the mapping elements. For example when we double click the ‘ReceivedClient’ entity we see the screen shown in figure 3.
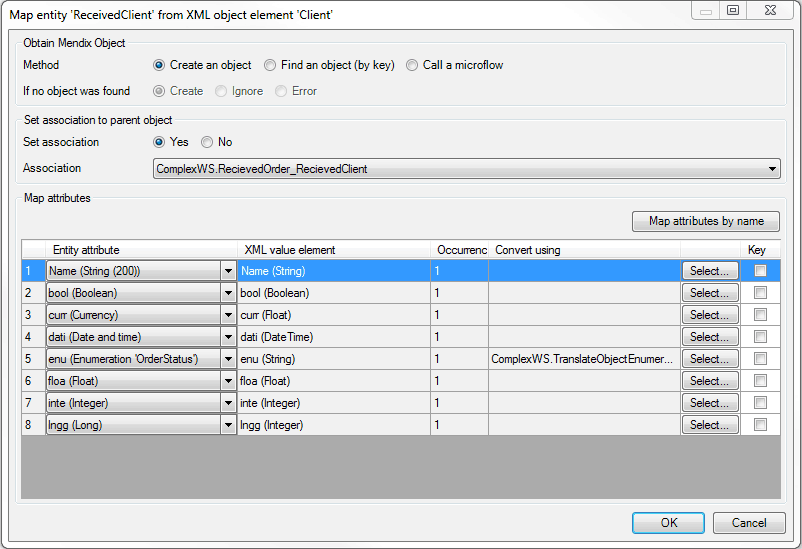
Figure 3. Mapping details for entity ‘ReceivedClient’
At the top of this screen you can define how to obtain the Mendix object to map the attributes in the incoming XML to, and what to do if this fails. Other than “Create an Object” you can choose “Find an object” or “Call a microflow”. If you choose “Find an object” you also need to select one or more attributes in the map attributes section as the key. When the mapping is executed it will look in the database for an object with the chosen attributes as the key. In the mapping it will show “find by key” above the arrow as shown in figure 4.
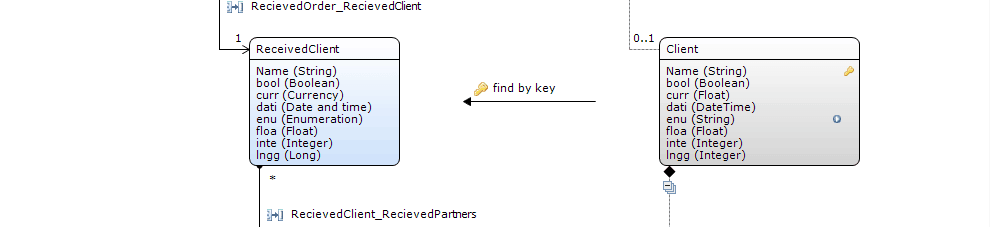
Figure 4. The object is found by key in this import mapping
When you choose “Call a microflow” the mapping will invoke the selected microflow when executed to obtain the Mendix object. It will pass those attributes and parent objects to the microflow that you select. Be aware that the mapping of the attributes in step 2 may override the values of attributes you have set for the object in the microflow. In figure 5 you can see how the arrow will look like if you select “call by microflow”. If you select the microflow, all the parameters are highlighted. In this case this is the ‘ReceivedOrder’ parent entity and all the attributes of the Client XML element.
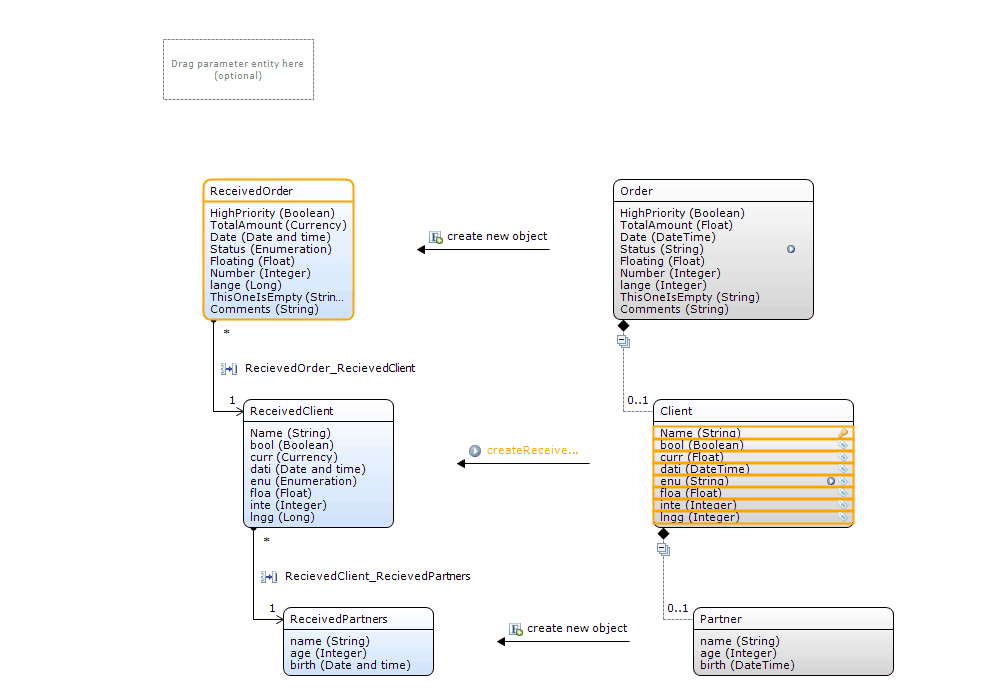
Figure 5. The Mendix object is obtained via a microflow in this import mapping
We also made it possible to navigate to the microflow or change what microflow is called by right clicking the arrow and selecting the option as shown in figure 6.

Figure 6. The context menu of “Call a microflow”
3.2 Map XML Attributes to the Obtained Object
We have not made any changes to how you define how attributes from the XML map to the attributes of the Mendix object. This is still done in the grid shown at the bottom of figure 3. In the mapping document itself we have made it more visible though. If you select an attribute in the XML element the corresponding attribute is automatically selected in the mendix object and vice versa. In figure 7 an example of this can be seen. The attribute ‘dati’ is selected in the XML element Client and the corresponding element ‘dati’ in the Mendix entity ‘ReceivedClient’ is selected as well. Note that the name of the attribute in the Mendix object and the XML element do not have to match.

Figure 7. The attribute mapping is shown by highlighting attributes that map to each other
3.3 Set the Association
Finally, for each mapping element you need to decide whether to set an association to its parent. This is done using the mapping details screen shown in figure 3. If you choose to set an association this is drawn in the mapping, see for example figure 1. If you choose not to set an association it is simply omitted in the mapping. In figure 8 I left out the association between the ‘ReceivedOrder’ and ‘ReceivedClient’ entities. Note, that all the objects will still be created. Only the association between them will not be set.
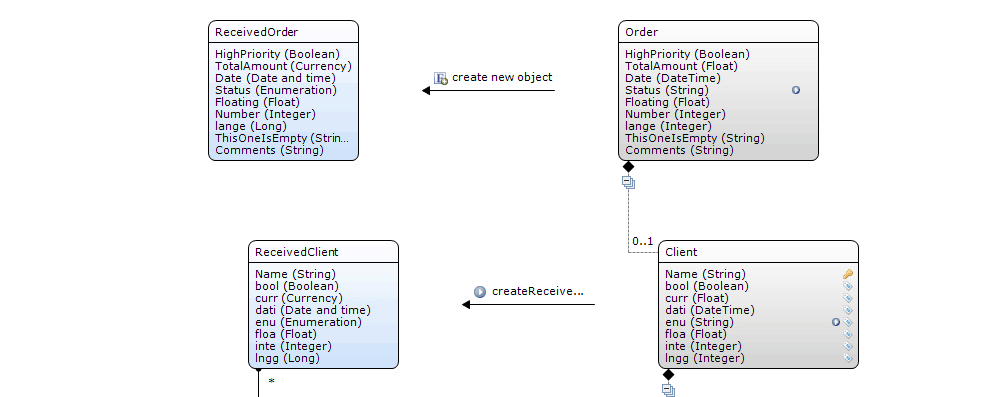
Figure 8. No association is set between ReceivedClient and ReceivedOrder
4. How to Use Export Mappings
The process for exporting data from Mendix consists of two steps:
- Obtain a Mendix object (by association or by microflow).
- Map attributes from the obtained object to XML.
Because the second step is the same as in import mappings, I will focus on how we show how an object is obtained. If in the example of figure 2 you double click on the ‘Orderlines’ entity you see the screen shown in figure 9.
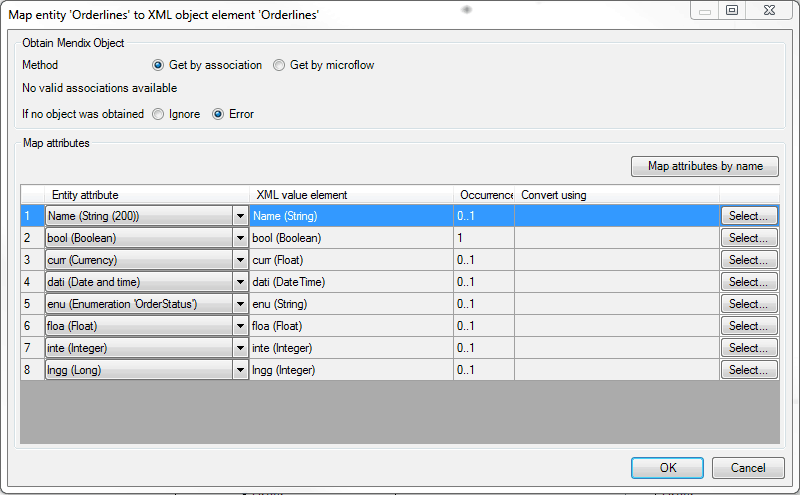
Figure 9. Mapping details orderlines
In this screen you see that the method is set to “Get by association”. If you look at figure 2 you can indeed see that an association is drawn between ‘Orderlines’ and ‘ReturnListOrderlines’ called ‘Orderlines_InputOrderlinesList’. If instead we select “Get by microflow” and choose a microflow, the microflow will be drawn as shown in figure 10.
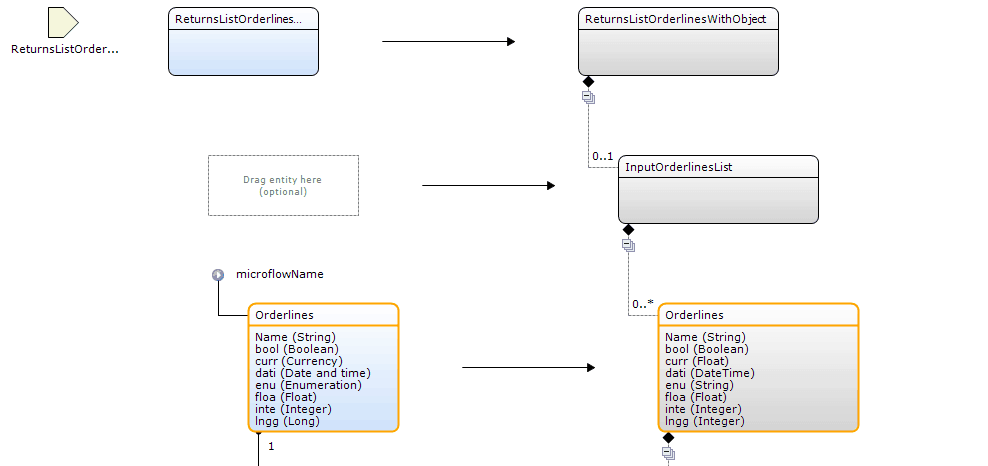
Figure 10. Export mapping obtain by microflow
5. Improved Selection Tree for Select Elements
Before you define what XML elements map to what Mendix objects and what attributes map to each other, you first need to select what elements you want to map. For import mappings you can decide that you are not interested in a large part of the received XML. In export mappings you are only free to omit optional elements. Optional elements are elements with a minimum occurrence of 0 (e.g. 0..1 or 0..*). To make it clearer what elements and attributes you can and cannot include or omit in a mapping improvements have been made to the select elements screen. To open this screen click “Select elements…” and a screen such as shown in figure 11 will be shown.
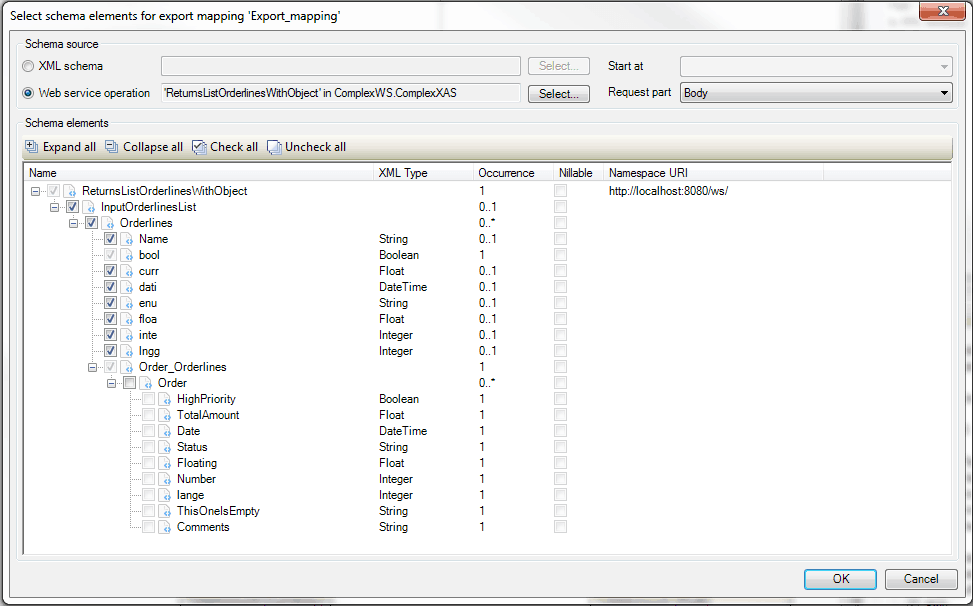
Figure 11. Select elements for an export mapping
In this example you can see that some of the checkboxes are disabled while others are enabled. If a checkbox is disabled it means that it is not possible to change the value of the checkbox. So, for example, it is impossible to deselect the ‘bool’ attribute of the ‘Orderlines’ XML element because the ‘Orderlines’ XML element is selected and the bool attribute has an occurrence of 1. Similarly it is impossible to select the ‘HighPriority’ attribute of the ‘Order’ XML element (because the ‘Order’ XML element is not selected). As illustrated in figure 12, when you hover over a disabled checkbox a tooltip will show you the reason it is disabled.
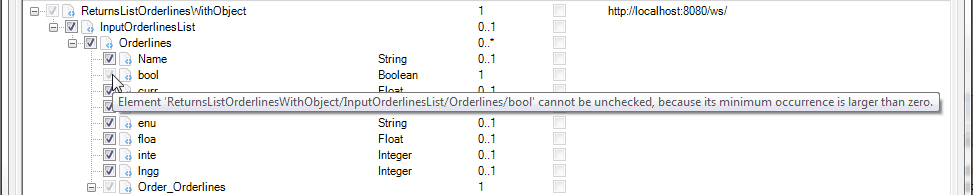
Figure 12. A tooltip is available when a checkbox is disabled
6. Important Other Improvements
Next to the improvements I discussed thus far, there are more improvements in the mapping documents. I don’t want to keep these from you, so I will go over them in this section.
6.1 Auto-Map for Export Mappings
When you make a new mapping document it can be quite cumbersome to initially connect the XML elements with entities, associations and attributes. This a lot of work in particular when the mapping is large and when you don’t have an existing domain model to map to. This is where the Map automatically helper function comes in. It finds or creates domain model entities and associations and adds them to the mapping to relieve you from doing a lot of manual work. After you run the function it will show you a detailed report of the changes it made to your project. Previously, this helper function was only available for import mappings. Now it is also available for export mappings.
6.2 Support for XML Inheritance by Extension
XML schemas can contain an inheritance relation by defining a complexType as an extension of another complexType. We call this XML inheritance. Mendix has partially supported this for a long time but with version 6.1 it’s fully supported. This is important because some widely used standards use XML inheritance (e.g. the ACORD electronic data standards for electronic exchange of insurance data between trading partners). From now on we require you to map to a similar inheritance structure in your domain model as defined in the XML schema. You will also need to decide which subtypes you want to map. Because of these changes we can now support mixed lists of a certain parent type in import and export mappings. For more information about this improvement I refer to this dedicated blog post.
6.3 Performance Improvement in the Modeler
In previous versions the mapping editor could get slow when working on particularly large mappings of more than 100 elements. This is now much better and that’s important because big and complex interfaces are common in the Enterprise landscape and when integrating ERP systems.
6.4 Mendix Entity Context Menu
You can now also right click the Mendix entity in the mapping document to get a context menu as can be seen in figure 13. Previously this menu was only available by right clicking the XML element.

Figure 13. Context menu for entities in mapping documents
6.5 Collapsible Mappings
It is possible for mapping documents to get quite large with deep nesting and many XML elements and attributes. When this is the case it can be hard to keep an overview of you mapping while working on it. Because of this we have made it possible to collapse parts of your mapping. Collapsing hides a part of the mapping from view and can be done by clicking the minus symbol under the composition symbol below the XML elements. To illustrate this I have collapsed everything below the ‘Client’ XML element in figure 14.
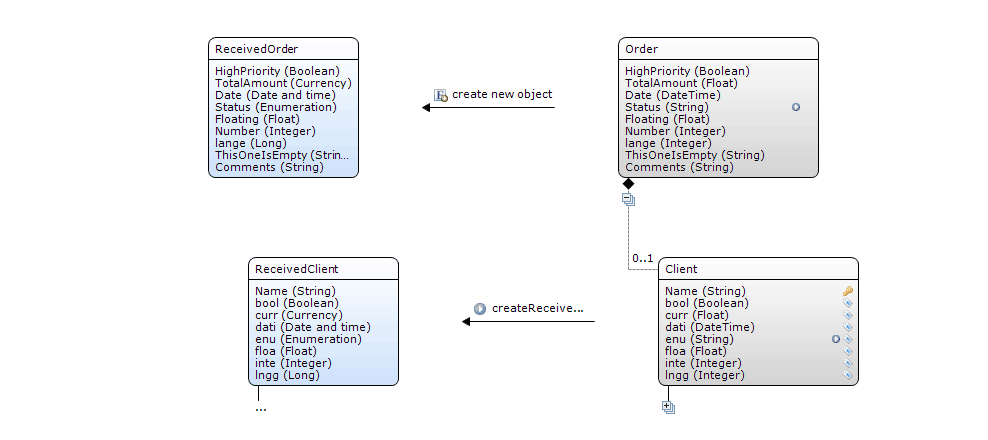
Figure 14. Collapsing part of a mapping
6.6 Import Mapping Optional Parameter
Export mappings always need to have an input parameter defined: the Mendix object which needs to be exported. For import mappings defining an input parameter is optional. If you choose to define one for a mapping you can use the passed object in two ways. Firstly, you can use it as a parameter when you call a microflow. Secondly you can set an association between the objects that are created by the mapping and the parameter entity. In previous versions of the Modeler this functionality was rather hidden in the property grid, but now a placeholder is drawn for the parameter and an entity can be dragged to it like for any other entity placeholder. See the top left corner of figure 1 for an example of such a placeholder for an optional parameter entity.
6.7 Attribute Mappings Metween XML Strings and Mendix Enumerations
In attribute mappings you can only map between compatible data types. Data types are compatible when the data type you are mapping from can be used in the place of the data type you are mapping to. If you want to map between attributes that are incompatible you need make a conversion microflow. Previously, if you mapped between XML attributes of type string and Mendix enumerations you would need such a microflow. Because you would need to do this for every enumeration you want to map this could force you to make a large amount of these microflows. This has been resolved and XML attributes of type string now can be mapped to Mendix enumerations directly.
7. Conclusion
In this blog post I gave an overview of the mapping document improvements we made for Mendix 6.1. I hope you are as excited as we are to try these out. We believe it will be a lot easier for you to make mappings yourself, and understand mappings made by others. Do you like the changes? Do you have any other feedback? Please let us know.