Publishing REST APIs in Mendix
Application Programming interfaces or APIs have become the standard way we get 2 computers or systems to communicate with each other on today’s web. I use the word “standard” here carefully because if you’ve worked with API development, you will know that they tend to be special and unique from project to project.
Most APIs you encounter will follow a set of rules known as Representational State Transfer or REST for short. In this blog, I will be focussing on REST APIs and how they work in Mendix.
Representational what now?
Simply put REST is a set of “rules” or protocols that governs the transfer of data. When an API follows these rules, we call it a RESTful API. The term REST was coined by Roy Fielding in his Ph.D. dissertation “Architectural Styles and the Design of Network-based Software Architectures” published in the year 2000. Don’t worry, you won’t have to read his dissertation to understand RESTful APIs — they have since become the de facto way to transfer data between systems on today’s web.
So what are these rules? The short answer is they vary between different APIs, but some universally accepted standards help make an API RESTful:
- It organizes entities or resources into unique URIs. URI stands for Uniform Resource Identifier. They are made up of 2 parts — a network location and the resource you are trying to access. The network location is commonly a website URL and the resource would be a table of data the website holds.
- It is stateless. This means you can call any API in any order, so long as you provide it with the correct details it requires. It also works well for high-performance apps as the server does not need to store the client’s session data.
- It uses HTTP methods. RESTful APIs come in different types or HTTP Methods. The way you want to interact with the data defines which type of method to use. (GET Retrieves data, POST Creates data, PATCH Updates data, DELETE Destroys or erases data, There are more but these are the *main ones*)
- Data payload is formatted using JSON or XML. Most REST APIs will format the data into JSON or XML payloads. Some other formats include HTML, markup, images, and documents (When an API supports multiple payload formats — you can specify the format you want to be returned using the “Accept” Header)
If you’re interested in learning more about the history and standards of REST, you can read more about them on Wikipedia.
Consuming VS Publishing
In API Development there is a difference between publishing an API for others to use and consuming one yourself. Mendix allows you to do both, you can consume REST APIs from other systems and publish your own, all within the same app. Some apps even call their own exposed services, a part of their architecture.
As my previous piece was about consuming, in this blog I will talk about Publishing REST APIs in Mendix.
It’s worth mentioning here that Mendix also supports OData APIs out of the box, which offers many advantages in certain scenarios, and has some powerful filters like skip, filter, order by, and select. However, this piece is about standard REST APIs and I would prefer to cover OData in my next blog — as it is an extensive topic and I would like to cover it in detail.
Creating an Exposed REST service
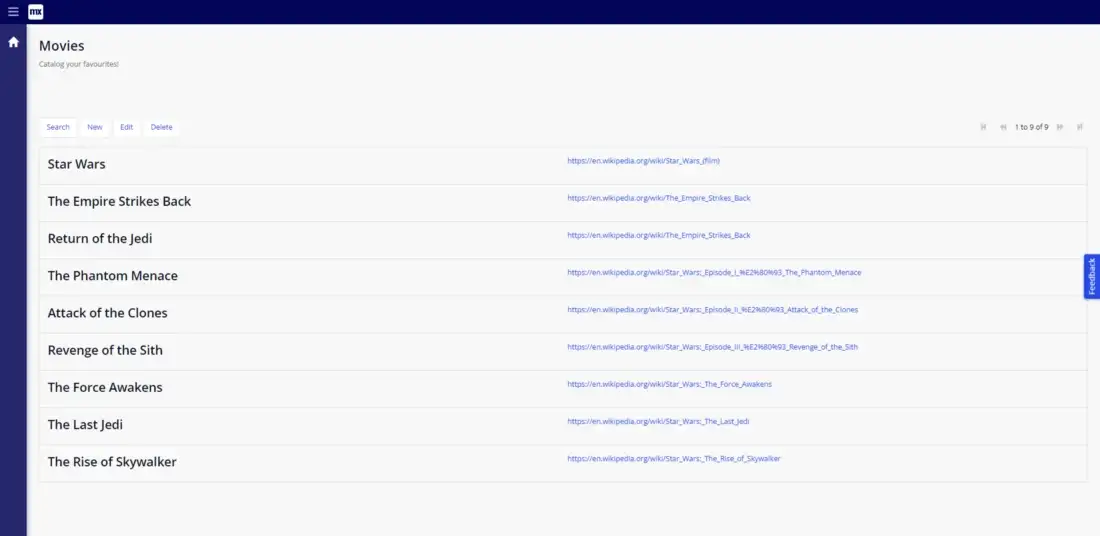
The best way to learn something is to do it — so this section will be a practical guide on how to publish a REST API. To work with a simple use case, I will show you how to create a simple collection of APIs — to interact with a simple movie catalog app that I have already built.

As you can see the app is just a home page displaying a list of movie titles and a link to the IMDB page for that film. Let’s fill it with data so we have something to interact with.
If we want to expose data from an entity in our domain model, we can simply select the entity, right-click on it, and choose to “Expose as REST Resource”
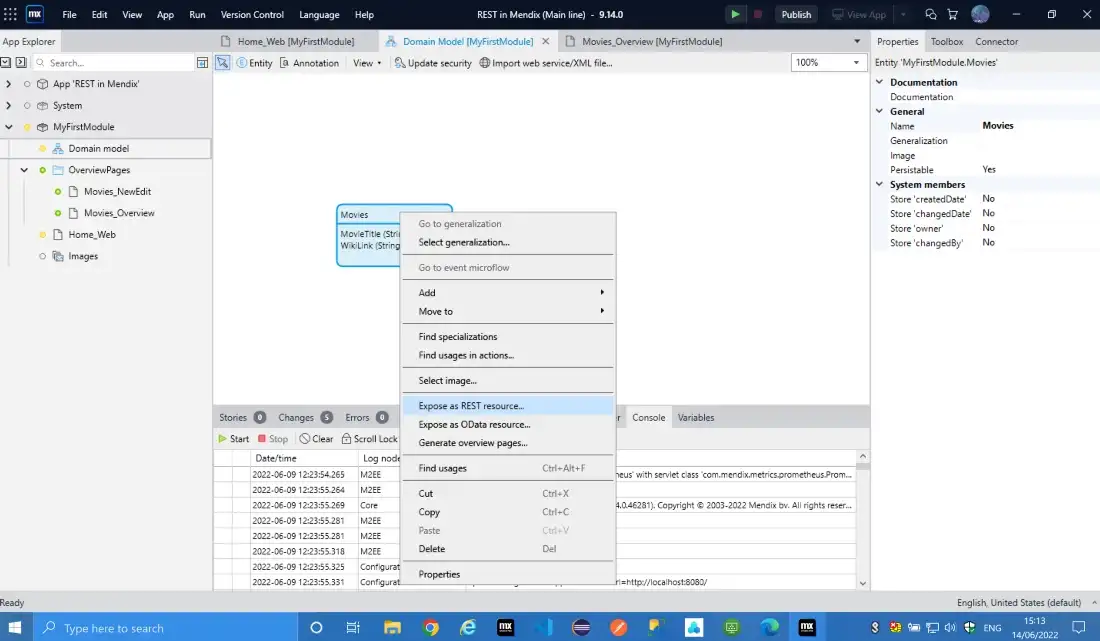
It will ask for a service in your project, but you can select to create a new one in any module of your project. For this example, I called mine Movielist.
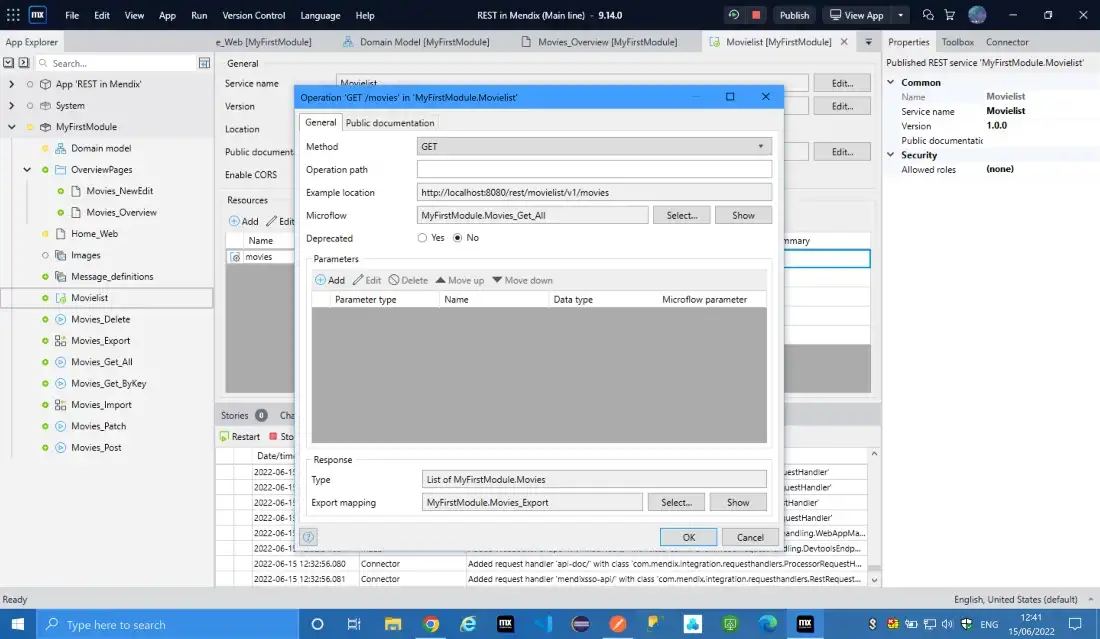
You will then need to decide on a key attribute. This is only needed if you want to interact with specific data and make use of HTTP methods like GET by key, Patch, and Delete

Once you click OK Studio Pro will take care of the rest and Generate all the mappings and logic needed to serve your entity as a REST API.
At this point, you can run your project locally and interact with the API via Postman or other API testing software.
Once your app is running your new services will be accessible(On your local development machine), and you will be able to see a summary of all your app’s published APIs at {Your_app_URL/api-doc/} which in my example is: https://localhost:8080/api-doc/
Testing the API with Postman
Once your app is running and you have Postman installed and open on the same machine, you can open up the details of the GET method which was generated for us by Studio Pro, by double-clicking on it.
You will notice, that there is a field called example location. This is an example because it is using the local host and runtime port of the local copy of your app. This will work fine for Postman, so we can copy this URI and use it there.
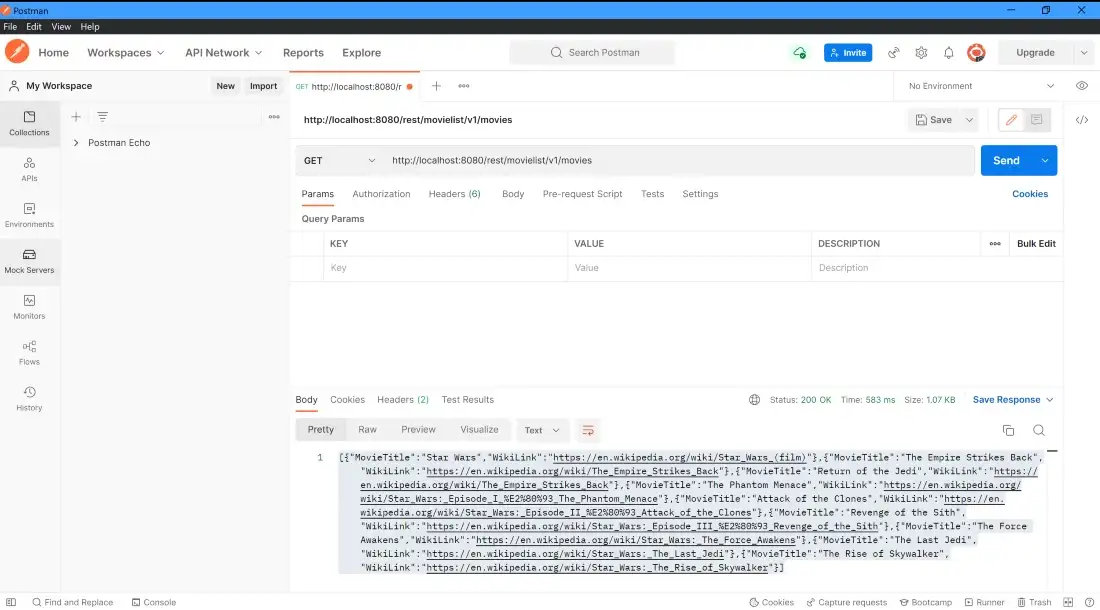
In Postman create a new request and paste in the URI in the request URI field and click send.

You should see the results returned in the window below, formatted in XML. Notice we also receive a status field which is 200 OK. This means the request was handled successfully.
Doing it yourself
Sounds easy — but what if I want more control over what the service does? Well, you don’t have to rely on Studio pro to generate it for you. You can also create an API completely from scratch and dictate every detail to your liking.
Above I mentioned that the auto-generated services we created will return the data in XML. This is fine for most scenarios, but what if you wanted to return the results in JSON instead?
We can open the microflow which handles the logic for this endpoint. In this case, its called “Movies_Get_All”
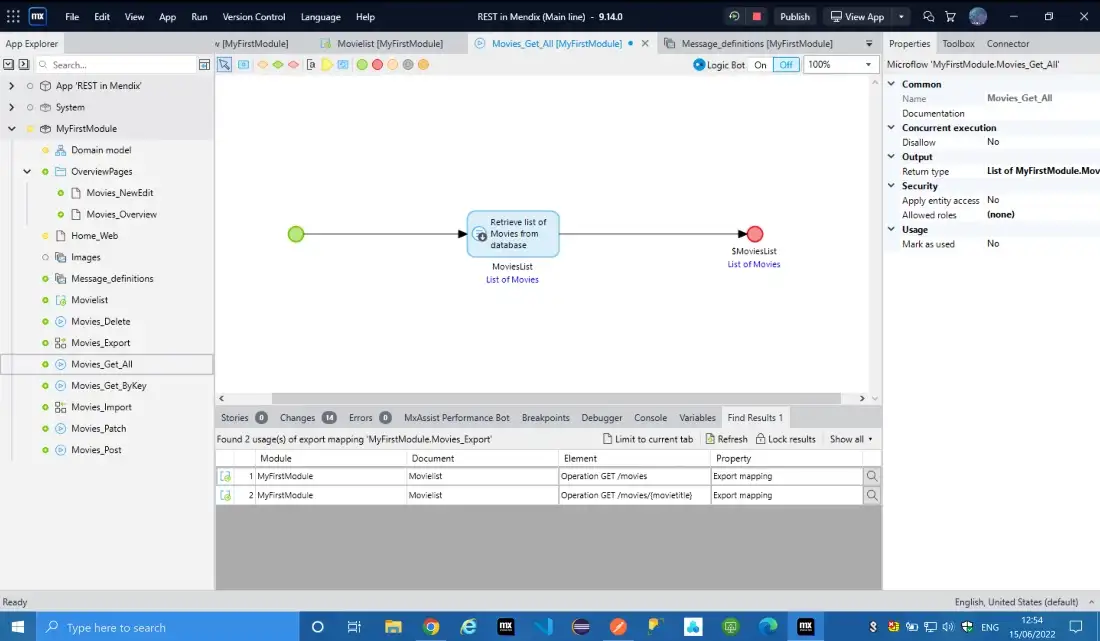
Right now the microflow simply retrieves all the records and returns them. The conversion to XML is being handled by the export Mapping connected to the REST service called “Movies_Export”.
To change the return type to JSON we can use the “Accept” header with the value “Application/JSON” as I mentioned above.
Without re-running your app, test it again in Postman without changing any details other than adding the “Accept” — “Application/JSON” header.
If all is successful you will receive the payload in JSON. Notice that the response time on the Service decreased by almost 400 ms (milliseconds) which is a considerable improvement in API response times. This is because JSON was specifically designed for the transfer of data. You can fine-tune services for even faster response times using optimization best practices such as applying indexes to speed up database retrieval times.
Building from Scratch
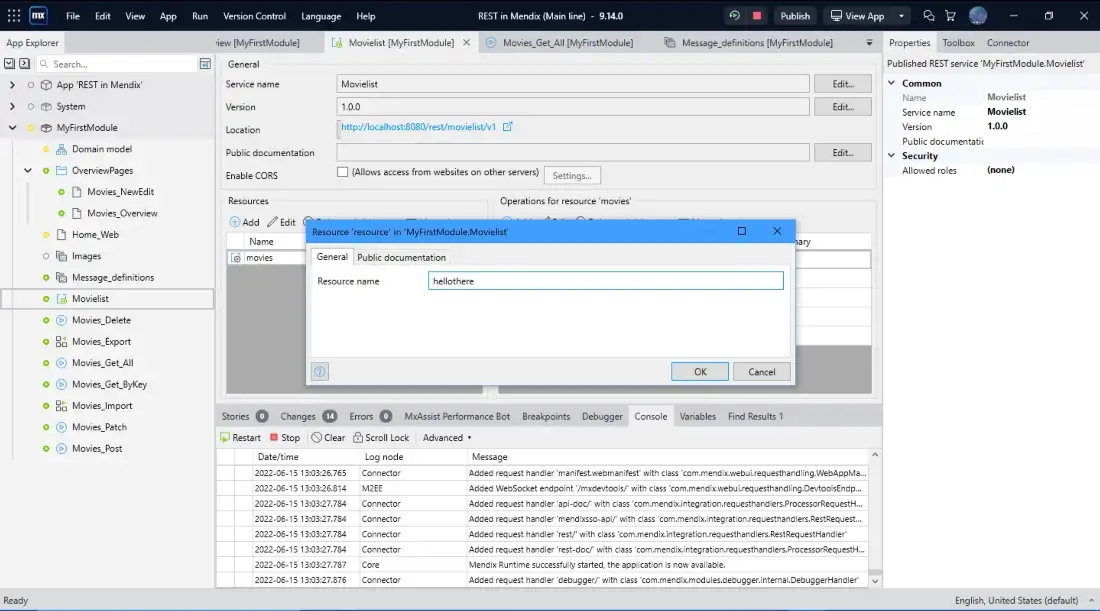
You can take this a step further and create all components of the API from scratch. We can try this now by building a new resource for this exposed service, which will specially greet users.
To start, click “Add” under resources on the exposed service, give the new resource a name — I called mine “hellothere”, and click “OK”.
Next, we need to create an operation for this resource. With the new resource selected click “Add” under “Operations”.
We will leave the Method as GET, and will not alter the Operation path — we only need to supply a microflow to handle the logic. Click “Select”, select where you want the flow, and click “new”, I used the auto-generated microflow name of “GetHelloThere”.
Open the flow, and double-click the microflow endpoint, so we can specify the data payload as a Custom JSON String.
‘{‘’greeting’’:’’https://www.youtube.com/watch?v=eaEMSKzqGAg”}’
Notice the quotes around the JSON key-value pairs of greeting and the Youtube link. These are not double quotes but rather 2 single quotes open and closing. This is to escape the string as Studio pro normally interprets quotes as a break in the string variable, this instructs Studio pro to include quotes within the response.
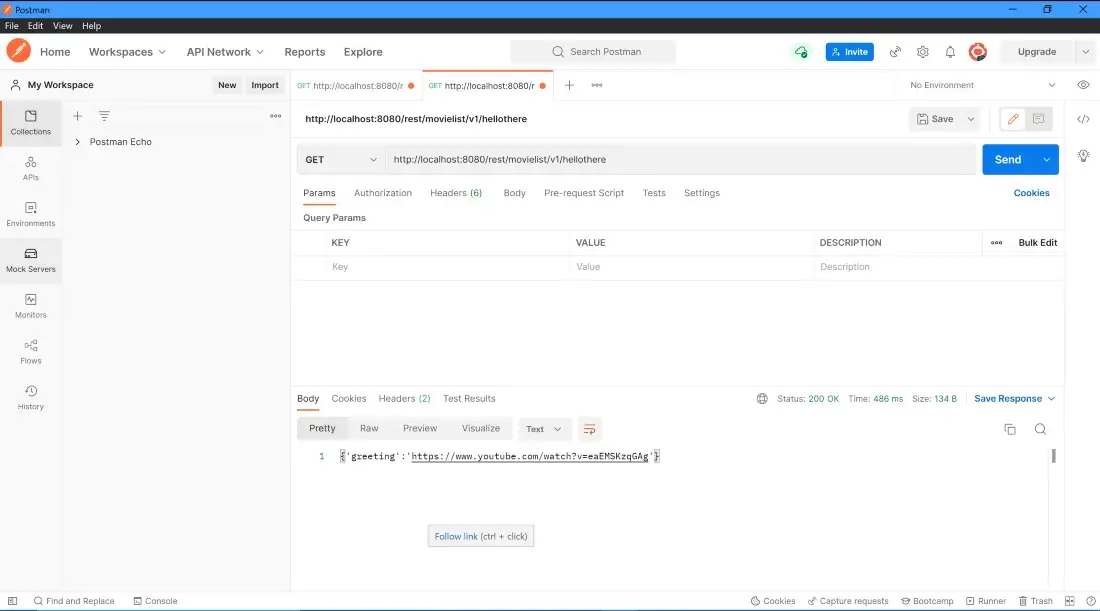
Now we can rerun our app and test the new service in Postman, and if all is well we should see our custom payload returned with a 200 OK status.
All set!
Now you know everything you need to start creating your very own REST APIs using Mendix. If you would like to learn more, like adding security, authentication, or custom headers to your service, make sure to head over to academy.mendix.com and learn. Look out for my next piece where I jump into the world of OData.