This is part two of a four-part blog series about building hybrid mobile apps with Mendix. Part one is about preparing your software, devices, and accounts. Read part one here. In this part I’ll go into building the actual app.
The picture below shows the high level steps to take when creating a mobile app with Mendix. I’ll discuss these steps one by one and give some practical tips.

I will use the Mendix World app as an example for creating a mobile app. It is an offline-capable app that shows information about the Mendix World event. The app lets you provide feedback and has voting functionality.
Model
From a model perspective, creating a mobile app is the same as creating a normal Mendix web app. However, there are a couple of things you need to be aware of.
The Mendix front-end is responsive, which means that the layout and elements will adjust to the screen size automatically so that the pages you model can be rendered on a mobile device. However, the use of a mobile device is very different than a desktop because the users use screen gestures instead of a mouse, the screen is smaller, the users expect different navigation, there is a different (slower) type of connection, and more.
Also, the goal of a mobile app is different than a normal web app, because it usually has a single purpose, like showing event information or performing inspections, instead of multiple functions.
To provide a better experience, use the mobile/tablet profile (enabled by default) which can be enabled in the project navigation. This navigation is used by the mobile app, so from one model you can create a channel for desktops, phones and tablets.
A requirement for the Mendix World app was that it needed to be able to work without an internet connection, which is supported by Mendix. For more information about offline mobile apps with Mendix, see Offline documentation and the Creating Offline Mobile Apps with Mendix webinar.
Modeling Tips
Here are some tips for when you’re creating a model for a mobile app:
- Keep pages simple for user friendliness and optimal performance
- For better performance, use close page/open page/new buttons instead of microflow actions if possible
- For phones, favor list views or template grids, which are more touch friendly, instead of data grids
- Limit the number of fields on a single page so that the user doesn’t have to scroll
- Limit the use of transparent CSS properties because it can negatively impact performance
- Use a separate module for the mobile pages and microflows to keep a better overview of your project
- When using the layout container for a phone app, add a class col-xs-N, where N is the column size.
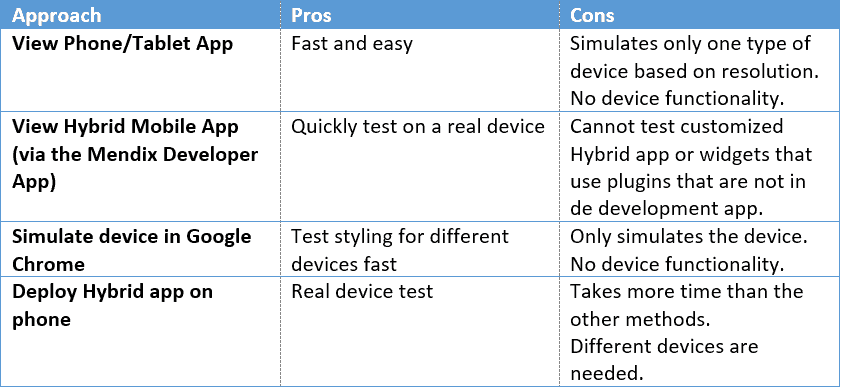
View and Test a Mobile App in Development
During development you also want to test and preview your mobile app. The Mendix Web Modeler with WYSIWYG functionality will be released soon, so you can directly see what your mobile app will look like. For now, there are several ways of viewing and testing your app, each with their own pros and cons.
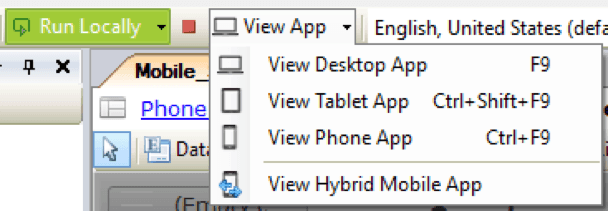
To view your app directly in your browser, select your view option in the View App menu from the Modeler.
You can easily test a Mendix project on your phone as a real app with the Mendix Developer App. Download the Mendix Developer App here:
Another quick approach is to simulate a device in Google Chrome by opening the Developer Tools (F12) and selecting the device icon in the top left corner.

I’ll discuss how to deploy apps to a specific device later.
Note that the testing of an offline-capable mobile app can be largely done in the browser because the Modeler checks for invalid constructions. To easily test your offline app in the browser, use the same homepage in the Phone (or Tablet) profile as in the offline profile. Note that eventually you should also test on real devices.
Generate a Hybrid Mobile App
As mentioned earlier, Mendix leverages PhoneGap Build to create a mobile app of your Mendix app. Via the Publish tab in your project in the Developer Portal you can click Publish for Mobile App Stores to go to the settings of your hybrid app. Here you can enter the name, app identifier, description, splash screens, and icons. Then, via the Publish for Mobile App Stores button you can go to the page where you can generate the Hybrid app. Before generating the Hybrid app, you can specify to which environment your app should connect. After this, you can send the app directly to PhoneGap Build or download it and upload it manually later.
Note that PhoneGap Build offers a free account that allows one app at a time.
Build the App
Once your app is sent or uploaded to PhoneGap Build, it automatically starts the build.
For Android this will work out of the box, and after the build you can directly download the Android binary (APK file) via a download link or a QR code. Note that this is a debug version meant only for testing and development purposes.
For iOS builds or production builds you need a developer certificate. For more information about obtaining a certificate, see:
Publish the Mobile App to App Stores
When your certificates are set up and you can build a production build of your app, you can publish your app to an app store like the Google Play Store and Apple App Store.
Android
To publish an Android app to the Google Play store you can download the signed APK from PhoneGap Build and upload it to https://play.google.com/apps/publish/.
iOS
To publish to the Apple App Store you need the Application Loader, which is part of Xcode (via Xcode / Open Developer Tool / Application Loader), which can be downloaded from the App Store. When you start the Application Loader you can add the PhoneGap Build IPA file and upload it to Apple iTunes Connect.
Beta and Acceptance Testing
Via PhoneGap Build it is also possible to make the link to the app publically available by enabling Allow public sharing via the settings tab of the application.
Android users should enable the Unknown sources option (Under Settings – Security) before the app can be installed. Note that for iOS apps, your device ID must be added to the provisioning profile. See Exporting Your App for Testing (iOS, tvOS, watchOS).
For iOS apps, you can also use TestFlight for providing test releases to a group of users. This is very useful when doing beta/acceptance testing because when you upload a new release it is automatically sent to the test users. For more information about TestFlight, see https://developer.apple.com/testflight/.
This covers the basics for the mobile application lifecycle with Mendix. Next week I will explain more about the Hybrid app, how it works, and how you can create your own mobile widget. Have fun with building your mobile app with Mendix!