
Mendix is all about the democratization of technology. This message was at the heart of the keynote given by Siemens AG CEO Roland Busch at this year’s Consumer Electronics Show (CES) in Las Vegas.
Roland shared how generative AI is becoming much more broadly accessible thanks to the Amazon Bedrock Connector. The connector, born from a strategic alliance between AWS and Mendix, offers access to a variety of foundation models from different services.
But it’s not just generative AI that’s now easier to use in your Mendix application. There’s a wide range of connectors for AWS services available in the Mendix Marketplace.
These connectors rely on the AWS authentication connector (recently upgraded to version 3.0.0). Since several AWS connectors share the same dependencies and rely on a similar request structure, these features are now centralized for ease of use. The accompanying architectural changes also allow you to edit the endpoint URL (used to consume the AWS API).
Typically, the endpoint URL is automatically set to a service- and region-specific default. But if you want to deploy your application on-premises, you may want to connect to a different endpoint. And there are even more cases where you might prefer to connect to a local or Virtual Private Cloud endpoint.
Why change the http endpoint URL?
There are four major benefits that come with changing the endpoint URL.
1. Increased security
Say you’ve decided to deploy your Mendix application on-premises, and you need the Amazon web services used in your application to adhere to the same security policies. By changing the endpoint URL, you’re no longer restricted to the services deployed in the AWS cloud. Instead, you can connect to any endpoint you prefer.
2. Decreased cost
When you connect to a service that isn’t hosted on an AWS server, you don’t pay for server usage. This can be a real money saver if, for example, you’re using a local service for testing and you don’t need all the benefits of a cloud service.
3. Better control over your test environment
Using a local service for testing gives you complete control over your environment. It also allows for even faster iterations (if you would otherwise need to deploy the application), instant feedback, and more efficient debugging.
4. No internet required
You don’t need an Internet connection to connect to a local endpoint. If you’re using a local endpoint, you don’t even need a network connection, which can be useful if you want to test your application on the move.
(Note that there is a trade-off between local and web service instances. In the Amazon DynamoDB example that follows, the local database is not shared. As a result, you cannot mirror all production scenarios locally per design. There are other differences between local and web service instances that you can read about here.)
So now that you know why you would want to change the endpoint URL, let me show you how using an example with Amazon DynamoDB.
How do you change the http endpoint URL?
To follow this tutorial, you need a Mendix application that has AWS Authentication v3.0.0 (or later) and Amazon DynamoDB implemented as documented here.
You will also need to have a local instance of DynamoDB running. The AWS documentation provides guidance on how to deploy DynamoDB locally, either as a .jar file or in a Docker container. Simply choose your preferred approach and follow the documentation to create a local instance.
Either way, once you have DynamoDB successfully installed, you can access the database using the AWS CLI as described below.
1. Access the DynamoDB with the AWS CLI
It’s not necessary to use the AWS CLI to connect your Mendix application to the local DynamoDB instance. However, the AWS CLI is a nice way to examine the database using the command prompt window (and to make sure the database is running and looking as intended).
If you don’t already have the AWS CLI installed, you can download it here.
Try out this prompt to list all existing tables in the database:
aws dynamodb list-tables --endpoint-url https://localhost:8000
DynamoDB uses port 8000 (unless, for example, you specified it differently in the Docker compose file). If your database is still empty, you will see something like this:
{
"TableNames": []
}
For example, you can add a new table called ‘Music’ with the following command (for Windows):
aws dynamodb create-table --table-name Music --attribute-definitions AttributeName=Artist,AttributeType=S AttributeName=SongTitle,AttributeType=S --key-schema AttributeName=Artist,KeyType=HASH AttributeName=SongTitle,KeyType=RANGE --provisioned-throughput ReadCapacityUnits=5,WriteCapacityUnits=5 --table-class STANDARD --endpoint-url https://localhost:8000
Documentation on how to create a table with the CLI can be found here.
If you again list all tables in the database, the new table with the name ‘Music’ should have been added:
{
"TableNames": [
"Music"
]
}
Use the CLI to play around with the local database if you like. You can find more commands here. Just make sure you always add the ‘–endpoint-url’ parameter so that the local database is accessed.
Instead of adding data manually you can also make a backup of the remote DynamoDB and use it to restore your local database as described here. This approach can even give you a rough idea of the performance of the remote instance.
2. Connect the local database with your Mendix app
Once you have configured the AWS Authentication Connector in your application with either static or session credentials, you’re ready to go. It’s not necessary to use valid credentials unless you intend to switch between local and remote databases and don’t want to set up authentication later.
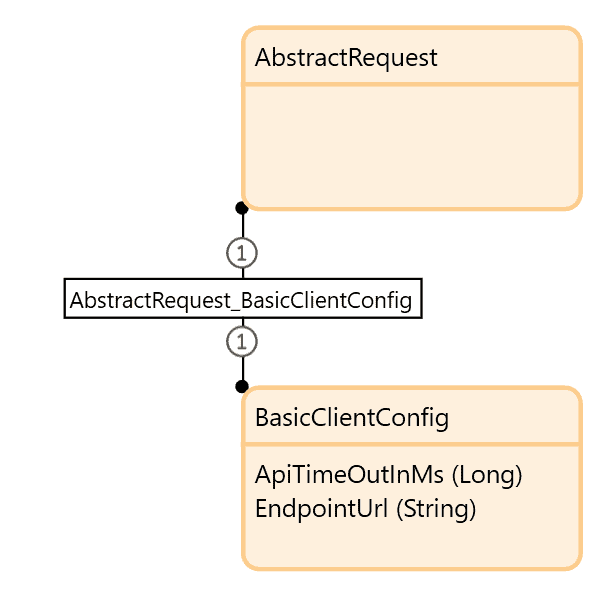
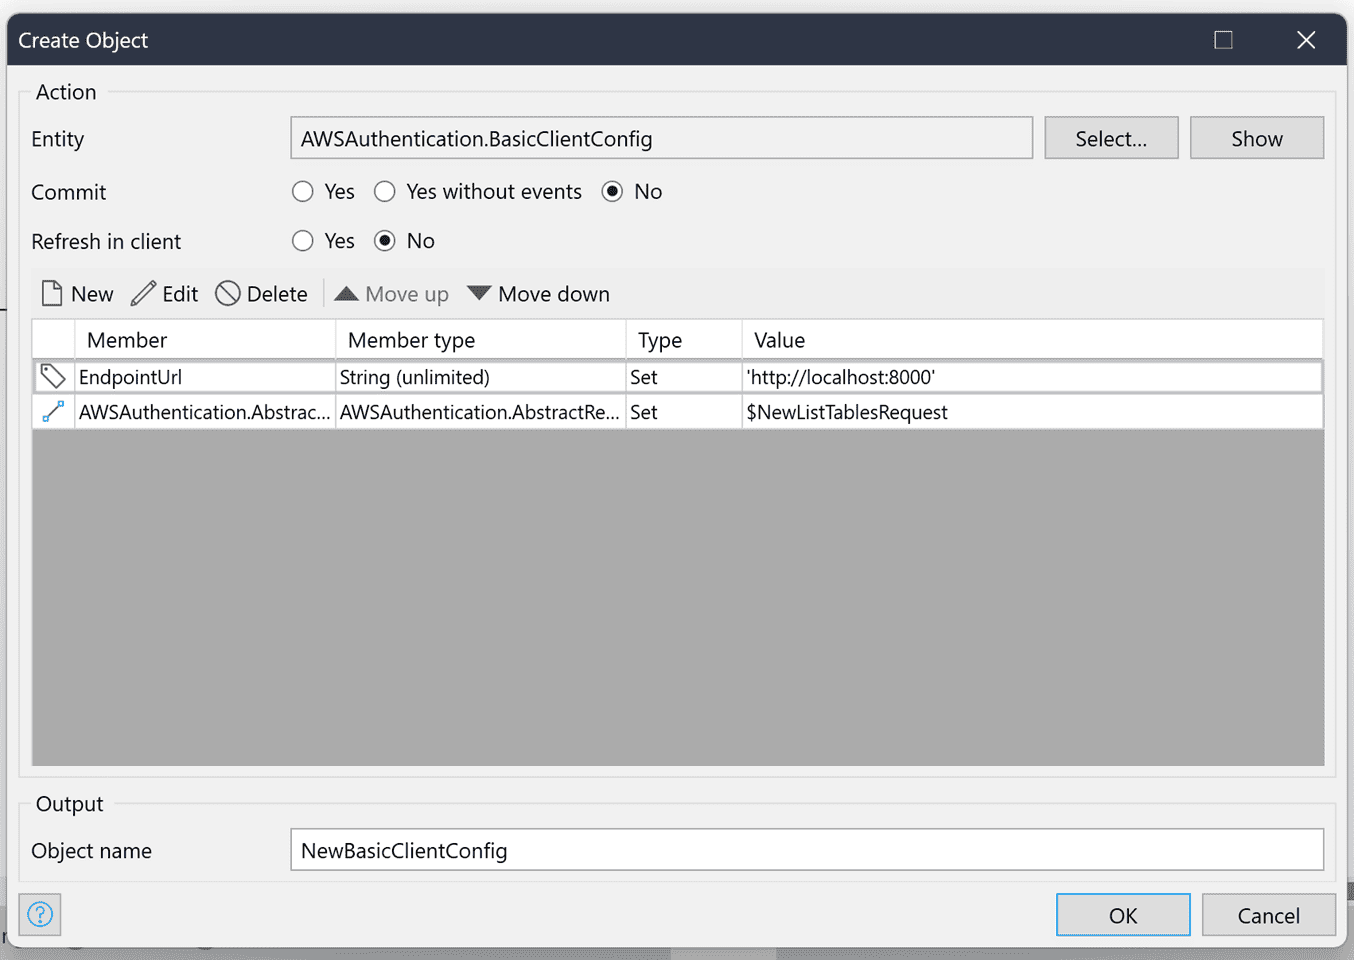
Since all request entities in our connectors inherit from the AbstractRequest entity, as of the AWS Authentication Connector 3.0.0 release, it’s possible to override the endpoint URL. Simply create a BasicClientConfig object with the correct endpoint URL value and associate it with the request.
This is what the two entities look like in the domain model of the AWS Authentication connector:
Below are three microflow examples of how to change the default http endpoint for an operation. If you are not sure how to create a suitable request, please refer to the Amazon DynamoDB connector and Amazon Dynamo DB documentation for more information.
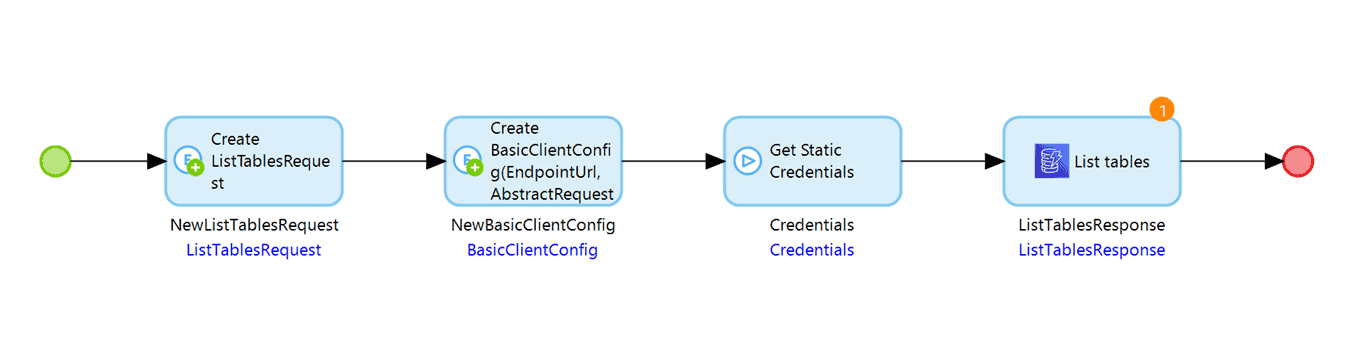
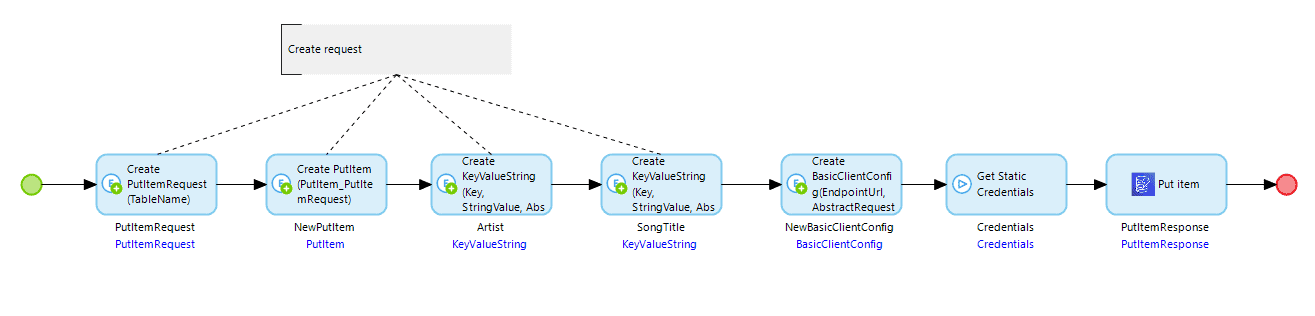
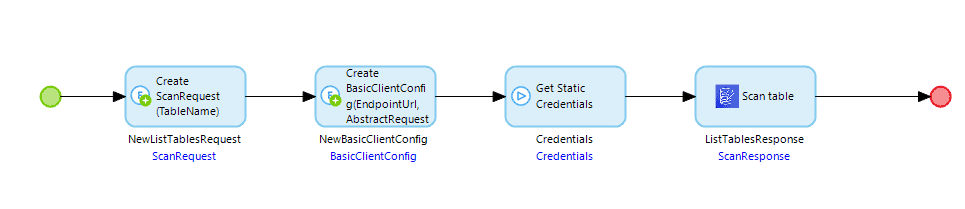
The same recipe works for any operation on any of our connectors where you want to address an endpoint different from the default.
Whether you run the .jar file in the downloaded folder or use the Docker container, your Mendix application should now be connected to the local database. Have fun testing it out!
If you are happy with how your application works locally, simply remove the BasicClientConfig object or delete the attribute value. The application will instead connect seamlessly to the remote instance. (Don’t forget to configure your AWS credentials in the settings! 😊)
Conclusion
With the new Authentication Connector feature, you’re no longer limited to the default endpoints. You can choose to connect to an on-premises private cloud or to a local endpoint and not have to settle for a compromise. Connecting to a different endpoint can further enhance your project in terms of cost and by providing a controlled and server-independent test environment.
Finally, changing endpoints is really easy with our connector!