A Practical Guide to the Agile Product Canvas

Once upon a time, a man of high regard said, “By failing to prepare, you are preparing to fail.” That man was Benjamin Franklin, and what he said is still very much true today.
Most of you are familiar with the Scrum methodology in combination with Mendix as a platform. And probably most of you are familiar with the fact that Scrum doesn’t say anything about how to prepare for your products. However, even in an Agile context, good preparation is still key to success.
Mendix has had great success with the Product Vision and Product Canvas methodology to prepare our projects and get ready for the first sprint. Let’s dive into the Product Canvas and how to use it.
What is a product canvas?
Before any work for a new product starts, you need to understand its purpose, audience, and goals. That’s where a product canvas comes in.
According to Miro, a product canvas is a planning tool that combines Agile methodologies and UX principles to help teams build products that provide great user experiences.
Roman Pichler, the inventor of the product canvas, describes it as “a simple but powerful tool that helps you create a product with a great user experience and the right features. It combines agile development and user-experience design by complementing user stories with personas, storyboards, scenarios, design sketches and other UX artefacts.”
How to plan for change with the product vision and product canvas
A common misconception in relation to Agile methodologies is that no preparation or documentation is needed and that the process will be magically guided by the outcome and feedback of every sprint.
This is of course not true. The correct Agile Manifesto statement advises “Responding to change over following a plan.” What that means is that you should have a plan that is easily adjusted for change. Which leads to adequate preparation.
Adequate in this context means the following:
- Getting ready to deliver business value
- Forming a clear vision for the project
- Enough preparation to enable forecasting
- Just enough detail to get started with the first sprint
Anything beyond that is overdoing it. Remember, we’re trying to create a “plan” that is easily adjusted for change. The bigger and more detailed the plan, the more rigid and harder it is to change.
While the Product Vision and Product Canvas methodology are advocated by Mendix due to the successes we’ve had, it is by no means the only methodology out there. Even when following different methodologies, such as a “Sprint Zero,” this blog post will be of great value, for it offers insight into the types of questions that should be answered to prepare for a project.
Take a quick glance at a product vision board
The first step is to create a high-level vision for the project. This is done using the Product Vision Board. Because this part is pretty straightforward, we won’t go into deep detail in this blog post.

Product Vision Board
Basically, the Product Vision Board answers the following questions:
- Why are we creating the application?
- Who is our target group of users?
- What are their needs?
- How do we envision our product to meet those?
- What are our business goals in doing so?
The Product Vision Board also serves as input for the Product Canvas. Both are the responsibility of the Product Owner. However, that doesn’t mean that they have to do all the work. It is highly advised to use the Scrum team and experts where needed.
The product canvas and its layout
After having defined your Product Vision, it’s time to figure out how to realize that vision. It will result in being able to answer the following questions:
- Who are our users?
- What are their tasks and how do we envision them completing them?
- What are relevant high-level constraints?
- What will the design be like in broad lines?
- What are our epics and ready user stories to accomplish this?
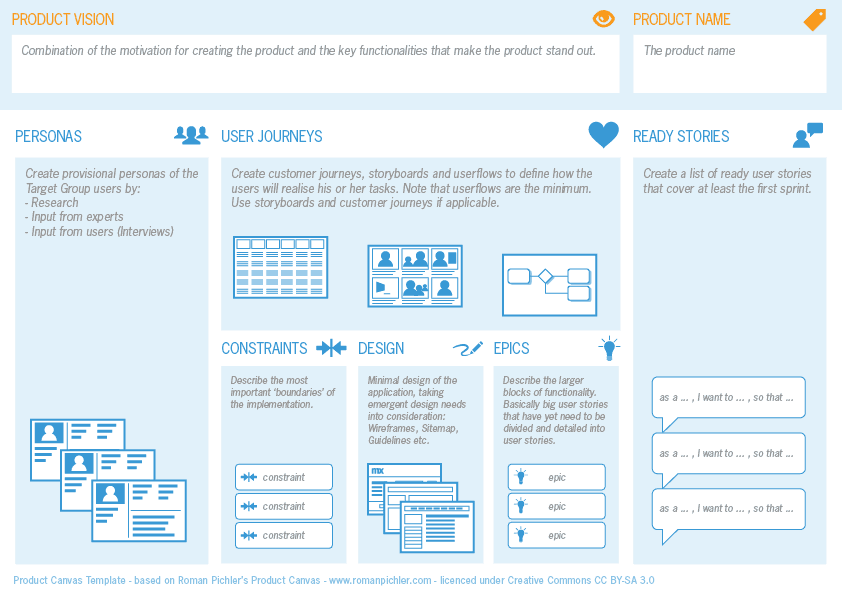
Product Canvas
When comparing the questions that will be answered to the Product Canvas it becomes clear that the actual layout of the Product Canvas does not tell the story in a chronological way. But to fully understand how to create a Product Canvas, that chronology is very important.

The chronological layout of the Product Canvas
The above image shows the logical steps to take to create a Product Canvas. One step leads to the next, starting with a recap of the Product Vision, the research into the actual users of the product, and the creation of Personas, all the way to the creation of Ready Stories for the first sprint.
Note that the Constraints are drawn parallel to the creation of User Journeys. It is also possible to do it beforehand as some constraints may or may not affect the User Journeys.
7 steps to create a product canvas
Step 1: Product vision and name
The Product Vision box is nothing more than a summary of the Product Vision Board. A good way to get there is to ask yourself how you would describe the most important parts of the vision in only one or two sentences.
The most underappreciated element of any (company internal) application development process is the name of the application. It’s rare to start the first sprint of a project in which a good application name is already present. Fair enough, coming up with a good name is hard work. It should be catchy while still having a strong link with the actual application. Not an easy task.
The biggest reason for coming up with a good name at the start is the positive effect it’ll have on everyone involved in the project. Like personas, people will start to develop an emotional bond with the actual application they’re creating or helping to create. And, if not done in the beginning, it’s just one of those details that never finds its way to the top of the priorities list if it’s not a company external application.
Step 2: Creating personas
Before we can begin to contemplate how to develop functionalities, it’s vital to understand for whom and why we’re developing these functionalities. This is done by doing some user research leading to Personas.

Example of a Persona
Basically, a Persona boils down to an archetype user that is based on research. Important to note is that the methodology of using Personas to model a group of users is not an unproven creative trick that marketers and UX designers use but is, in fact, based on scientific research. Both in content as well as the effectiveness of their usage. They help in building empathy, providing focus for the project, communicating and forming consensus within the project team, and helping to make and defend decisions.
On top of that, the research part of this step will help in validating all the assumptions that were made in creating the Project Vision. Remember that in the Project Vision we’ve stated who the Target Group of users is and what their needs are. This step is almost always done without talking to a single user. This is not necessarily bad, but it does require a check of the assumptions that have been made. Like solving bugs, the amount of time and effort needed to alter the application at the beginning of a project is 10 to 100 times greater than after taking it into production.
When dealing with a fast-paced Mendix project, one of the challenges is a lack of time, making the creation of (traditional) personas that are based on quantitative scientific research impossible. Luckily, provisional personas offer a solution in which a very limited number of interviews are done as research. Admittedly, they only serve as a starting point and are less valuable than traditional personas, but they can be created in one or two days, making them very attractive for Mendix projects.
Step 3: Creating user journeys
At this point, you and your team know exactly who your users are, what their needs are, and what they’re trying to accomplish with the application you’re going to build. The next step is to bridge the gap between your Personas and their tasks and how the application is going to work. User Journeys offer a great way to do this.
You can define different levels of User Journeys that each have their own advantages and disadvantages.
1. Customer Journeys
Common in the world of marketing, mapping out the total experience in which the application has its place (and often is but a part of the complete journey). Chances are that the Customer Journey has already been mapped out. If so, it should be used as part of the preparation.

Example of a Customer Journey
2. Storyboards
Storyboards are a much more concrete method that very much resembles graphic novels or movie storyboards. They offer a great way to not only define the way a user will interact with the application, but also add context if needed.

Example of a Storyboard
Note that the example above offers a lot of context. Which is good, but not always necessary. It’s also possible to roughly sketch out screens as the drawings and add text and arrows to tell the story. It’s also good to point out that a storyboard doesn’t have to be “pretty”. It needs to help design the journey and communicate ideas within the team.
3. User flows
At the lowest level of abstraction are user flows, which are very similar to microflows. They schematically map out the flow a user can take to accomplish a task.

Example of Userflow
The creation of user flows is considered a minimum as they’re easy to create (even PowerPoint is a great tool to use for this) and are very powerful in designing the experience together with aligning the entire team on how to get there.
We recommend creating storyboards because they offer much more context and make it easier to design the experience, because some (less relevant) details can be skipped. Those details can be mapped out in a later stage using user flows.
A practical note: don’t map out every User Journey, but focus on the most important ones. After all, it’s an agile way of working, meaning: don’t overdo the preparation.
Step 4: Defining relevant constraints
As I mentioned before, the actual moment for creating constraints is not set in stone. Just keep in mind that some constraints can influence User Journeys and hence should be created before or in parallel with User Journeys. A good example would be the constraint of only being able to use networking features inside of the physical office, making the location of a user a very important part of any User Journey.
A tip for defining constraints is to keep them relevant. A list of a hundred constraints is no longer a productive tool for the preparation but a counterproductive obstacle. There will be time enough in the actual sprints to define and deal with constraints.
Step 5: Design
The design section is the first step in translating the User Journeys to the application that needs to be built. The actual activities of this step can vary wildly depending on the type of application, the type of customer, and the maturity of that customer in terms of using the Mendix platform.
In general, we can identify at least four tools that have proven to be very effective.
1. Sitemaps (or app-maps)
A tool that is used extensively in website design and development but a bit less common in application design and development. Basically, mapping out the (page)structure of the application.

Example of a sitemap
2. Wireframes
Design sketches of actual screens ranging in fidelity as well as a level of abstraction. This is familiar to most people. Since this stage is meant as preparation for the project, it’s important not to overdo it. Focus on designing a system rather than individual pages, and find a balance in already designing the broad lines of the entire User Experience as well as preparing for the first sprint. We can define three levels of fidelity, each with its own advantages and disadvantages: Low-fidelity, medium-fidelity, and high-fidelity.

Example of wireframes and different levels of fidelity
Similar to User Journeys, low fidelity is considered a minimum, and at least a couple of medium-fidelity wireframes are recommended. Although best done by a UI or UX designer, everyone can create low-fidelity wireframes. There are great tools out there, like Balsamique, to do just that, and even pen and paper or a whiteboard can be enough to get going. It’s always faster to try out different designs and solutions with wireframing than to wait for everything to be modeled and then change it. On top of that, a good wireframe will tell you exactly how to model that specific set of pages.
3. Style tiles
The visual language of a UI is very important to both the usability and the branding of the application. Trying to create that visual language together with the best User Experience of the application can be a bit much. Both in the design phase and communicating and discussing that design with team members or stakeholders. The technique of using style tiles is based on designing the visual language of an application without actually designing that application.

Example of a style tile
As you can see in the example, the design of the style tile clearly defines the visual language and branding of the application without showing us the actual application. A very quick and effective method to use. Especially if some experimentation is still required that can lead to multiple style tiles from which one is chosen.
4. Design / Corporate identity guidelines
Most companies will already have guidelines and assets that deal with the design of either online websites or applications. If present, they should definitely be included in the design section of the Product Canvas.
Step 6: Creating epics
At this point you’ve covered and researched your users, know what they’re trying to accomplish, have designed the way they can achieve this by using the application and even created a design framework. You’ve got all the info you need to create your epics, the first step in translating your application design into user stories.
Note that epics can be seen as very large user stories that can either not be completed in a single sprint, or need to be divided into separate user stories in order to be able to create “ready” user stories from them. Most of the time, an epic will describe a larger feature that needs to be cut up in sections to realize it.
An example would be the epic “Enable our users to buy their groceries online”. This epic can be divided into user stories dealing with selecting groceries from the shop, setting a delivery address, and paying for the groceries using an online payment option.
The reason why creating epics instead of just user stories is a good idea is that it saves a lot of time as well as adds focus to the project. The creation of ready user stories takes up a lot of time. On top of that, a backlog that comprises 500 user stories is not easy to work with. It’s better to have 10 epics and 20 user stories.
Step 7: Creating ready stories
The last step in creating your Product Canvas is the creation of ready user stories that at least cover the first one or two sprints.
Note that a ready user story means that it is compliant with the definition of ready. As it’s the first time that any ready user stories will be delivered it’s a good idea to involve (if already available) the entire scrum team in this step.
Mendix’s Positive Experiences With Using the Method
At Mendix, we’ve had great experiences with using the Product Vision & Canvas methodology. We’ve used it for a range of projects to kick off the project. We’ve even used a compact version of the Product Canvas for a Proof of Concept project that only lasted one week where we included storyboards, sitemaps, wireframes and style tiles.
Some of the positive effects we’ve had at Mendix, gathered from feedback received from Project Managers, Scrum Masters, and Developers:
- Even a limited amount of preparation work greatly increases the quality of the end-result
- The assets from the Product Canvas provide the focus needed to complete an application in less time
- First time right effect: every step of the Canvas consists of research, experimentation, design, and reflection. Improving the starting point of the development phase. Which in turn leads to almost no rework during the project
- Increased communication and efficiency in the team
Due to these positive experiences the usage of a preparation phase and, more specifically, the Product Vision and Canvas methodology is now considered best practice.
How to use a product canvas
Although this blog post describes the Product Canvas in great detail, one of the important lessons is actually the benefit of a preparation phase before starting the first sprint. The given method works well with Mendix projects, but in the end, it’s all about the content, the questions that are answered with the result of the preparation phase, and the benefits this will have on the rest of the project.
Another interesting detail is that some teams choose to keep on using the Product Canvas or parts of it throughout the project instead of just preparation. Using a part of a wall in their war room as a Product Canvas.
Mendix teams have used user flows as a part of the definition of ready of user stories. The reason for this was that the schematic way of the user flow was much faster and more efficient for the team to fully understand the user story than the textual content of the user story.
But most importantly, it doesn’t matter if a project is small or big, of low complexity or high complexity, the right amount of preparation will always result in a more focused and efficient development with an increase in the quality of the actual application.
Download product canvas templates
Download product canvas and vision templates: