Build Widgets in Mendix With React Part 5 — Running WebAssembly in Mendix
Mendix enables you to create custom React widgets and use them in your app, thereby extending the front end of your application in whatever way you want. But did you know you can also extend your front end with C, C++, and Rust?
This is blog 5 in a multi-part series. The previous blogs can be found here:
- Build widgets in Mendix with React — Part 1 — Colour Counter
- Build Widgets in Mendix with React Part 2 — Timer
- Build Widgets in Mendix with React Part 3 — Kanban
- Build widgets in Mendix with React Part 4— ArcGIS Maps
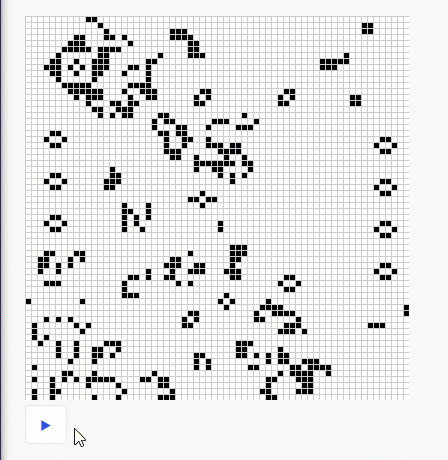
What we are building
The Game of Life! No, not the classic board game… but a cellular automation one-player game. With a few simple rules, you can build a universe of living and dying cells creating cool, repeating patterns.

Before we get started — Wasm the heck‽
So we are going to build out a game where we are going to leverage code written in Rust and compiled to WebAssembly.

But what is WebAssembly? Well, it’s a small, fast, efficient stack-based virtual machine that allows you to execute bytecode compiled from code written in C, C++, Rust, Python, or others.
But what does this actually mean?
Well, WebAssembly essentially is compiled down to a binary format which is smaller to load and lightning fast to run. You can also leverage libraries from popular programming languages and convert existing code to work in your browser, like Doom 3.
So this is cool for games, but does anyone actually use this?
The short answer is yes. Large-scale web apps like Figma and Zoom are mostly written using WebAssembly. But beyond this, a whole host of useful npm packages leverage .wasm (compiled WebAssembly) files, including the ArcGis library we used in the most recent blog.
Getting Started with WebAssembly
There’s many different ways to create WebAssembly files, including compiling code using Emscripten. For this example, we will use code we have written in Rust.
To write the Game Of Life in WebAssembly and publish it as a node package we can easily use in our widget, I followed this tutorial. The tutorial is an excellent resource for getting started with WebAssembly, and if you want to get familiar with Rust and WebAssembly, I would highly recommend it.
The output of this tutorial is a node library consisting of a Wasm file, containing our compiled Rust code, a javascript file defining our interface with our Wasm file and a types file for using our code with Typescript.
Once we have our npm library, we can run our code in Mendix using a Pluggable Widget.
Widget Time
We start by scaffolding our widget yo @mendix/widget gameOfLife and renaming our components. We then import our WebAssembly npm library npm i wasm-game-of-life-joerob319 (or your library you created yourself).
From our child component, we can begin to use our Wasm file. For this, we need to import our file and use the types that are provided in the npm library:
import * as wasm from "wasm-game-of-life-joerob319";
import { Universe, Cell, wasm_memory } from "wasm-game-of-life-joerob319";
Next up, let’s load our file and create our Universe of cells when our component initially renders in useEffect.
const initiateWasm = async () => {
  wasm.default().then(() => {
    setUniverse(wasm.Universe.new());
  });
};
useEffect(() => {
  initiateWasm();
}, []);
Rendering
Our WebAssembly file is now loaded. We need to think about how we will display our Universe on our page.
The first thing to do is to calculate how big our universe is going to be in pixels. Luckily we can access how wide and high our universe is in the number of cells, from our WebAssembly and then store them in state like this:
const [width, setWidth] = useState<number>();
const [height, setHeight] = useState<number>();
useEffect(() => {
    if (universe) {
        setWidth(universe!.width());
        setHeight(universe!.height());
    }
}, [universe]);</number></number>
We are going to want to display our universe on our screen. To do this, we will leverage a canvas – a powerful tool that allows you to use Javascript to draw.
return (
    <div>
        <canvas ref="{canvasRef}"></canvas>
    </div>
);
We then update our useEffect to set the height and width of the canvas. To do this, we need to use our canvas reference and define a CellSize.
const canvasRef = useRef(null)
const CellSize = 5;
    useEffect(() => {
        if (universe) {
            setWidth(universe.width());
            setHeight(universe.height());
            const canvas = canvasRef.current!;
            if (universe.height()) {
                canvas.height = universe.height() * (CellSize + 1);
                setHeight(universe.height());
            }
            if (universe.width()) {
                canvas.width = universe.width() * (CellSize + 1);
                setWidth(universe.width());
            }
        }
    }, [universe]);
Time to draw some pretty pictures! Let’s start with our grid:
const GridColour = ‘#CCCCCC’
    const drawGrid = () => {
        const canvas = canvasRef.current!;
        const ctx = canvas.getContext("2d")!;
        ctx.beginPath();
        ctx.strokeStyle = GridColour;
        // Vertical lines.
        for (let i = 0; i <= width!; i++) {
            ctx.moveTo(i * (CellSize + 1) + 1, 0);
            ctx.lineTo(i * (CellSize + 1) + 1, (CellSize + 1) * height! + 1);
        }
        // Horizontal lines.
        for (let j = 0; j <= height!; j++) {
            ctx.moveTo(0, j * (CellSize + 1) + 1);
            ctx.lineTo((CellSize + 1) * width! + 1, j * (CellSize + 1) + 1);
        }
        ctx.stroke();
    };
The next step is to draw out the cells. Within our WebAssembly file, the cells are stored as either alive or dead. To display them in our widget, we need access to the Wasm memory.
One thing important to understand about Wasm memory is that it is linear. This means that we can access it in JavaScript essentially as an array of bytes (unsigned 8-bit integer).
So we create an array from the memory buffer, starting at the point where the Wasm tells us the current cells are located, and we take the length of all of the cells in the universe, which is the same as the number of cells high times the number of cells wide.
        const cellsPtr = universe!.cells();
        const memory = wasm_memory();
        const cells = new Uint8Array(memory.buffer, cellsPtr, width! * height!);
This can then be translated to our canvas like so:
    const getIndex = (row: number, column: number) => {
        return row * width! + column;
    };

    const DeadColour = ‘#FFFFF’
    const AliveColour - ‘#3a34eb’

    const drawCells = () => {
        const cellsPtr = universe!.cells();
        const memory = wasm_memory();
        const cells = new Uint8Array(memory.buffer, cellsPtr, width! * height!);
        console.log (cellsPtr)
        console.log (cells);
        const canvas = canvasRef.current!;
        const ctx = canvas.getContext("2d")!;
        ctx.beginPath();
        for (let row = 0; row < height!; row++) {
            for (let col = 0; col < width!; col++) {
                const idx = getIndex(row, col);
                ctx.fillStyle = cells[idx] === Cell.Dead ? DeadColour : AliveColour;
                ctx.fillRect(col * (CellSize + 1) + 1, row * (CellSize + 1) + 1, CellSize, CellSize);
            }
        }
        ctx.stroke();
    };
We use our getIndex to convert our row and column to a location in our 1D array created from our Wasm memory. Then fill in each square with the appropriate color, depending on if it is alive or dead.
Animating
Now we can start animating our widget. We want to let our user stop and start our animation.
const [isPaused, setIsPaused] = useState(true);
    const btnClick = () => {
        setIsPaused(prevState => !prevState);
    };
    return (
        <div>
            <canvas ref={canvasRef} />
            <div className="btnContainer">
                <button onClick={btnClick} className="btn mx-button">
                    {isPaused ? "▶" : "⏸"}
                </button>
            </div>
        </div>
    );
To animate, we are going to create a render loop that makes use of the requestAnimationFrame() to create a loop to animate our grid. We use the universe.tick() function to recalculate all of the cells, then draw the canvas.
let animationId: number | null = null;
    const renderLoop = () => {
        universe!.tick();
        drawGrid();
        drawCells();
        animationId = requestAnimationFrame(renderLoop);
    };
We then call this using useLayoutEffect so that it updates before the browser paints the screen.
    useLayoutEffect(() => {
        if (!isPaused) {
            renderLoop();
            return () => cancelAnimationFrame(animationId!);
        } else {
            if (animationId) {
                cancelAnimationFrame(animationId!);
            }
        }
    }, [isPaused]);
We then include our cancelAnimationFrame in our cleanup to avoid any side effects. We run our application and click the button…errors!
Rollup RoundUp
This is because we haven’t actually loaded the Wasm file into our browser to run. For that, we need our old friend rollup.
We run npm i rollup-plugin-copy-save to create our rollup file in our root directory:
import copy from "rollup-plugin-copy";

export default args => {
    const result = args.configDefaultConfig;
    return result.map((config, index) => {
        if (index === 0) {
            const plugins = config.plugins || []
            config.plugins = [
                ...plugins,
                copy({
                    targets: [{ src: "node_modules/wasm-game-of-life-joerob319/*.wasm", dest: "dist/tmp/widgets/mendix/gameofLife/" }]
                })            ]
        }
        return config;
    });
};
The copy plugin moves our Wasm file to ensure it is part of our widget package and will be served up to the browser.
If we run our widget, we have our game of life.
Only two more minor things left to do…
Kill or revive your cells
So our Game of Life is cool at the moment, but there is no ability for the user to set the state of the universe. Let’s make it so that the user can click to toggle cells alive or dead.
To do this, we create a function called addPointClick, then calculate what cell has been clicked by finding the top left position of the canvas and the click position, ensuring to multiply by any scale applied to the canvas. Once we have the row and column, we can use the toggle_cell function within our webassembly file to update the universe and then redraw the canvas.
    const addPointClick = (event: React.MouseEvent): void => {
        event.preventDefault();
        if (canvasRef.current!) {
            const node = canvasRef.current;
            const boundingRect = node.getBoundingClientRect();
            const scaleX = node.width! / boundingRect.width;
            const scaleY = node.height! / boundingRect.height!;

            const canvasLeft = (event.clientX - boundingRect.left) * scaleX;
            const canvasTop = (event.clientY - boundingRect.top) * scaleY;

            const row = Math.min(Math.floor(canvasTop / (CellSize + 1)), height! - 1);
            const col = Math.min(Math.floor(canvasLeft / (CellSize + 1)), width! - 1);

            universe!.toggle_cell(row, col);

            drawGrid();
            drawCells();
        }
    };
Make sure to add it to your canvas too:
<canvas ref={canvasRef} onClick={addPointClick}/>And voila….it’s alive!

Tidying up
Let’s finish by removing our variables from our file CellSize, GridColour, DeadColour, AliveColour, and let’s allow our widget user to set them. Update the xml to:
<propertyGroup caption="General">
            <property key="CellSize" type="integer" required="true" defaultValue="5">
                <caption>Cell Size</caption>
                <description>Size of each square in px</description>
            </property>
            <property key="GridColour" type="string" required="true" defaultValue="#CCCCCC">
                <caption>Grid Colour</caption>
                <description>Colour of Grid</description>
            </property>
            <property key="DeadColour" type="string" required="true" defaultValue="#FFFFFF">
                <caption>Dead Colour</caption>
                <description>Colour of Dead Cells</description>
            </property>
            <property key="AliveColour" type="string" required="true" defaultValue="#000000">
                <caption>Alive Colour</caption>
                <description>Colour of Alive Cells</description>
            </property>
 </propertyGroup>
Your final parent should look something like this:
export function GameOfLife({ CellSize, GridColour, DeadColour, AliveColour }: GameOfLifeContainerProps): ReactElement {
    return (
        <GameOfLifeComponent
            CellSize={CellSize}
            GridColour={GridColour}
            DeadColour={DeadColour}
            AliveColour={AliveColour}
        />
    );
}
And update the child to accept them as parameter (not forgetting to remove the existing variables from your code!).
export interface GameOfLifeComponentProps {
    CellSize: number;
    GridColour: string;
    DeadColour: string;
    AliveColour: string;
}

export function GameOfLifeComponent({
    CellSize,
    GridColour,
    DeadColour,
    AliveColour
}: GameOfLifeComponentProps): ReactElement {

…..
}
So we are done! We’ve seen how you can write code in C, C++, Rust, or Python and run it in your Mendix app. As ever, you can find the full code for the widget on Github: GitHub – joe-robertson-mx/gameOfLife.
The end…well, not really
That’s the end of this series on Pluggable Widgets! We’ve gone from creating a simple counter widget right through to running WebAssembly in our Mendix app.
That’s not to say that this is the end… there will be more great widget content coming your way over the coming weeks and months. If you have anything you would want to see or any feedback on this series, just drop a comment on this story.