How to Scale Your Private Cloud Infrastructure: Strategies for Handling Growth

A lot happens between your code being committed to source control and it being deployed to your Cloud environment. Even if you start with a simple application, building an infrastructure architecture without considering future scalability can lead to all sorts of problems when the application starts to grow.
After deploying your Mendix application to Kubernetes, the received traffic may change in unpredictable ways. How do you keep your app responsive at all times?
This is where scaling comes into play. You want your cluster to gracefully handle the load, whether it’s a traffic spike or just regular usage. Mendix for Private Cloud facilitates this by dynamically adjusting the number of pods to match the demand. In our Connected offering, you can do it manually from the Developer Portal or by enabling Horizontal Pod Autoscaler directly in the Kubernetes cluster. Pretty cool, right?
In this blog, you will learn how to implement autoscaling for a Mendix application based on an application-specific custom metric. We will use a combination of Horizontal Pod Autoscaler and Cluster Autoscaler. But wait, there’s more? Yes, a nice Grafana dashboard tailor-made for Mendix for Private Cloud to visualize it all while it happens in real-time!
Autoscaling in Kubernetes – what does that include?
To begin, let’s take a closer look at the use of the term “autoscaling” in Kubernetes. In Kubernetes, several things are referred to as “autoscaling,” including:
- Horizontal Pod Autoscaler (HPA) – adjusts the number of replicas of an application.
- Vertical Pod Autoscaler (VPA) – adjusts the resource requests and limits of a container. Please note that VPA is not a recommended autoscaling strategy in the context of Mendix and is strongly discouraged.
- Cluster Autoscaler (CA) – adjusts the number of nodes of a cluster.
Mendix for Private Cloud supports all of the above, but they all address very different use cases and use different concepts and mechanisms.
Let’s explore strategies for effective scaling.
A scaling strategy
How do you get an optimal number of replicas for any given demand? Wouldn’t it be great to have a numerical indicator of the demand that your app is currently experiencing?
For scaling, a suitable metric is a measurement that represents the current load of the app.
Some examples of suitable scaling metrics are:
- The number of requests received per second by each replica.
- The CPU and/or Memory usage of the apps’ processes.
(NOTE: As the Mendix Runtime is based on Java, which pre-allocates memory and typically never releases it, memory-based metrics should not be used for autoscaling.)
The key here is to find an optimal metric value (let’s call it the target value) where the application is neither over- nor under-utilized. Unfortunately, this is easier said than done since every application behaves differently.
For example, if you specify a maximum usage of 80% CPU, the HPA controller will add a pod as soon as the average usage of all pods within this replica set reaches 80% or more. An important factor here is whether or not you have correctly configured the resource requests and limits for the pod. Our scaling strategy should then look like this:
- If the observed value is below the target value (i.e., the app is underutilized), the replica count should be decreased so that each replica gets a higher utilization. This will cause the metric value to increase and get closer to the target value.
- If the observed value is above the target value (i.e., the app is over-utilized), the replica count should be increased so that each replica receives a smaller share of the total load, causing the metric value to decrease and get closer to the target value.
Resource Request and Limits Basics
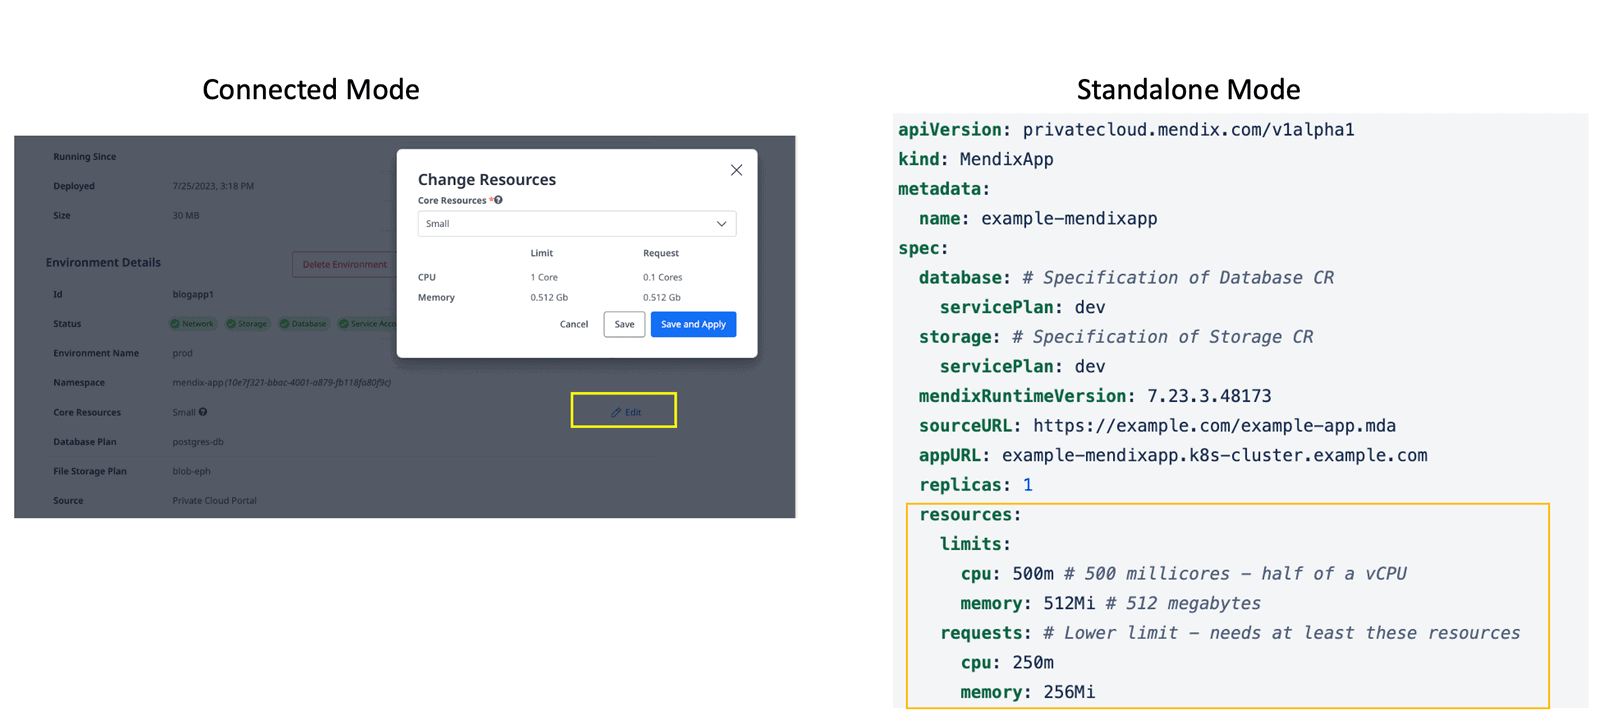
Kubernetes allows you to specify how much CPU/RAM a single Pod needs and how to restrict the usage of these resources for a given Pod. In Mendix for Private Cloud, this is easily configured via our Developer Portal or, for customers using our standalone offering, by editing the MendixCR object.
Memory Units
- Memory units are typically represented in bytes, but for simplicity, Kubernetes allows you to use more human-readable formats such as megabytes (MB) or gigabytes (GB).
- You can use the following suffixes to represent memory units:
- “Mi” for mebibytes (2^20 bytes)
- “Gi” for gibibytes (2^30 bytes)
- “M” for megabytes
- “G” for gigabytes
CPU Units
- CPU units in Kubernetes are measured in “millicores,” which are fractions of a CPU core.
- 1 CPU core is equivalent to 1000 millicores.
- You can specify CPU requests and limits using the “m” suffix to indicate millicores.
Examples
- 100m represents 100 millicores, which is 0.1 of a CPU core.
- 500m represents 500 millicores, which is 0.5 of a CPU core.
CPU is an absolute unit, meaning that 1 CPU is the same no matter how many cores a node has.
Our Mendix application deployment is configured with the following small-size template values:
- CPU Request of 100m
- Memory Request of 512Mi

Simulating autoscaling
Our goal with this post is to:
- Simulate growth in traffic received by a Mendix application hosted in a Kubernetes cluster.
- Configure Horizontal Pod Autoscaler to scale the number of Mendix application replicas in a live Mendix Kubernetes environment running in Mendix for Private Cloud Connected mode.
- Configure Cluster Autoscaler to scale the number of cluster nodes to allocate the new replicas of the Mendix application.
In this example environment, I will be hosting my Mendix cluster in Azure AKS. For other supported Mx4PC cluster types, follow your vendor’s recommended way of configuring the CA feature.
For details on how to deploy a Mendix application, you can check out this guide: https://docs.mendix.com/developerportal/deploy
Before we start, it’s a good idea to review some prerequisites. Have you:
- Enabled Horizontal Pod Autoscaler in your Mendix environment?
- Enabled Cluster Autoscaler?
- Installed Kubernetes metrics server in your cluster?
Configuring Horizontal Pod Autoscaler
Let’s enable HPA and set the metric to 80% CPU usage threshold:
# kubectl -n mendix-app autoscale mendixapp blogapp1-master --cpu-percent=80 --min=1 --max=3
horizontalpodautoscaler.autoscaling/blogapp1 autoscaled
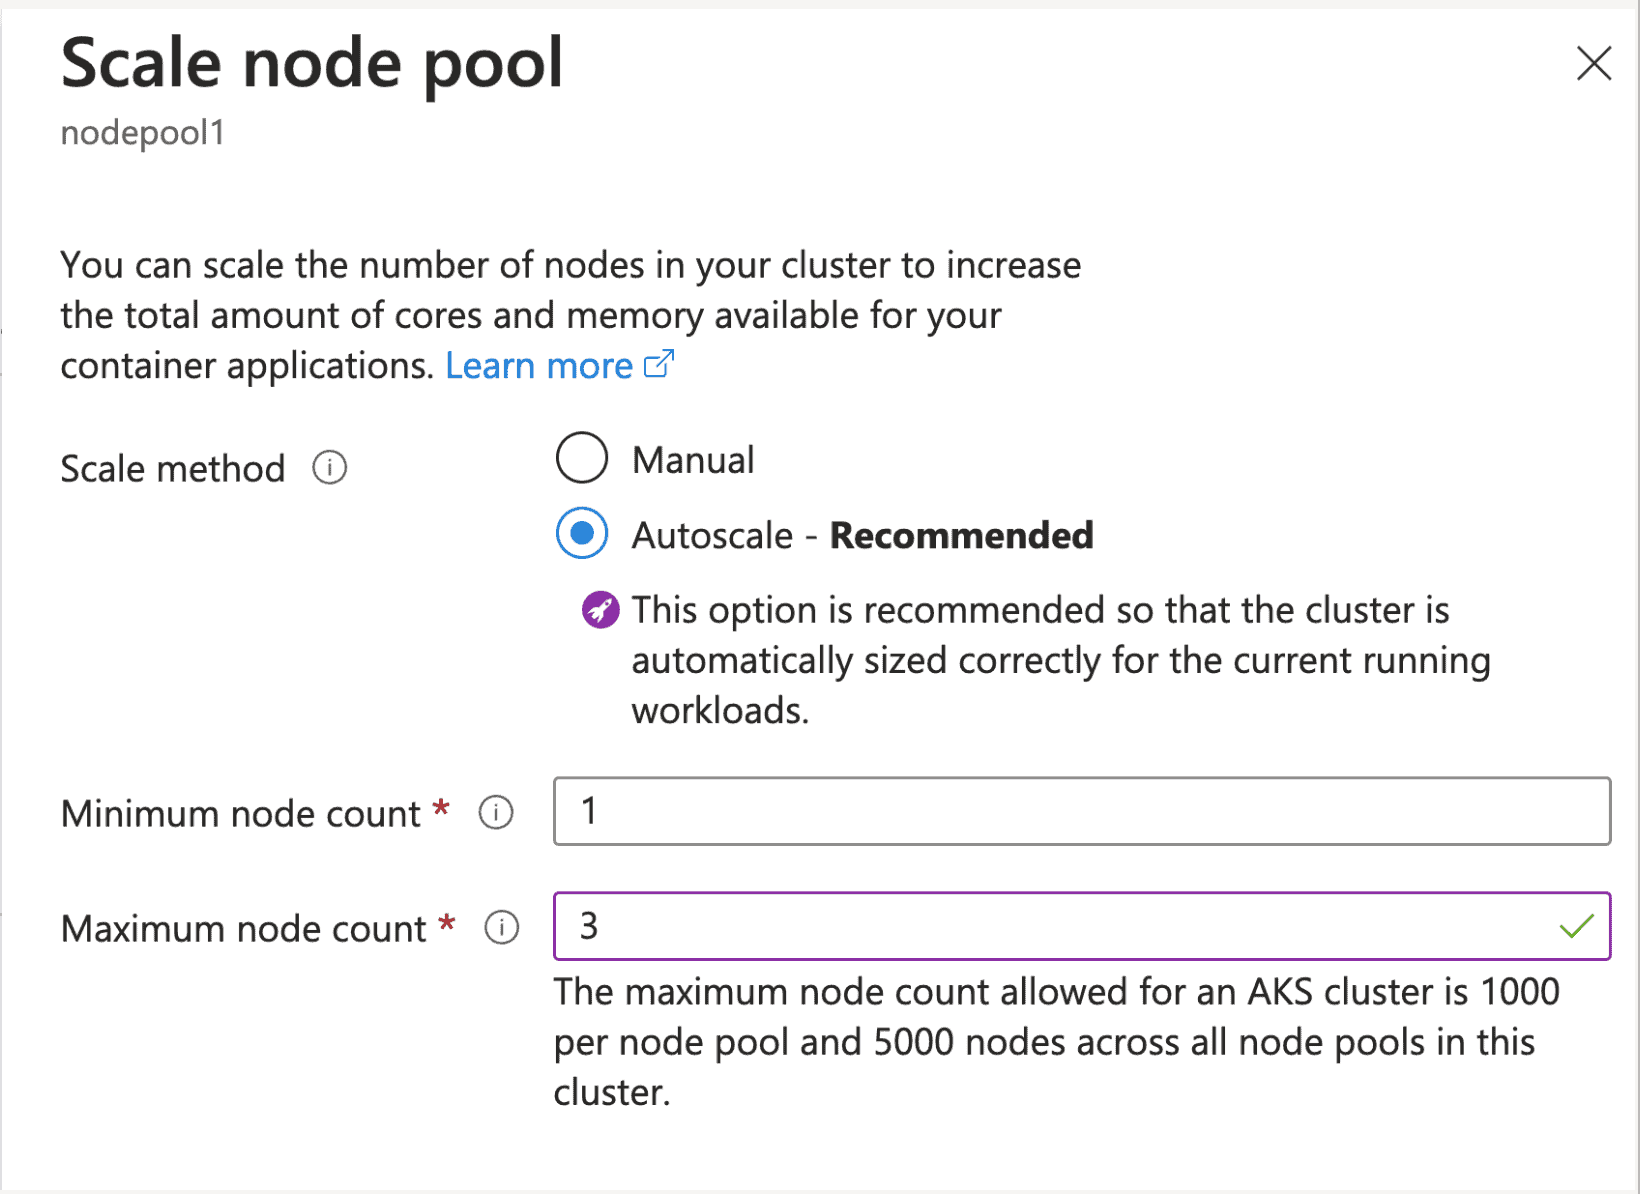
Configuring Cluster Autoscaler (CA)
You can enable CA from the command line or from Azure Portal. I will set the maximum node count to 3 for this example:
Generating traffic!
In the following video, you can see on the left top side that I am generating traffic directly into the Mendix application by sending 1000 concurrent connections for two minutes. I use this tool inside a temporary pod, but there are many others that can do the same!

Horizontal Pod Autoscaler view from Kubernetes Cluster
Let’s explore how the same sequence looks in our Grafana dashboard:

Horizontal Pod Autoscaler view from Grafana Dashboard
Once we start sending 1000 concurrent requests to the Mendix application, we observe the following:
- CPU usage for the blogapp1-master application goes from 8m to above 100m (right top screen).
- The Horizontal Pod Autoscaler starts scaling the Pods.
- Two more Pods are created.
- One of the Pods is now pending and cannot be deployed. There is not enough space in either existing node to allocate one more pod.
- After a few minutes, the Cluster Autoscaler does trigger and creates a new node in the cluster (right bottom side screen)
- The Pending Pod is now deployed.
Exploring autoscaling lead time
Let’s wrap up by understanding how everything ties together:
- Horizontal Pod Autoscaler reaction time.
- By default, pods’ CPU and memory usage is scraped by kubelet every 10 seconds.
- Every minute, the Metrics Server will aggregate those metrics and expose them to the rest of the Kubernetes API.
- By default, the Horizontal Pod Autoscaler checks Pods metrics every 15 seconds.
- In the worst-case scenario, the Horizontal Pod Autoscaler can take up to 1 minute and a half to trigger the autoscaling (i.e. 10s + 60s + 15s).
- Cluster Autoscaler reaction time.
- The Cluster Autoscaler checks for unscheduled Pods in the cluster every 10 seconds.
- The entire process should take around 30 seconds on clusters with 100 nodes or less with up to 30 pods each.
- Node provisioning time.
- Then, there’s the Node provisioning time, which depends mainly on the cloud provider.
- It’s pretty standard for a new compute resource to be provisioned in 3 to 5 minutes.
- Mendix Pod creation time.
- Starting Mendix Runtime typically shouldn’t take more than 30 seconds.
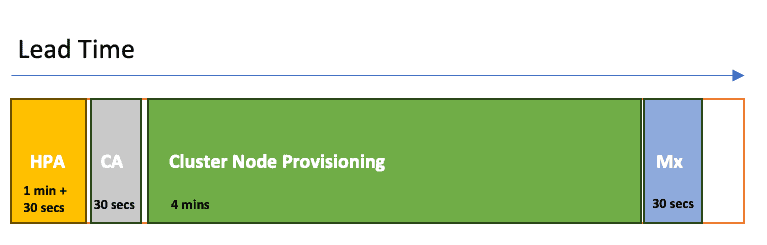
In the worst case, the total delay could be up to 7 minutes. Not bad right? However, can you handle a sudden surge in traffic for 7 minutes before you get more pods?
Are there any ways to tune the autoscaling to reduce the scaling time minutes?
Try adjusting some of these default values:
- The default refresh time for HPA which is controlled by the horizontal-pod-autoscaler-sync-period (default 15 seconds).
- The interval for metrics scraping in the Metrics Server, which is controlled by the metric-resolution flag (default 60 seconds).
- The cluster autoscaler reaction time to unassigned Pods, which is controlled by the scan-interval flag (default 10 seconds).
Closing Words
Scaling and handling growth in Kubernetes clusters might seem like a daunting task at first, but with the right strategies and leveraging the features provided by Mendix for Private Cloud, you’re well-equipped to navigate this exciting journey. The key lies in finding that sweet spot between adding more nodes and optimizing the ones you’ve got.
One last word to the wise – Mendix apps tend to be relatively database-intensive compared to app-container intensive, so be sure to (auto)scale your database as well.
Happy scaling!