A Guide to ML-Enhanced Applications Powered by Mendix and Amazon SageMaker AI

There is no doubt that we are living in the time of AI. Companies are racing each other to create faster, smarter, better applications, making machine learning the “must have” of today’s application market. In this blog post, I will demonstrate how much faster and easier it has become to go from zero to hero in incorporating trained machine learning models into applications with the help of Mendix and Amazon SageMaker AI.
What is Machine Learning?
Machine Learning (ML) is a subset of Artificial Intelligence (AI) that focuses on developing algorithms and models that enable computers to learn from data and make predictions or decisions without being explicitly programmed. That means that models can be trained based on custom data of a specific sector or company and can perform tasks more efficiently than an out-of-the-box foundational model.
Tailored smart apps – wow, that sounds great, right? Right. But is it complicated? Well, ten years ago, this would have been a no-go for most companies or industries because of the complexity, the limited access to relevant tools, and, of course, the difficulties of implementing the models in end-user applications.
Nowadays, the struggles and worries of the past finally start to dissolve. Thanks to a transition to more AI-enhanced application development with Mendix, applications can incorporate smart solutions and features like Amazon Textract, Rekognition, etc.
If you want to know more, visit our site or read the Mendix Evaluation Guide.
The tools you’ll need
First things first, let me introduce to you the tools. Do not be scared; there are just a few.
- Amazon SageMaker AI: For creating and training the model.
- Amazon SageMaker AI is a fully managed machine-learning service from Amazon that helps you build, train and deploy machine learning models quickly. It offers a wide range of features that include, but are not limited to, Jupyter notebooks, Pipelines, SageMaker Studio, Canvas, and RStudio. If you want to know more, you can visit the Amazon SageMaker AI site here or here.
- Python 3.0: To write the code.
- Mendix Studio Pro 10: The latest version of Mendix includes the ML Kit required to create tailored smart end-user apps.
With the newest version of Studio Pro 10, Mendix has raised the bar for application development by including a lot of cool, smart features in the platform. One of them, and a personal favorite of mine, is the Mendix Machine Learning Kit (Mendix ML Kit). The ML Kit can help you create faster, smarter, and more collaborative apps by importing your ONNX models straight to Studio Pro without further integrations or adjustments.
For more information, see this dedicated blog post and the documentation.
Machine learning and me, a brief history of struggle
Amazon SageMaker AI
For everyone starting the machine learning journey, SageMaker might seem a bit complicated and overwhelming. Talking from personal experience, my first couple of tries ended up in total disaster. Multiple kernels running, every choice from the menu clicked, multiple notebooks performing who knows what, domains and profiles all over the place, and constantly hitting the play button just to see what would happen. A total and ultimate disaster. But I was not ready to give up, so after some trials and a couple of reading hours, I produced the conclusion: “Not everything is used for everything.”
Amazon SageMaker AI gives you a lot of choices to help you create, train, integrate, deploy, and do almost everything you want to do with machine learning models, but the truth is, in most cases, you are only going to need a Jupyter notebook, some Python knowledge, and, of course, a data set.
Machine Learning Libraries
One of the things I learned in my machine learning journey is that there are many different ‘’modeling frameworks”, like ONNX, Scikit -learn, Tensorflow, Pytorch, etc. Each is specialized in its own way to perform and create various kinds of AI.
ONNX
As mentioned a few lines up, the ML Kit in Mendix 10 is compatible with the ONNX modeling framework. You may ask yourself, why ONNX?
Well, ONNX (or Open Neural Network Exchange) is an open-source format for AI models that supports interoperability between frameworks, meaning you can train a model in one framework, convert it to ONNX, and then consume it in a different framework. To make it a bit clearer, every framework that can be converted to an ONNX model can also be imported to Mendix 10.
In this blog post, I am going to explain a little bit about how you can convert a Scikit-learn model into an ONNX model, import it to Mendix 10.1.1, and create a test app around it. If you want to know more about ONNX and how you can convert or consume ONNX models, visit this website.
Time to get to work
For every reader who wants to roll up their sleeves and tag along, you are going to need the following:
- An AWS Account with SageMaker Access
- A Mendix Account
- Mendix 10 installed on your device
As said at the beginning of this blog post, I will be creating a smart app in a quick and effortless way by guiding you through the process of creating a demo spam filter with the help of Amazon SageMaker AI and Mendix.
To make it a bit easier, if you want to tag along in this journey, you can download the example files from the following links:
Step 1 – First things first: Starting with Amazon SageMaker Studio
To start using SageMaker Studio, log in to your AWS account and navigate to the SageMaker service. In the SageMaker dashboard, from the left side menu, select Studio to go to the SageMaker Studio interface.
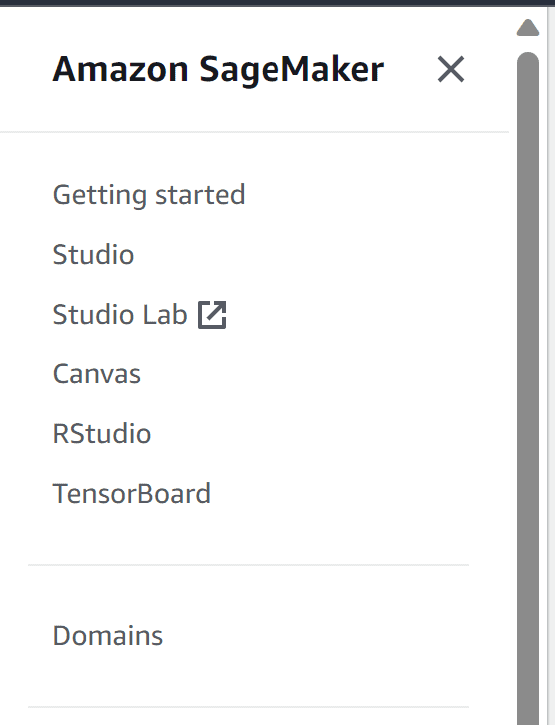
Choose your user profile if you have one already, and open Studio. If you don’t have a profile or a domain, create one by choosing Domains from the left-side menu and by following the instructions.
Step 2 – SageMaker Studio: Jupyter Lab Notebook
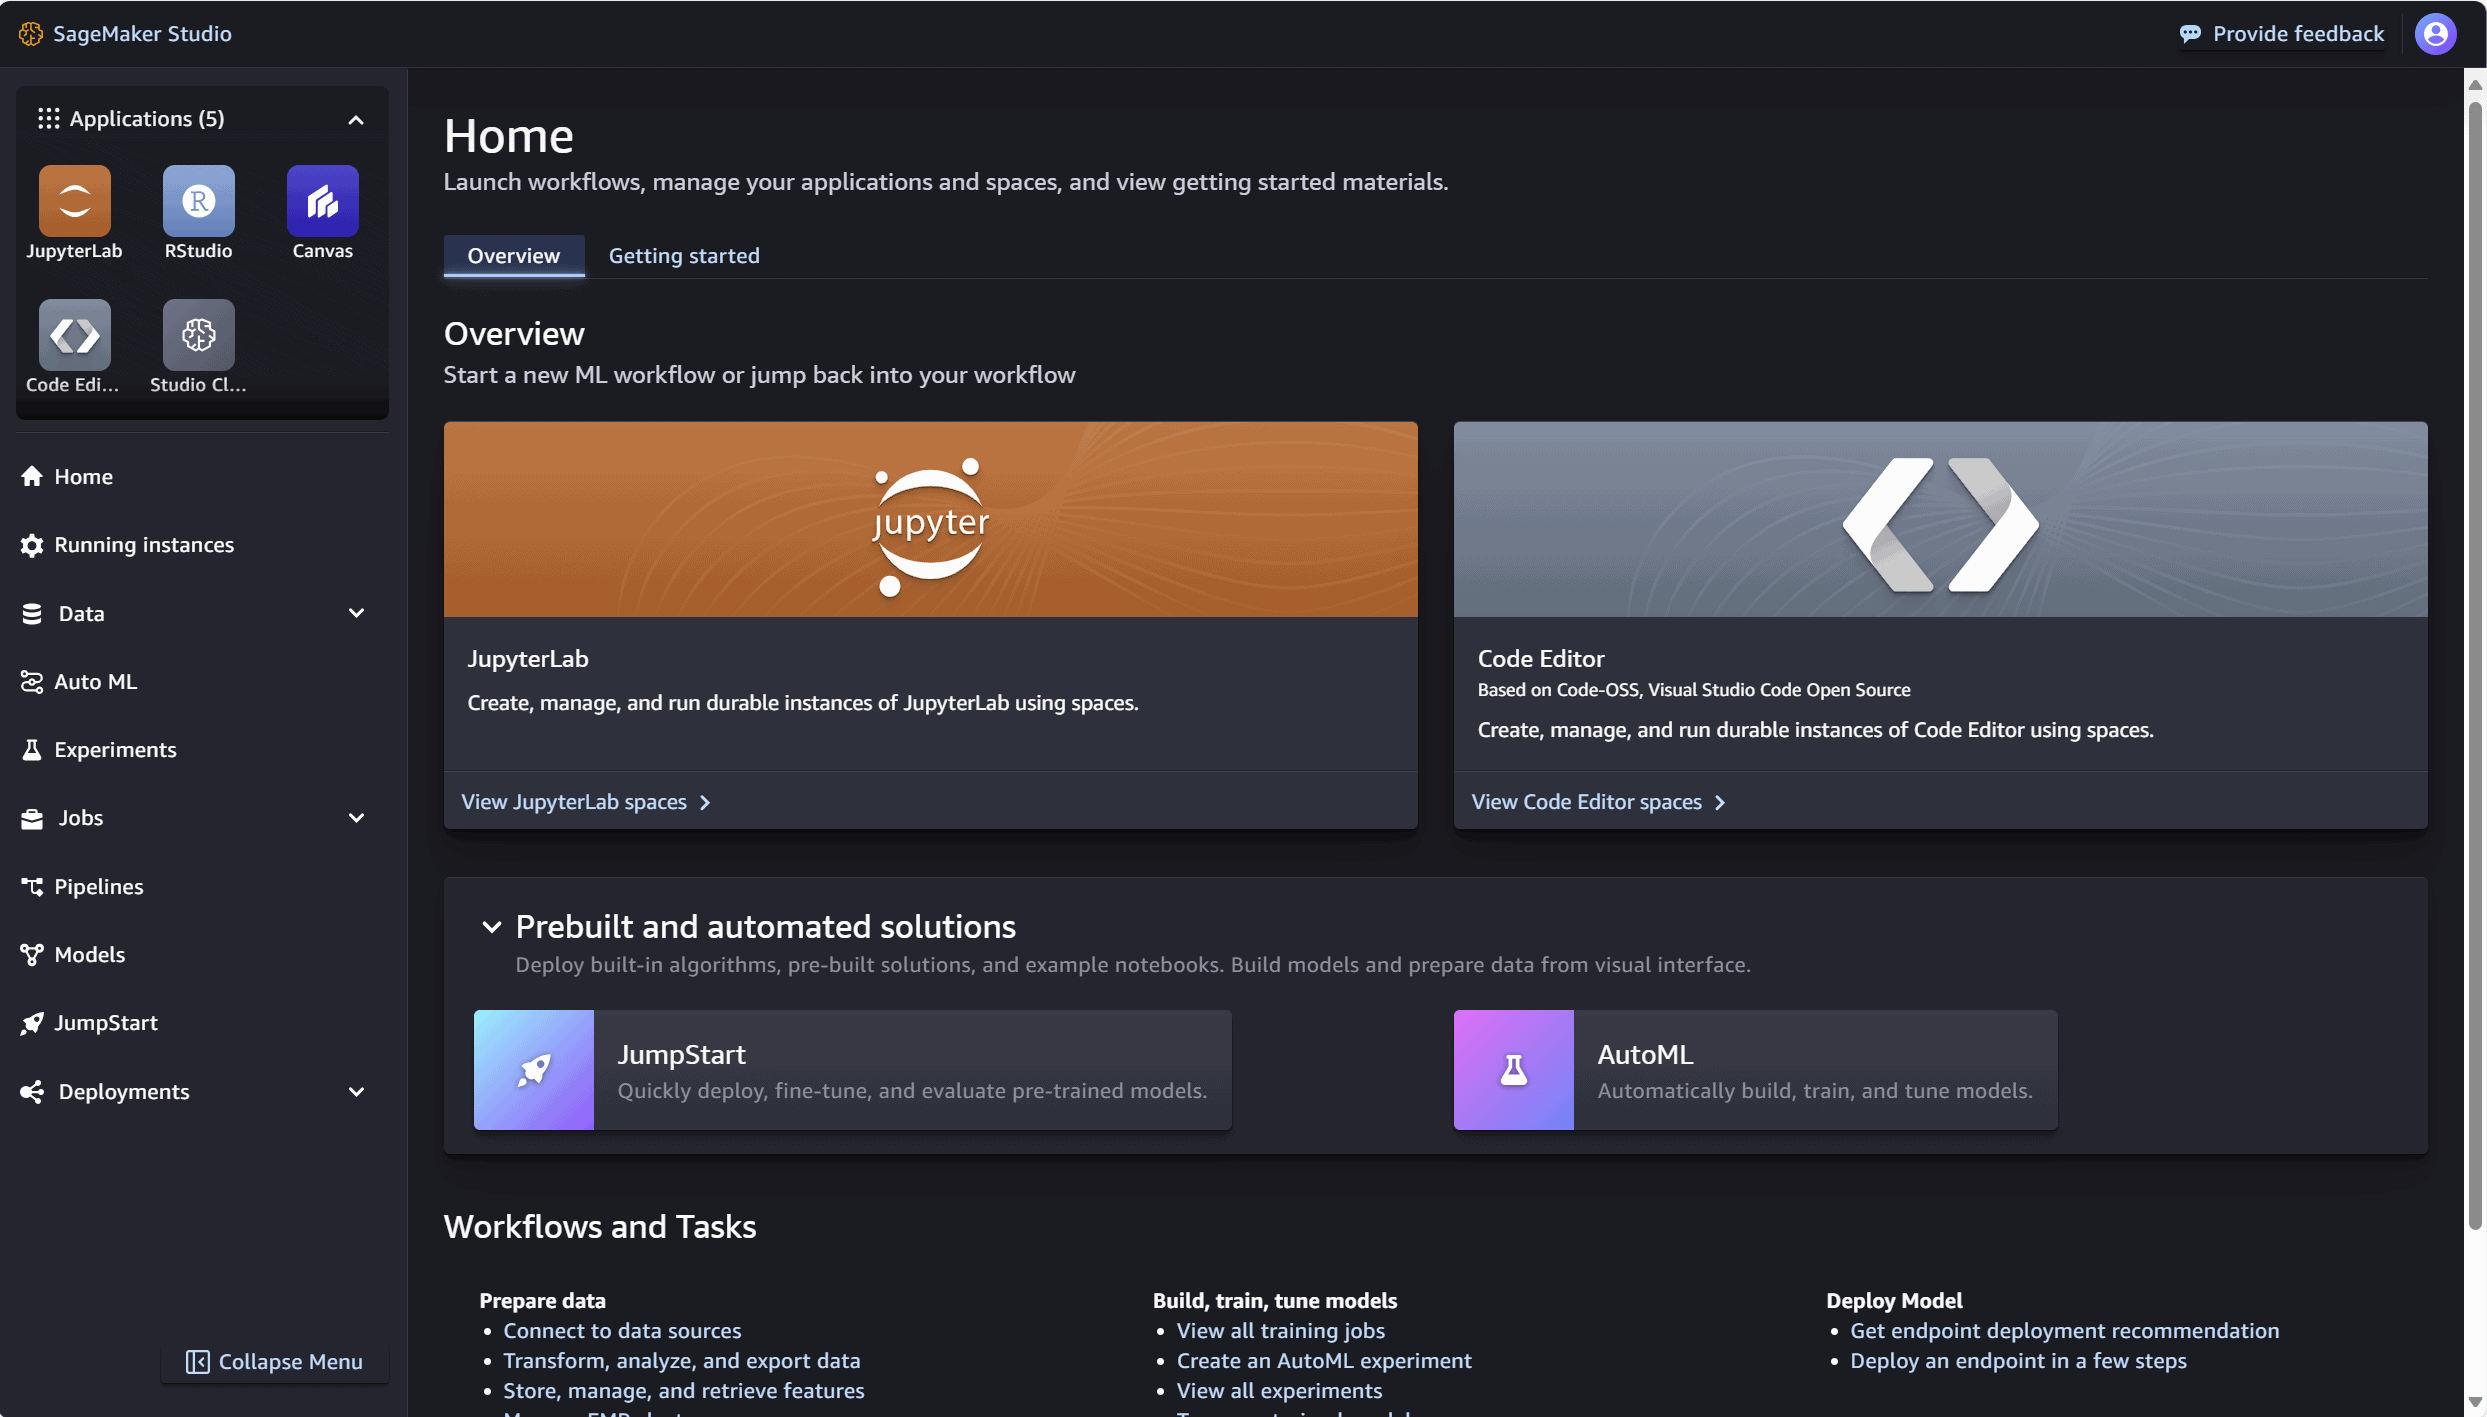
Once the studio is ready to use, you are going to land on the home screen, take some time to check the screen, click on the jJupyterLab icon to continue. ‘’JupyterLab is the latest web-based interactive development environment for notebooks, code, and data. Its flexible interface allows users to configure and arrange workflows in data science, scientific computing, computational journalism, and machine learning.’’ Learn more about it here.
Select the JupyterLab and then Create JupyterLab space.
Choose a Name, to specify the name of the space and hit the Create Space button.

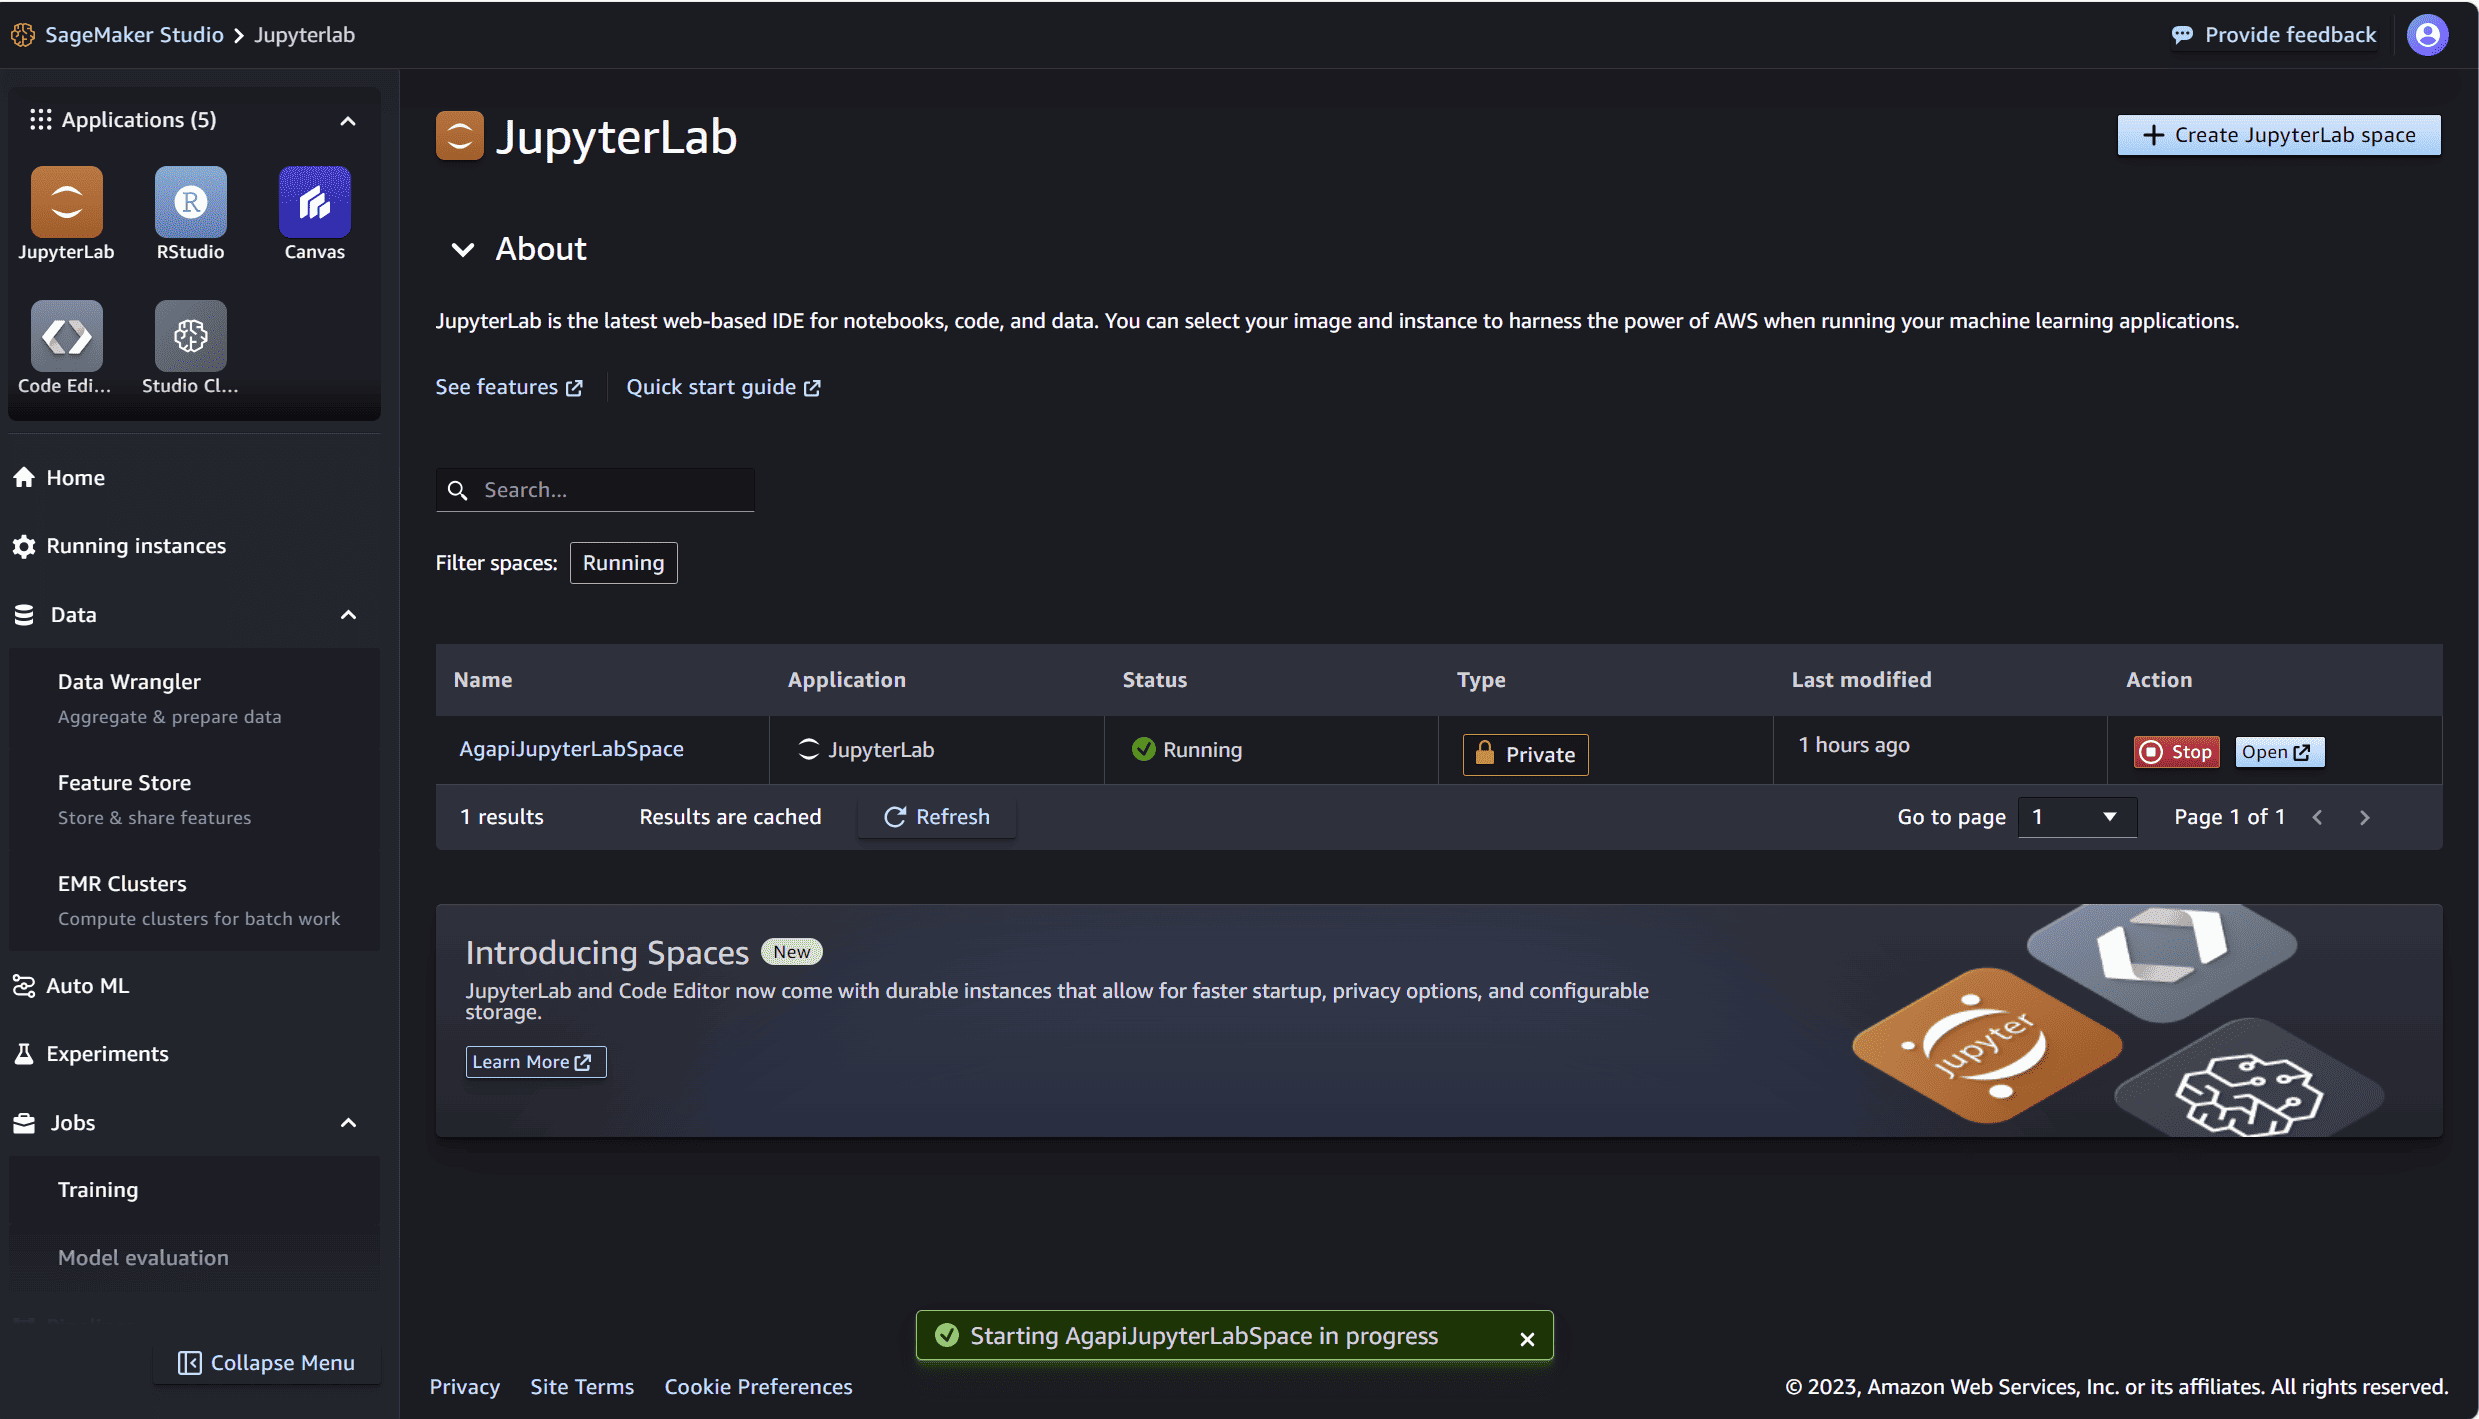
You will be redirected to the JupyterLab overview space, then select Run space to run the newly created space, once is read Open it.
Step 3 – Let the fun begin
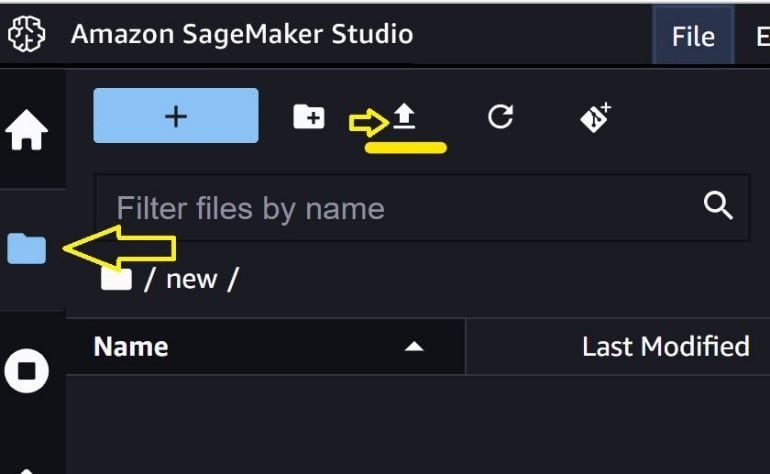
Check the left side menu and select the files (folder) icon. This will open the files section, and all the available files in the studio will be visible. Find the upload button appearing (as shown on the screenshot below) to upload the example files.
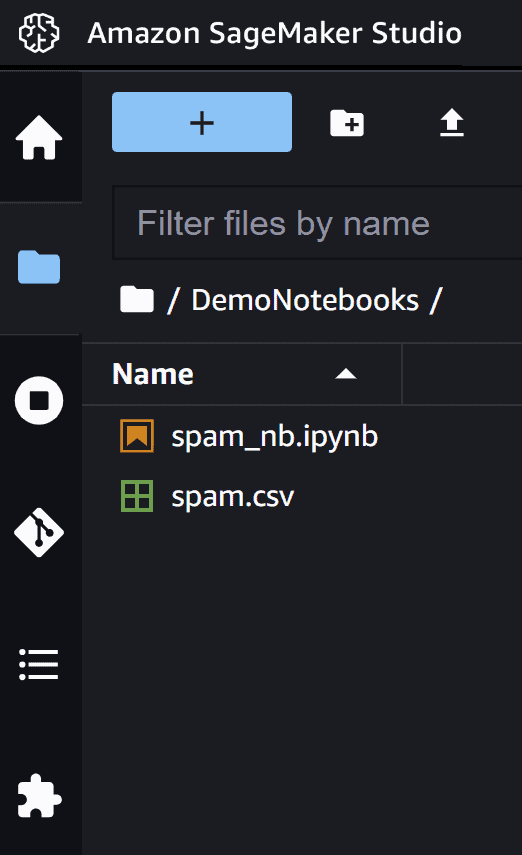
Once the files are visible in your folder, open the spam_nb.ipynb notebook.
The studio will start the Kernel. This might take a few minutes, and once it is ready, the notebook should appear.
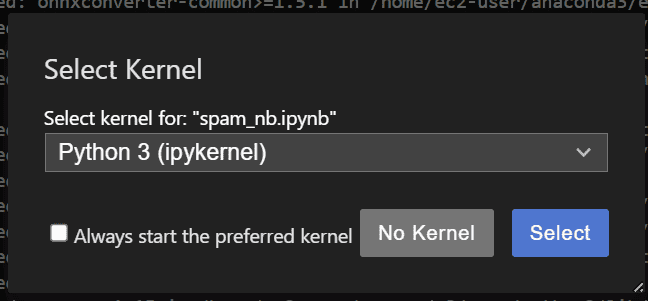
Double click on the spam and select the ‘ipykernel’ as kernel at the popup window.
Step 4 – Explanation of the Spam code in Notebook
The Spam example is quite simple and consists of three parts.
- Part one: The necessary libraries
- Part two: Training and exporting
- Part three: Testing
In this blog post, the first two parts will be explained.
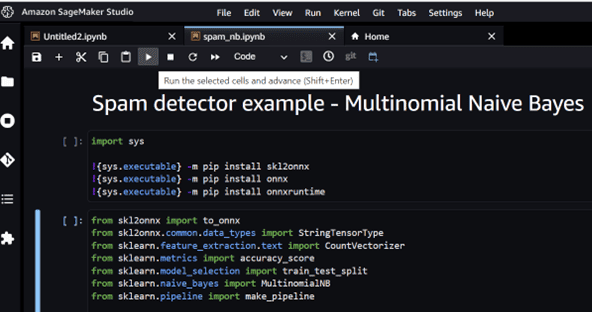
Part one
In the first part, the libraries are imported.
- The SYS module will help control and change the environment runtime.
- The skl2onnx module. The sklearn-onnx contains the functions to convert models from scikit-learn toolkits into ONNX.
- The ONNX module.
- The onnxruntime module.

Part two
In this part, the model is trained and converted to ONNX and then exported to an ONNX file. The below example is teaching the model to predict by using a training set.
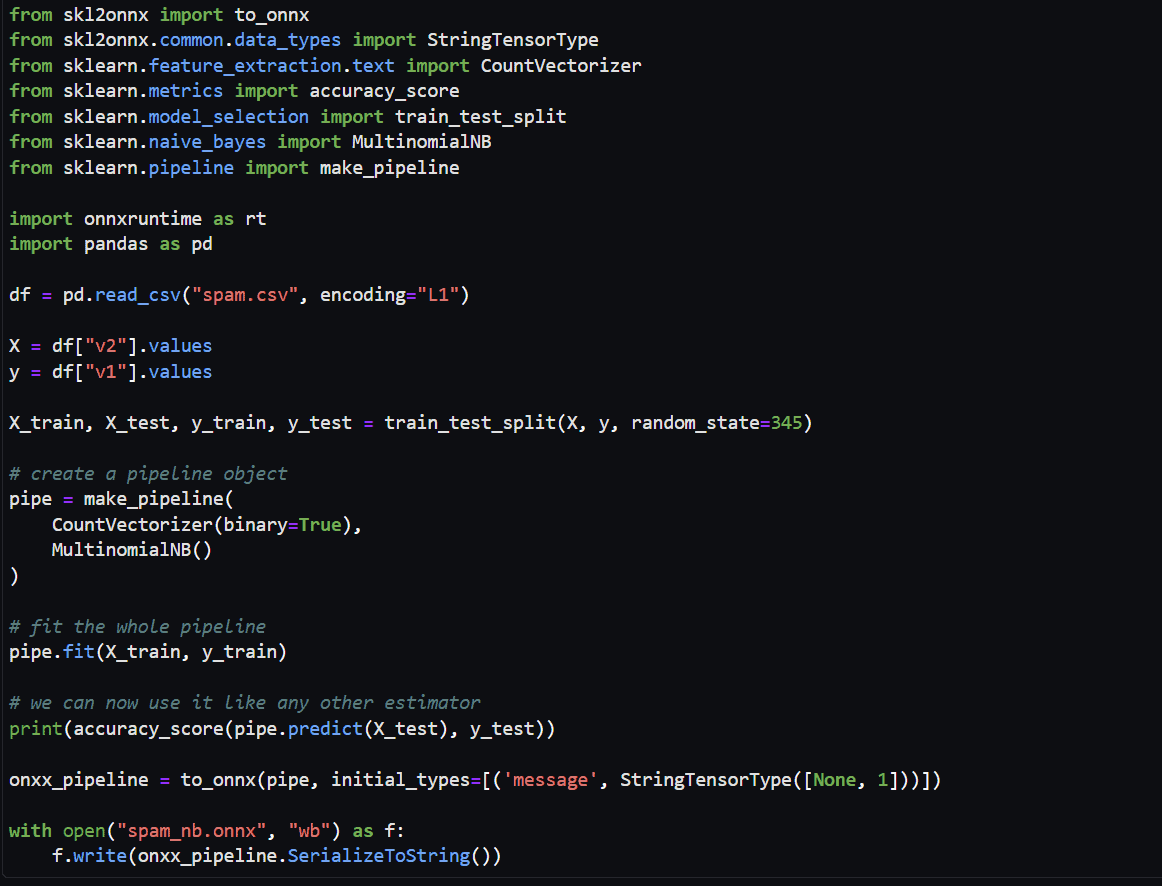
The training set consists of training data (X_train) associated with the known results (y_train). The model will learn which pattern will be labeled as 1 (true), for example, spam, or 0 (false), for example, ham. This process is also called fitting. A testing set is also going to be included (X_test, y_test).
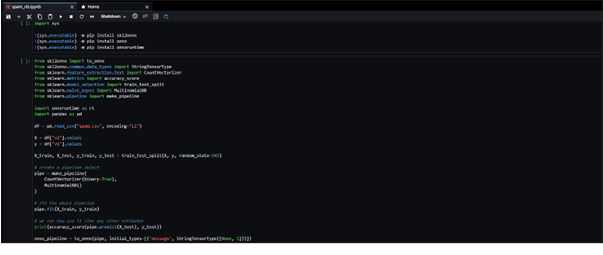
In the picture above, we can see that the second part also starts with the import of some methods (lines 1-10). There is no need to dive deep into explanations for these methods for now since the functions will be explained further, line by line.
In the next line, 12 data sets are imported:
(df = pd.read_csv("spam.csv", encoding="L1")), and the attributes X and y are defied (X = df["v2"].values, y = df["v1"].values)Then, four portions of data are created, which will be used for fitting and predicting values:
X_train, X_test, y_train, y_test = train_test_split(X, y, random_state=345)(The sklearn.model_selection.train_test_split spits the arrays into random train and test subsets.)
In the next lines, the pipeline object is created:
pipe = make_pipeline(
    CountVectorizer(binary=True),
    MultinomialNB()
)
So, the most important part happens on the next line since here starts the ‘’fitting’’ of the model:
pipe.fit (X_train, y_train)And you are done! The only thing left is to convert the model to the ONNX file using the “to_onnx” function and then export the file to the files in the notebook using the “write” function.
>
onxx_pipeline = to_onnx(pipe, initial_types=[('message', StringTensorType([None, 1]))])
with open("spam_nb.onnx", "wb") as f:
  f.write(onxx_pipeline.SerializeToString())
For more examples and information about converting a pipeline to ONNX, check the ONNX documentation.
Last but not least, you need to run the notebook to execute the code:
- Put your cursor on the first line.
- Click the play icon on the top.
- Some extra lines will appear on the notebook, and the cursor will re-appear at the next part.
- Click the play icon one more time to execute the training.
- Some extra lines will appear again, and the ONNX file will be created.
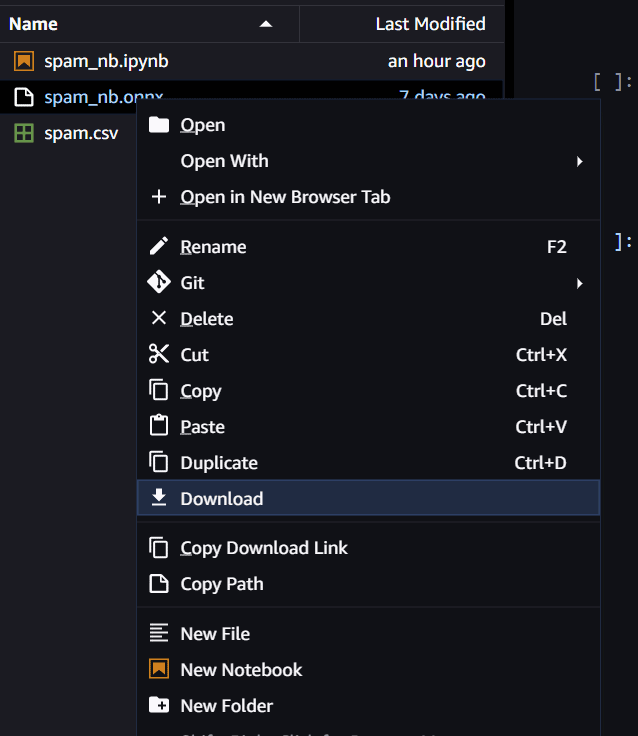
Check the files folder, right-click on spam_nb.onnx and download the file.
Important! After you are done training and testing your model, click on the running terminals icon…
![]()
…at the left side menu, and terminate all running instances to avoid extra charges.
Step 5 – Bring the Mendix Shine
So, the time has come to put the ML Kit to the test.
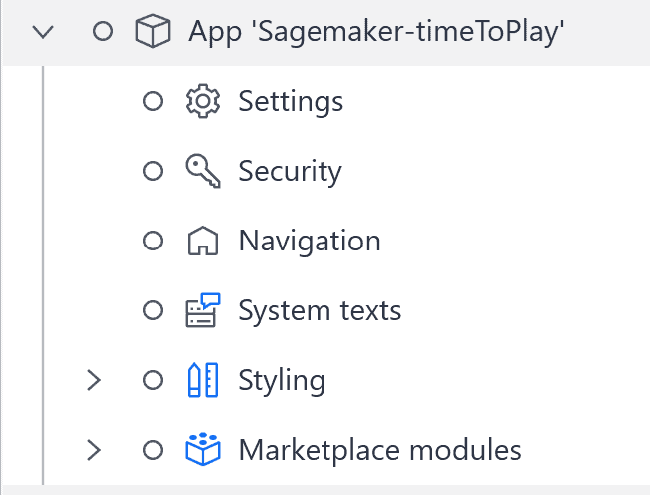
Start by opening your Mendix 10 studio and creating a new blank app. Select the module called MyFirstModule from the explorer tab and right-click to open the pop-up menu
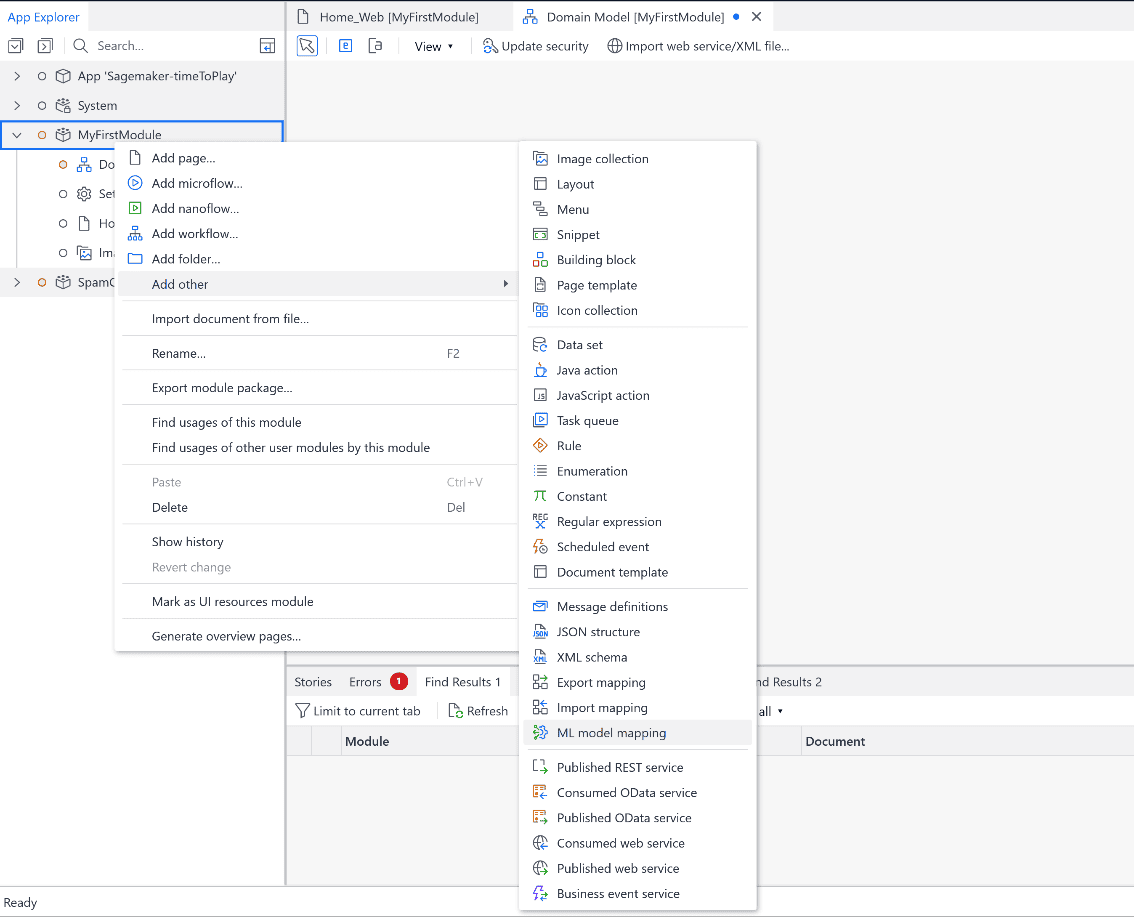
Select the ML model mapping.
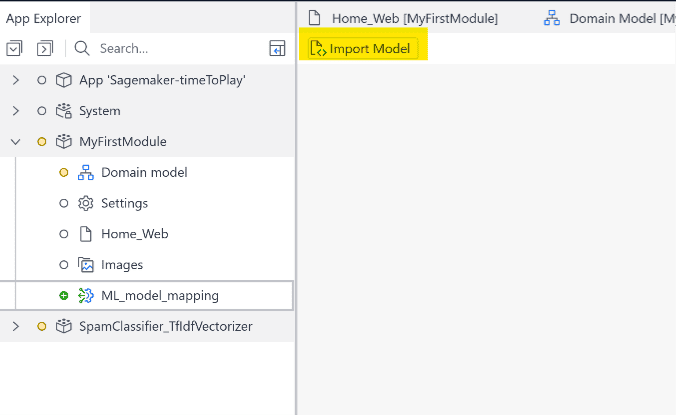
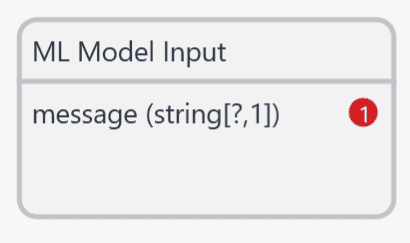
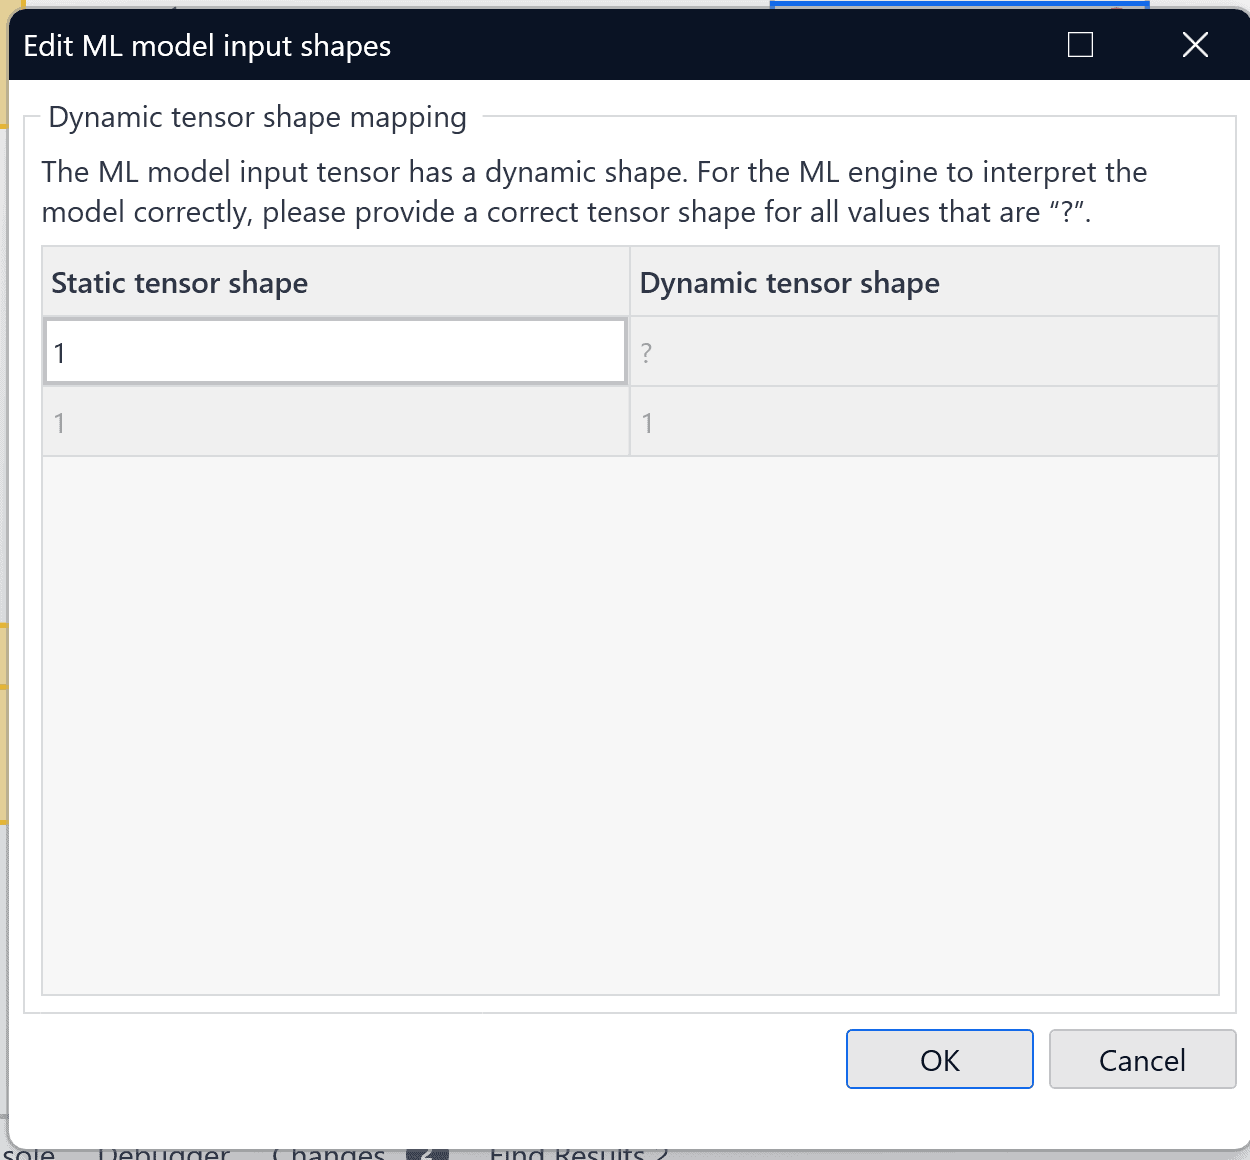
Click on Import Model in the upper left corner and import the ONNX file. Mendix will automatically create the input and output objects.
If you see an error message at the ML Model input, open the entity and fix the issue by selecting “1” as the Static tensor shape.
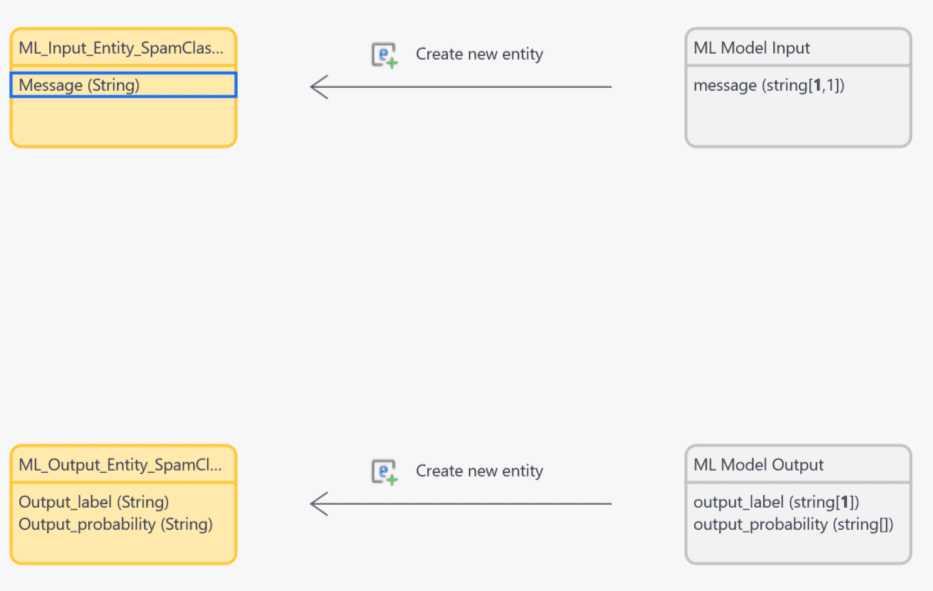
Your domain model should look like this:
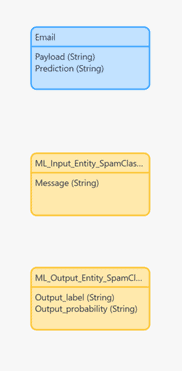
Go to the domain model in the app explorer, add an extra entity, and call it Email. Add two string attributes to the email entity: Payload (unlimited characters) and Prediction (leave the default value).
Select the email entity and right-click to open the side menu, then select Generate overview pages.
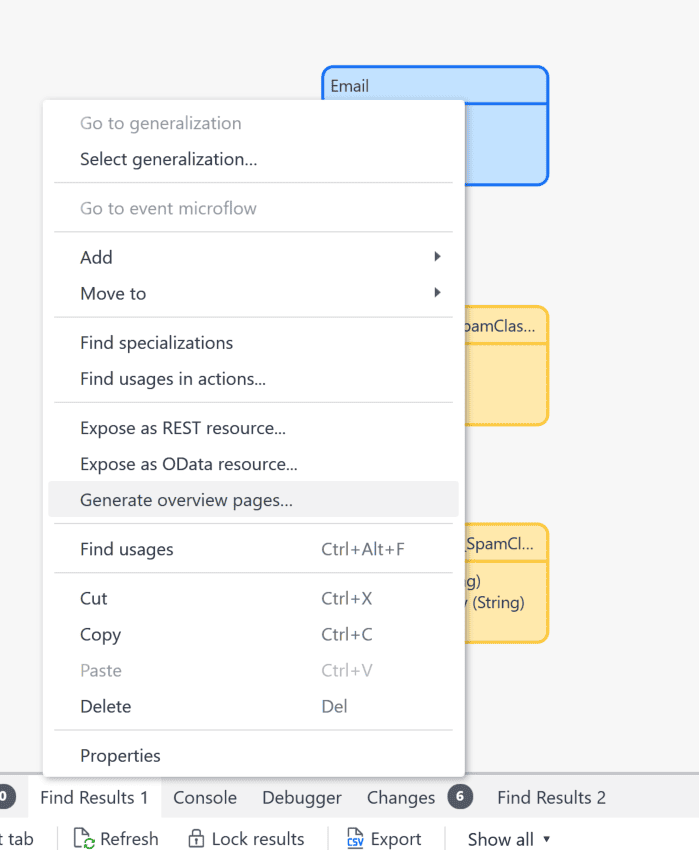
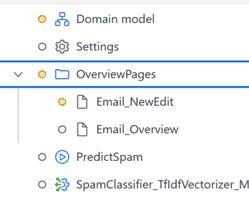
Mendix will automatically create the Email Overview and Email_NewEdit pages and place them in the Overview pages folder of the Explorer menu.
Find the Email_NewEdit page and double-click to open it. Double-click the Save action to open its properties.
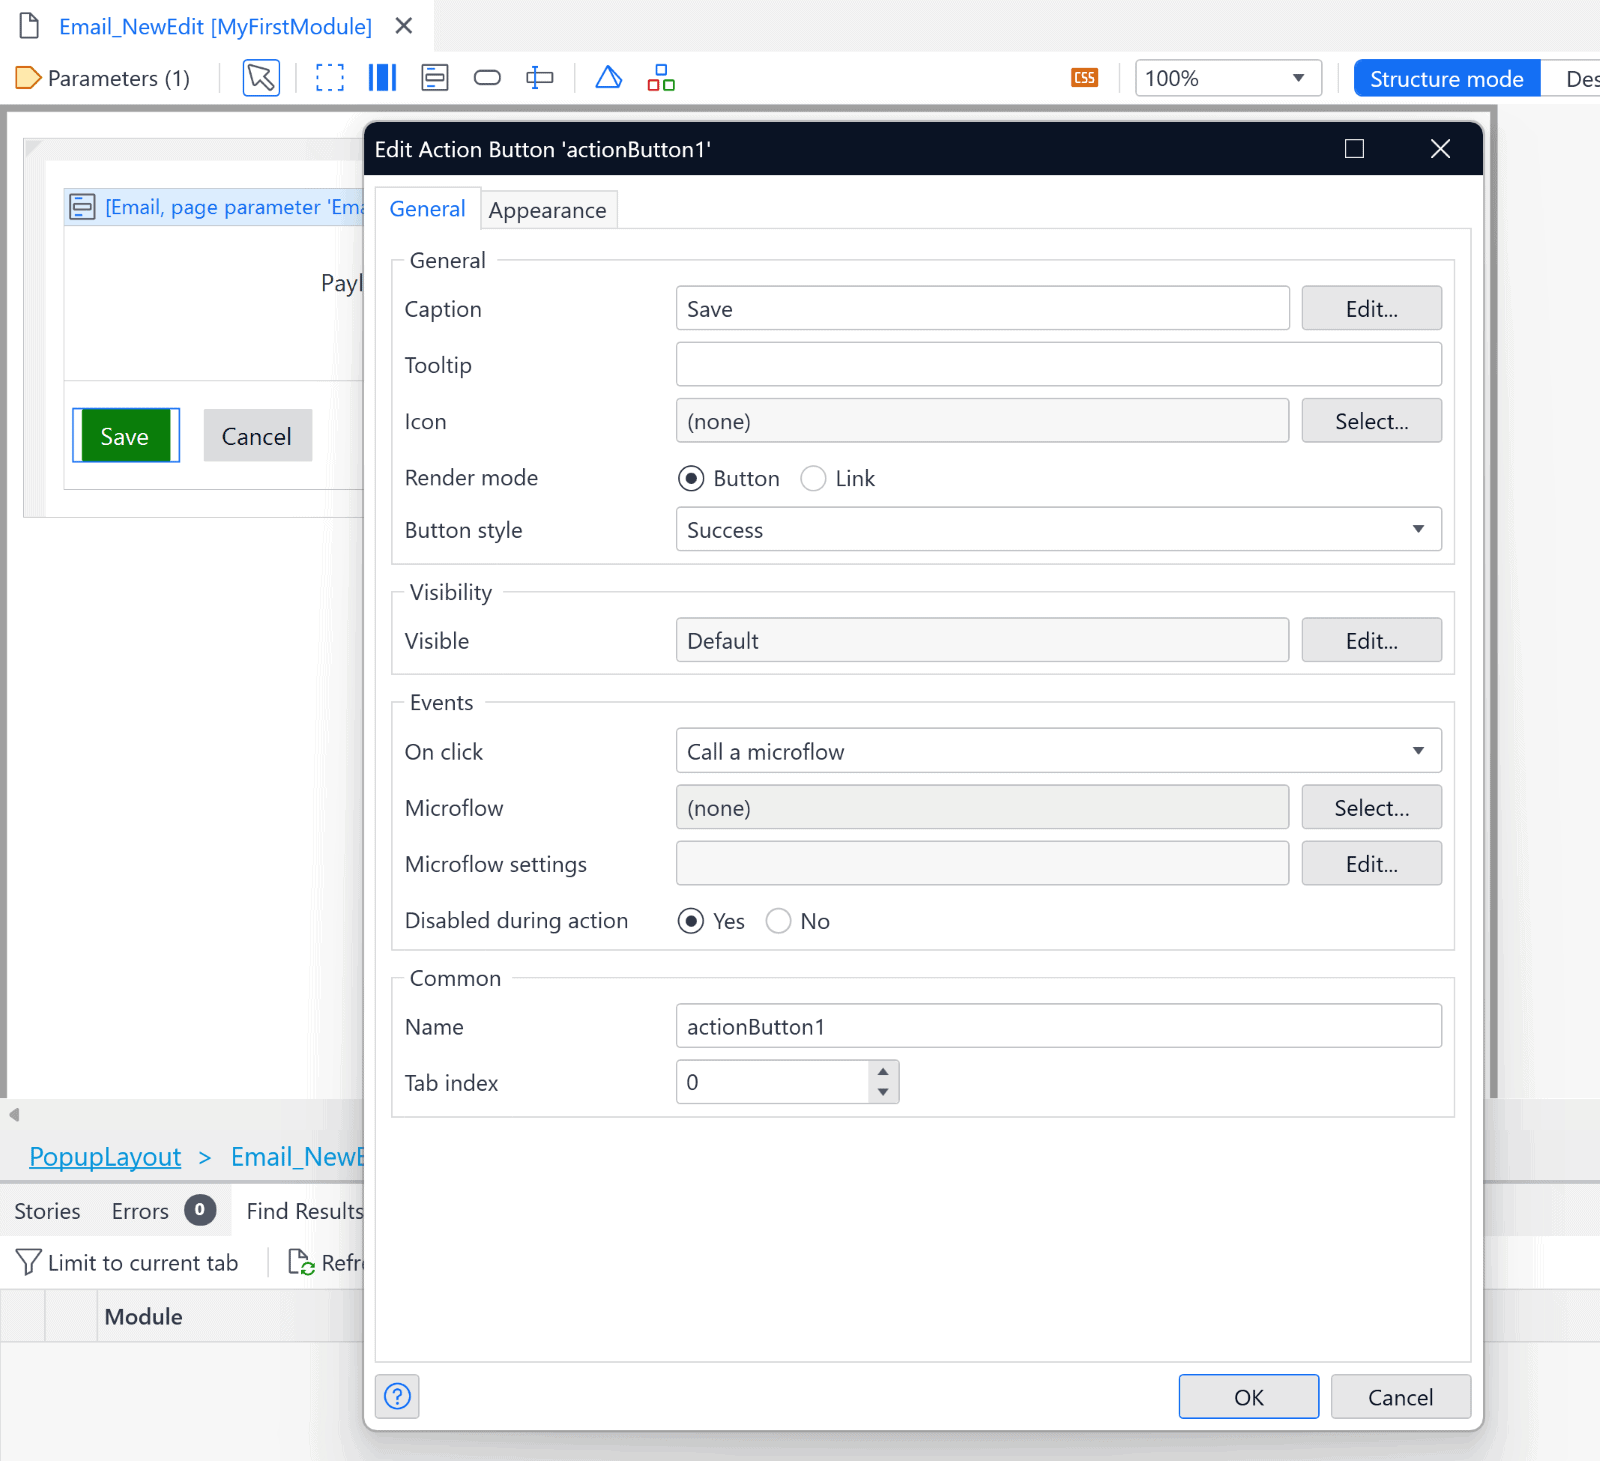
In the Events section, select Call a microflow > Select > New.
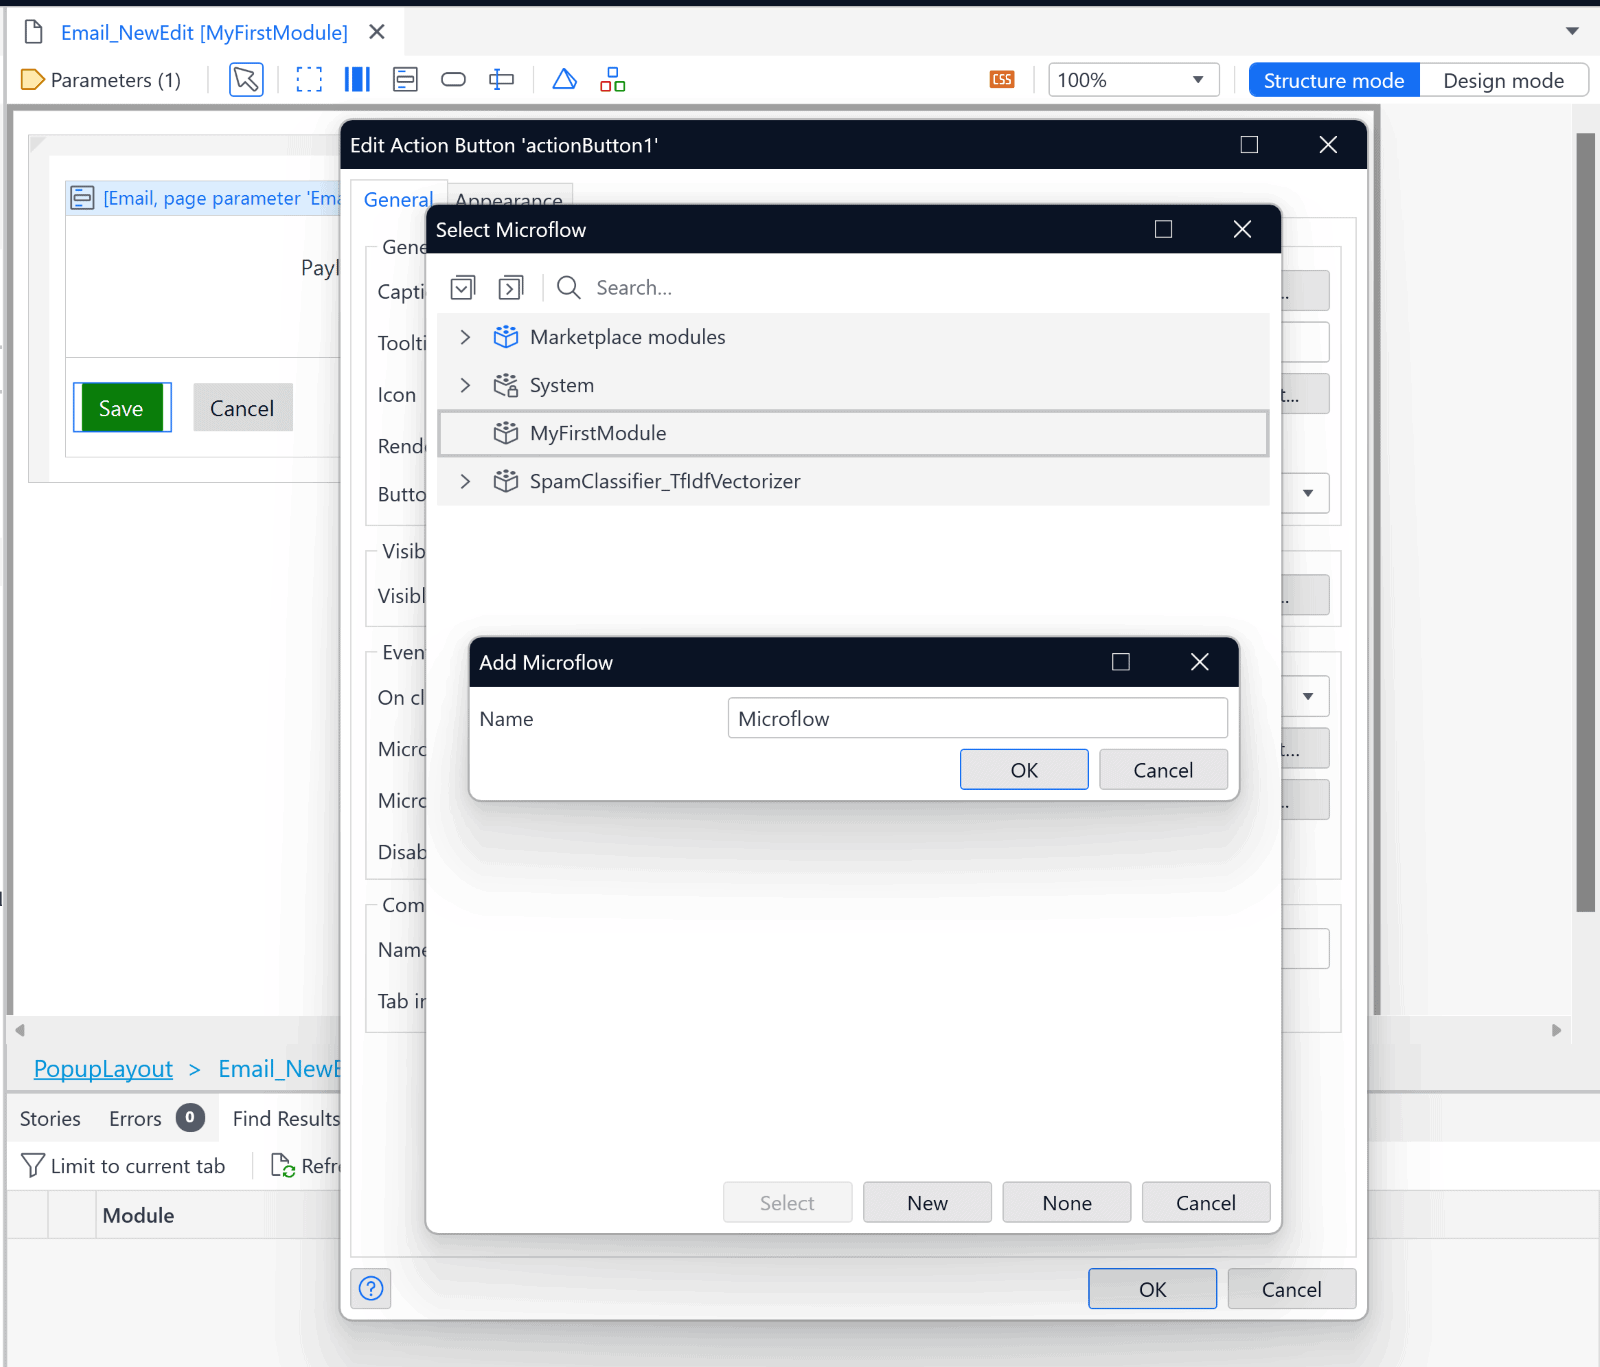
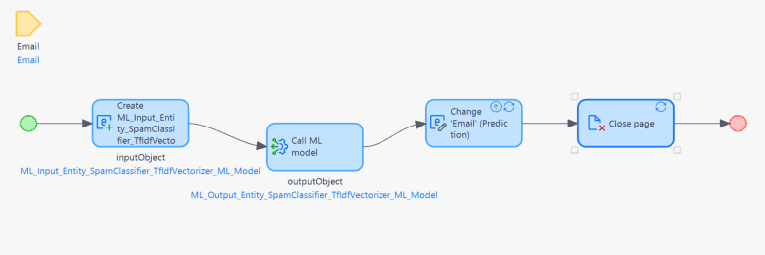
Name the new microflow Predict_Spam (or PredictSpam). Once the new microflow is open, add the following actions:
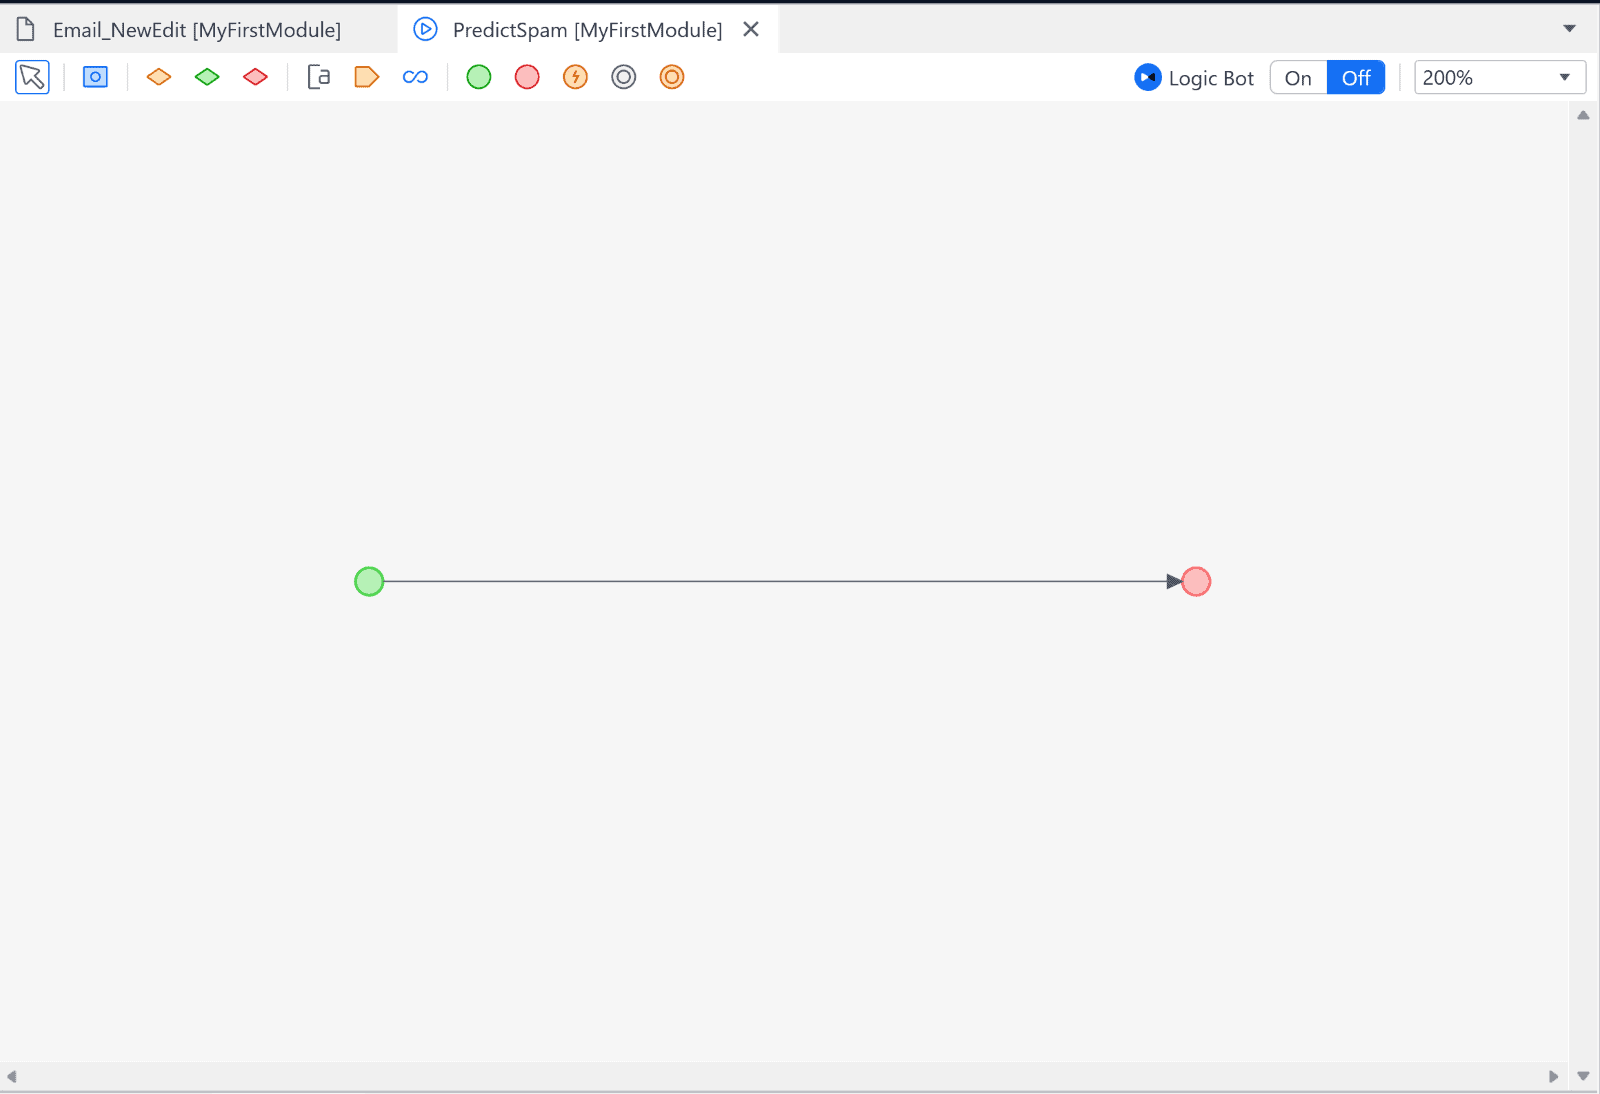
- A parameter for the email entity.
- A Create object action for the input object of the ML model.
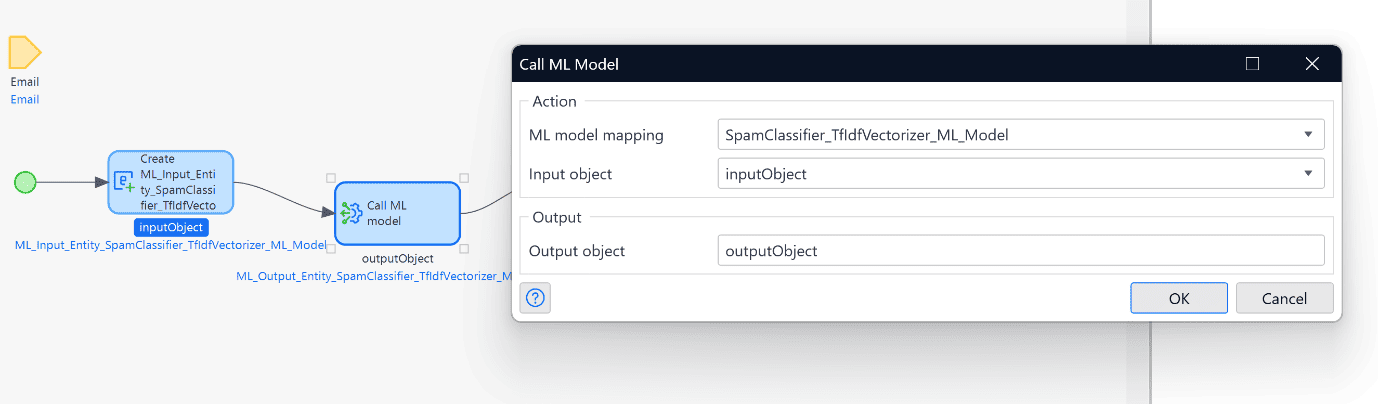
- The Call ML model action: Select the available ML model mapping and input object, and then click OK.
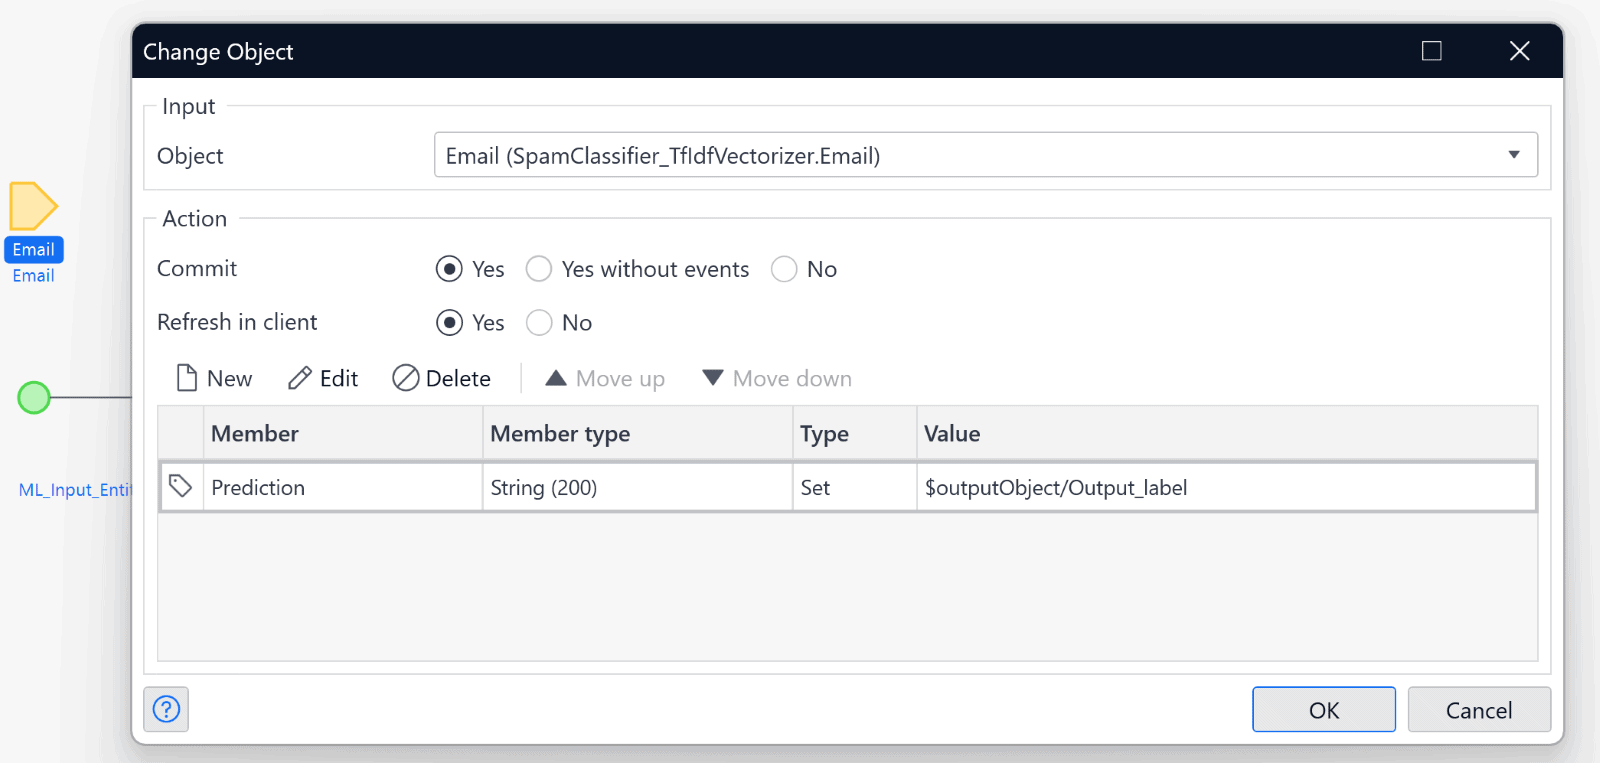
- A change email action (set Commit and Refresh to Yes.) As a member, select the prediction, and as a value, set the output label of the OutputObject.
- Lastly, a Close page action.
The application is almost ready with just two adjustments left, and you will be able to run and use your smart email spam detection app.
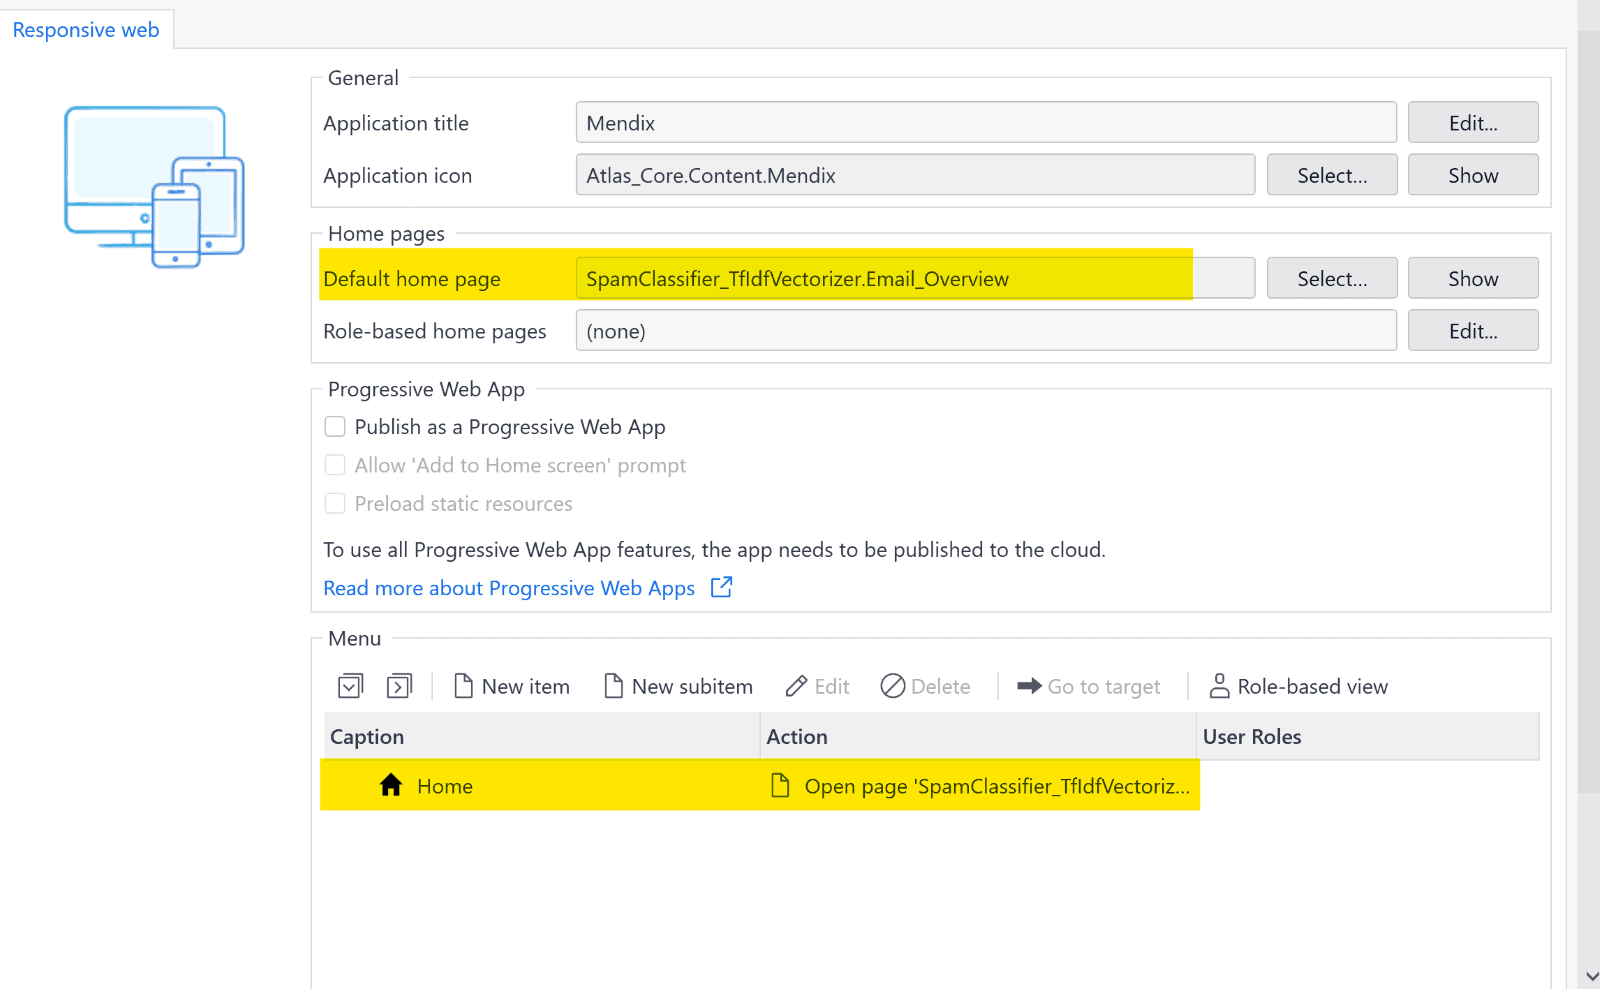
Go to the navigation option of the menu.
Select the email overview page as the default page and also as the home page.
Done! The time is finally here…
Testing
Click the play icon in the upper right corner to run your project. Once it is ready, click the View App button to go to your application.
![]()
The homepage should look something like this:

Start testing by clicking New. Add a message as a payload.
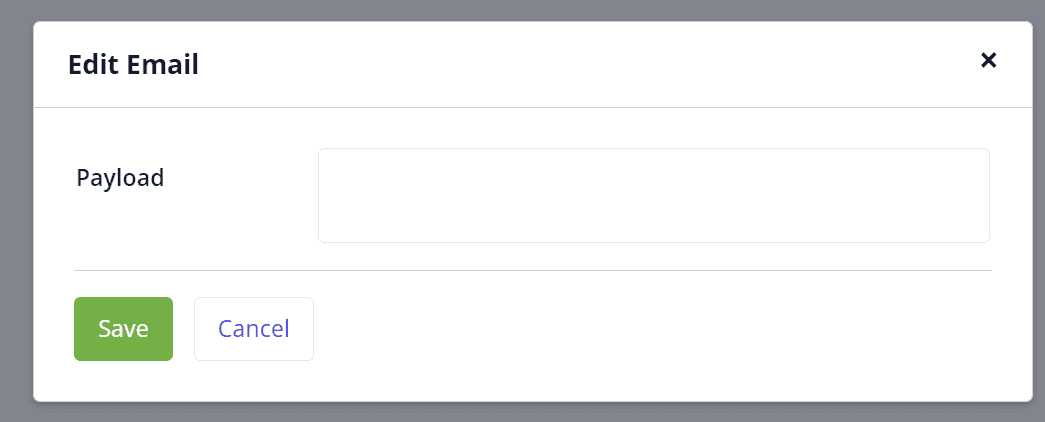
You can test it by adding a spam-like message as the following.
“Congratulations!
You have been selected as one of the lucky winners of the Microsoft Lottery 2023. You have won a cash prize of $10,000,000 USD and a brand-new laptop.
To claim your prize, you need to contact our agent with the following information:
Contact Agent “
If the email is recognized as spam, it will have “spam” under prediction…

…and if not, “ham.”

And that was it. You created a small ML-infused app in less than an hour! If you enjoyed the process and would like to continue learning more, you can follow this link for further examples or the Mendix ML kit example application.
What’s next
The fusion of two powerful technologies, the Mendix 10 ML Kit and Amazon SageMaker AI, opens an exciting realm of possibilities in the world of AI application development. By harnessing the intuitive visual development capabilities of Mendix with the advanced machine learning capabilities of SageMaker, developers can create AI-driven applications that are not only user-friendly but also deeply intelligent.
Want to continue exploring AI?
There’s a lot of hype around generative AI and tools like ChatGPT, but what does it mean for the future of enterprise app development? Is it just a shiny new toy or a game-changing tool that can deliver real ROI? Sign up for our webinar, Generative AI: Build Smarter Apps, Build Apps Smarter, on September 28, 2023 (9am EST | 3pm CEST)!